PCR and Electrophoresis: Essential Tools for Analyzing Cellular Response to Biomaterials
This article provides a comprehensive guide for researchers on applying Polymerase Chain Reaction (PCR) and electrophoresis to evaluate cellular responses to biomaterials.
PCR and Electrophoresis: Essential Tools for Analyzing Cellular Response to Biomaterials
Abstract
This article provides a comprehensive guide for researchers on applying Polymerase Chain Reaction (PCR) and electrophoresis to evaluate cellular responses to biomaterials. It covers the foundational principles of how biomaterials interact with biological systems and why molecular-level analysis is crucial for assessing biocompatibility, inflammation, and tissue regeneration. The content details standardized methodologies for nucleic acid isolation, PCR amplification, and product analysis, alongside direct protocols for preparing biomaterial extracts and culturing cells. A significant focus is given to troubleshooting common PCR challenges and optimizing protocols for complex biomaterial samples. Finally, the article explores advanced validation techniques, including the use of digital PCR for absolute quantification and integrity assays, ensuring data reliability for preclinical and clinical applications in tissue engineering and regenerative medicine.
Understanding Biomaterial-Cell Interactions: The Role of Molecular Biology
The concept of biocompatibility has evolved significantly from its early definitions focused primarily on biological safety. The contemporary understanding, encapsulated in the Williams definition, describes it as "the ability of a material to perform with an appropriate host response in a specific application" [1] [2]. This definition underscores that biocompatibility is not merely about the absence of harm but involves a dynamic interaction between the biomaterial and the host environment, optimized for the clinical function of the medical device or tissue engineering construct [1].
In the context of tissue engineering, this definition expands further to emphasize the scaffold's role in supporting appropriate cellular activity, including the facilitation of molecular and mechanical signaling systems to optimize tissue regeneration [1]. This progression from bio-inertia to biofunctionality represents a paradigm shift in biomaterial science, moving from materials that passively coexist with tissues to those that actively direct a desired biological response [3]. Evaluating these complex interactions requires sophisticated molecular tools, with polymerase chain reaction (PCR) and electrophoresis forming cornerstone technologies for quantifying cellular responses at the genetic level.
Core Principles and Definitions
Biocompatibility encompasses a spectrum of requirements that vary significantly based on the medical application. The core principle is that a biomaterial must not only be non-toxic but must also perform its intended function effectively within the biological environment.
Application-Specific Definitions
- Long-Term Implantable Devices: The ability of the device to perform its intended function with the desired degree of incorporation in the host, without eliciting any undesirable local or systemic effects [2].
- Tissue-Engineering Products: The ability to perform as a substrate that supports appropriate cellular activity, including molecular and mechanical signaling systems, to optimize tissue regeneration [1] [2].
Key Determinants of Biocompatibility
The biological response to a biomaterial is influenced by multiple factors that extend beyond its chemical composition [1]:
- Material Chemical Properties: Composition, surface chemistry, and degradation products.
- Physical Characteristics: Stiffness, topography, and mechanical properties.
- Host-Related Factors: Implantation site, tissue vascularization, and patient health status.
- Material Response: The effect of the biological system on the material, including degradation and structural changes.
The following diagram illustrates the multifaceted nature of the host response to biomaterials and the key pathways researchers can investigate using molecular tools like PCR:
Quantitative Biocompatibility Assessment
While traditional histological evaluation provides valuable qualitative data, recent advances emphasize the importance of quantitative metrics for objective biocompatibility assessment. These methods enable more precise comparison between different scaffold compositions and architectures [4].
Geometric Analysis of Encapsulation
A study investigating freeze-cast polymeric scaffolds for tissue regeneration introduced geometric models to quantify the foreign body response [4]. Key measurable parameters include:
Table 1: Quantitative Metrics for Scaffold Biocompatibility Assessment
| Parameter | Measurement Technique | Biological Significance |
|---|---|---|
| Encapsulation Thickness | Histomorphometric analysis of cross-sections | Indicator of fibrotic response; thinner encapsulation suggests better integration |
| Cross-sectional Area | Digital imaging of explanted scaffolds | Measures structural stability and deformation in vivo |
| Ovalization | Ratio of minor to major axis dimensions | Quantifies structural deformation under physiological loads |
| Cell Infiltration Distance | Microscopic measurement of cell migration into scaffold | Indicates scaffold porosity and bioactivity |
This quantitative approach demonstrated that EDC-NHS-crosslinked bovine collagen scaffolds exhibited superior biocompatibility with minimal encapsulation compared to other materials, highlighting how material composition directly influences the host response [4].
Molecular Analysis of Cellular Response
PCR-based methods provide crucial quantitative data on gene expression patterns in cells interacting with biomaterials:
Table 2: Key Apoptosis Markers for Biocompatibility Assessment
| Gene/Protein | Function | Detection Method | Significance in Biocompatibility |
|---|---|---|---|
| Bax | Pro-apoptotic protein | RT-qPCR, Western blot | Elevated expression indicates activation of apoptotic pathways |
| Bcl-2 | Anti-apoptotic protein | RT-qPCR, Western blot | Higher expression suggests cell survival and material compatibility |
| Caspase-3 | Apoptosis executioner | RT-qPCR, Western blot | Activated form indicates ongoing apoptosis |
| Bax/Bcl-2 Ratio | Apoptosis regulation balance | Calculated from expression data | Predictive metric for overall cellular health |
A recent study evaluating dental polymers demonstrated that CAD/CAM PMMA materials showed more stable apoptotic marker expression over 28 days compared to conventional polymers, indicating superior temporal biocompatibility [5].
Experimental Protocols
RNA Extraction and Quality Control
Purpose: To isolate high-quality RNA from cells or tissues exposed to biomaterials for subsequent gene expression analysis [5].
Materials:
- RNAiso Plus lysis buffer or equivalent
- Chloroform
- Isopropyl alcohol
- 75% ethanol (in DEPC-treated water)
- Nuclease-free water
- Tissue homogenizer
Procedure:
- Tissue Homogenization: Place 50-100 mg of tissue in 1 mL of RNAiso Plus buffer. Homogenize using a low-temperature high-speed grinder at 5.5 m/s for 3 cycles of 1 minute each at 4°C [5].
- Phase Separation: Incubate homogenate for 5 minutes at room temperature. Add 0.2 mL chloroform, shake vigorously for 15 seconds, and incubate for 3 minutes. Centrifuge at 12,000 × g for 15 minutes at 4°C.
- RNA Precipitation: Transfer aqueous phase to new tube. Add 0.5 mL isopropyl alcohol, mix, and incubate for 10 minutes. Centrifuge at 12,000 × g for 10 minutes at 4°C.
- RNA Wash: Remove supernatant. Wash pellet with 1 mL 75% ethanol. Centrifuge at 7,500 × g for 5 minutes at 4°C.
- RNA Dissolution: Air-dry pellet for 5-10 minutes. Dissolve RNA in nuclease-free water.
- Quality Control: Measure RNA concentration and purity using spectrophotometry (A260/A280 ratio of 1.8-2.0 indicates pure RNA).
Reverse Transcription Quantitative PCR (RT-qPCR)
Purpose: To quantify expression of specific genes involved in the cellular response to biomaterials [5].
Materials:
- PrimeScript RT reagent kit [5]
- TB Green Premix Ex Taq [5]
- Gene-specific primers (e.g., for Bax, Bcl-2, Caspase-3, GAPDH)
- Thermal cycler with real-time detection capability
- Nuclease-free PCR tubes
Procedure:
- Reverse Transcription:
- Prepare reaction mix: 1 μg total RNA, 1 μL PrimeScript RT Enzyme Mix, 1 μL RT Primer Mix, 4 μL 5× PrimeScript Buffer, nuclease-free water to 20 μL.
- Incubate: 37°C for 15 minutes, 85°C for 5 seconds [5].
- Store cDNA at -20°C.
qPCR Amplification:
- Prepare reaction mix: 10 μL TB Green Premix Ex Taq, 0.8 μL forward primer (10 μM), 0.8 μL reverse primer (10 μM), 2 μL cDNA template, 6.4 μL nuclease-free water [5].
- Cycling conditions:
- Initial denaturation: 95°C for 30 seconds
- 40 cycles: 95°C for 5 seconds, 60°C for 30 seconds
- Melt curve: 95°C for 15 seconds, 60°C for 1 minute, 95°C for 15 seconds
Data Analysis:
- Calculate quantification cycle (Cq) values
- Determine relative expression using the 2^(-ΔΔCq) method [5]
- Normalize to housekeeping gene (e.g., GAPDH)
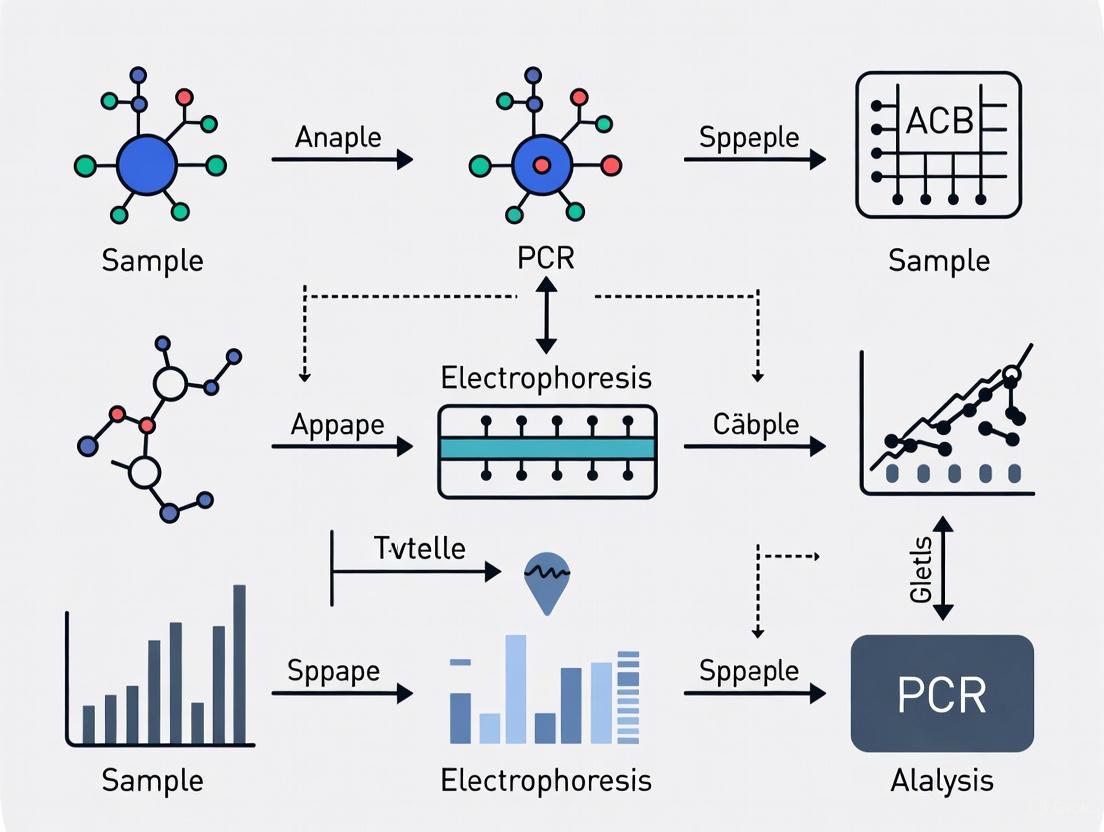
The following workflow diagram outlines the complete process from sample preparation to data analysis in biomaterial biocompatibility assessment:
Agarose Gel Electrophoresis for PCR Product Analysis
Purpose: To separate and visualize amplified DNA fragments to confirm specificity of PCR reactions [6] [7].
Materials:
- Agarose
- TAE or TBE electrophoresis buffer
- DNA ladder (molecular weight standard)
- Ethidium bromide or SYBR Safe stain
- Gel electrophoresis apparatus
- UV transilluminator or gel documentation system
Procedure:
- Gel Preparation: Melt 1-2% agarose in electrophoresis buffer. Cool to approximately 60°C, add nucleic acid stain (0.5 μg/mL ethidium bromide), and pour into casting tray with comb [6].
- Sample Loading: Mix PCR products with 6× loading dye. Load samples alongside DNA ladder in separate wells.
- Electrophoresis: Run gel at 5-10 V/cm until adequate separation achieved (approximately 30-45 minutes) [6].
- Visualization: Examine gel under UV light and document results.
The Scientist's Toolkit: Essential Research Reagents
Table 3: Essential Reagents for Biomaterial Cellular Response Research
| Reagent/Category | Specific Examples | Function in Research |
|---|---|---|
| Reverse Transcriptase Enzymes | PrimeScript Reverse Transcriptase | Converts RNA to cDNA for gene expression analysis [5] |
| DNA Polymerases | Taq DNA Polymerase, TB Green Premix | Amplifies specific DNA sequences with thermostability [6] [7] |
| Nucleic Acid Isolation Kits | RNAiso Plus | Extracts high-quality RNA from tissue samples [5] |
| Fluorescent Detection Reagents | TB Green, SYBR Green, Ethidium Bromide | Enables detection and quantification of amplified DNA [7] |
| Apoptosis Assay Kits | TUNEL Assay Kit | Detects programmed cell death in tissue sections [5] |
| Histological Stains | Haematoxylin and Eosin (H&E) | Visualizes tissue morphology and cellular structure [5] |
| Scaffold Materials | EDC-NHS-crosslinked collagen, PCL, PEEK | Provides three-dimensional substrates for tissue integration studies [4] [8] [5] |
Advanced Research Applications
Single-Cell RNA Sequencing in Biomaterial Evaluation
The application of single-cell RNA sequencing (scRNAseq) has revolutionized our understanding of cellular responses to biomaterials by enabling unprecedented resolution of cell-type-specific responses [8]. This technology has revealed previously unknown diversity in immune and stromal cell populations responding to implanted materials.
A comprehensive atlas of the biomaterial tissue microenvironment created through scRNAseq identified 18 distinct cell clusters responding to biological and synthetic scaffolds, including multiple subsets of fibroblasts, natural killer (NK) cells, and specialized macrophage populations with unique functional signatures [8]. This granular understanding moves beyond bulk tissue analysis to reveal intricate cell-cell communication networks that determine clinical outcomes.
Computational Analysis of Cellular Signaling
The development of computational tools like Domino enables reconstruction of intracellular signaling networks based on transcription factor activation from scRNAseq data [8]. This approach identifies condition-specific intercellular signaling patterns connected to downstream biological functions, providing insights into:
- Immune-stromal interactions in the cellular response to biomaterials
- Signaling modules for stromal, immune, and tissue-specific cells
- Material-specific communication patterns that drive regeneration versus fibrosis
These computational approaches validated novel signaling pathways, such as IL-17 signaling in the foreign body response, confirmed through Il17ra−/− knockout models [8].
The evolution of biocompatibility from a concept focused primarily on safety to one emphasizing biofunctionality represents significant progress in biomaterial science. The integration of molecular biology techniques like PCR and electrophoresis with traditional histological methods provides researchers with powerful tools to quantify and understand host responses at unprecedented resolution. The quantitative frameworks and standardized protocols outlined in these application notes empower researchers to conduct comprehensive biocompatibility assessments that bridge the gap between basic material characterization and clinical performance. As single-cell technologies and computational analysis continue to advance, our ability to precisely tailor biomaterial design to specific clinical applications will further transform the field of regenerative medicine.
The study of inflammation and tissue regeneration is pivotal for developing new therapeutic strategies for a wide range of conditions, including osteoarthritis, metabolic dysfunction-associated steatohepatitis (MASH), and impaired wound healing. Understanding the key molecular players—both genetic and protein-based—provides critical insights into disease mechanisms and enables the development of targeted interventions. This field has been revolutionized by advanced molecular biology techniques that allow for precise detection, quantification, and analysis of these targets.
Molecular targets can be broadly categorized into genetic elements (specific genes, single-nucleotide polymorphisms, and expression profiles) and proteins that execute cellular functions. The integration of polymerase chain reaction (PCR) and electrophoresis methodologies provides a powerful framework for investigating these targets within the context of biomaterial research, where understanding cellular responses to implanted materials is essential for evaluating biocompatibility and regenerative potential.
Key Genetic and Protein Targets
Recent research has identified specific molecular targets crucial for regulating inflammatory processes and regenerative pathways. The tables below summarize key validated targets.
Table 1: Key Genetic Targets in Inflammation and Regeneration
| Target Name | Full Name/Type | Primary Biological Function | Associated Conditions |
|---|---|---|---|
| WSTF | Williams Syndrome Transcription Factor | Represses pro-inflammatory gene loci in the nucleus; evicted during chronic inflammation [9] [10]. | Chronic Inflammation, Osteoarthritis, MASH, Aging [9] [10]. |
| GWAS-Derived Loci | 513 novel genetic markers from meta-analysis | 962 genetic markers identified; 700 genes with high confidence linked to disease pathogenesis [11]. | Osteoarthritis [11]. |
| Reference Genes | Housekeeping Genes (e.g., EF1α, Act, UBI, GAPDH) | Constitutively expressed genes used for normalization in gene expression studies [12] [13]. | Used as stable controls across various tissues and experimental conditions [12]. |
Table 2: Key Protein Targets and Analytical Methods
| Target/Method | Description | Role in Inflammation/Regeneration | Primary Detection Method |
|---|---|---|---|
| WSTF Protein | Nuclear protein degraded via autophagy in chronic inflammation [9] [10]. | Loss leads to persistent activation of pro-inflammatory genes; restoration suppresses inflammation [9] [10]. | Western Blot, Immunostaining [14]. |
| SDS-PAGE | Denaturing electrophoresis separating proteins by molecular mass [14]. | Analyzes protein expression, purity, and molecular weight in cell-biomaterial interactions [14]. | Protein separation and quantification [14]. |
| Native-PAGE | Non-denaturing electrophoresis separating proteins by charge, size, and shape [14]. | Studies native protein complexes, quaternary structure, and enzymatic activity [14]. | Analysis of native protein complexes [14]. |
| 2D-PAGE | Separates proteins by isoelectric point (pI) and then by mass [14]. | High-resolution proteomic analysis of complex protein mixtures from tissues or cells [14]. | Proteomic analysis of complex samples [14]. |
Gene Expression Analysis Using Quantitative PCR (qPCR)
Principles of qPCR and Reverse Transcription qPCR (RT-qPCR)
Quantitative PCR (qPCR), also known as real-time PCR, is a fundamental technique for quantifying gene expression levels. Unlike traditional PCR that provides end-point detection, qPCR monitors the amplification of DNA in real-time during the exponential phase of the reaction, which provides the most reliable data for quantification [13]. The key output is the threshold cycle (Ct), which is the PCR cycle number at which the sample's fluorescence crosses a predetermined threshold, indicating a significant increase in amplified product [13].
For analyzing gene expression, RNA must first be reverse-transcribed into complementary DNA (cDNA) in a technique called reverse transcription qPCR (RT-qPCR) [13]. This method is exceptionally sensitive and can detect even low-abundance transcripts, making it ideal for studying subtle changes in gene expression in response to biomaterials or inflammatory stimuli [13] [15].
Detailed Protocol: RT-qPCR for Inflammatory Marker Gene Expression
Application Note: This protocol is designed to quantify the expression of inflammation-related genes (e.g., cytokines) in cells cultured on a novel biomaterial, compared to a control surface.
I. Sample Preparation and RNA Extraction
- Cell Culture: Seed cells onto the test biomaterial and control surface in culture plates. After the desired incubation period, lyse cells directly in the culture well.
- RNA Isolation: Use a commercial RNA extraction kit to purify total RNA. Treat samples with DNase I to remove genomic DNA contamination. Determine RNA concentration and purity using a spectrophotometer (e.g., A260/A280 ratio ~2.0 is ideal).
II. Reverse Transcription (cDNA Synthesis)
- Reaction Setup: Use a commercial reverse transcription kit. For a 20 µL reaction, combine:
- 1 µg of total RNA
- 1 µL of Oligo(dT)₁₈ primer (or random hexamers)
- 4 µL of 5x Reaction Buffer
- 1 µL of Ribolock RNase Inhibitor (20 U)
- 2 µL of 10 mM dNTP Mix
- 1 µL of RevertAid Reverse Transcriptase (200 U)
- Nuclease-free water to 20 µL.
- Thermal Cycling: Incubate at 42°C for 60 minutes, followed by 70°C for 5 minutes to inactivate the enzyme. The resulting cDNA can be stored at -20°C.
III. Quantitative PCR (qPCR) Setup
- Detection Chemistry: SYBR Green or TaqMan probes can be used. SYBR Green is more cost-effective and suitable for validating primer specificity, while TaqMan probes offer greater specificity through an additional hybridization step [13].
- Reaction Mixture: For a 20 µL reaction using SYBR Green:
- 10 µL of 2x SYBR Green Master Mix
- 0.8 µL of Forward Primer (10 µM)
- 0.8 µL of Reverse Primer (10 µM)
- 2 µL of cDNA template (diluted 1:10)
- 6.4 µL of Nuclease-free water.
- Primer Design: Primers should be designed to be sequence-specific. For plant genomes or genes with homologs, design primers based on single-nucleotide polymorphisms (SNPs) to ensure specificity [12]. Amplicon length should typically be 85–125 bp [12].
- Thermal Cycling Protocol:
- Data Analysis: Use the comparative ΔΔCt method for relative quantification [13]. Normalize the Ct values of your target gene to the Ct values of a stable reference gene (e.g., GAPDH, β-actin) in the same sample. Calculate the fold-change in gene expression relative to the control group.
Optimization and Troubleshooting
- Primer and Assay Validation: It is critical to optimize primer sequences, annealing temperatures, and primer concentrations for each gene [12]. The amplification efficiency of the primer set should be between 90–110%, which can be validated using a standard curve with a serial dilution of cDNA [12] [13]. An R² ≥ 0.99 for the standard curve indicates excellent linearity [12].
- Annealing Temperature: If nonspecific amplification occurs (e.g., multiple peaks in a melt curve), increase the annealing temperature in 1-2°C increments. Use touchdown PCR for difficult targets [16].
- Inhibition: If amplification is inefficient, ensure the cDNA template is not contaminated with inhibitors from the RNA isolation or biomaterial itself. Test different dilutions of the cDNA.
Protein Analysis Using Electrophoresis
Principles of Protein Gel Electrophoresis
Protein gel electrophoresis is a standard laboratory technique that uses an electrical field to separate proteins through a porous matrix based on their size, charge, or a combination of both [14]. The most common form is sodium dodecyl sulfate-polyacrylamide gel electrophoresis (SDS-PAGE), which denatures proteins and coats them with a negative charge, allowing separation strictly by molecular mass [14]. Other forms include native-PAGE for separating proteins in their native state and two-dimensional PAGE (2D-PAGE) for high-resolution separation of complex protein mixtures [14].
Detailed Protocol: SDS-PAGE for Protein Profiling
Application Note: This protocol is used to separate and visualize proteins isolated from cells interacting with a biomaterial, allowing for the analysis of protein expression levels, including key inflammatory mediators or regeneration markers.
I. Sample Preparation
- Protein Extraction: Lyse cells harvested from the biomaterial surface using RIPA buffer supplemented with protease and phosphatase inhibitors.
- Protein Denaturation: Mix the protein lysate with 2x or 4x Laemmli sample buffer (containing SDS and β-mercaptoethanol). Heat the samples at 70-100°C for 5-10 minutes to denature the proteins [14].
- Protein Quantification: Determine the protein concentration of each sample using a colorimetric assay (e.g., BCA assay). Adjust all samples to the same concentration with lysis buffer and sample buffer.
II. Gel Casting and Setup
- Gel Composition: SDS-PAGE uses a discontinuous gel system:
- Resolving Gel (Lower Gel): Typically 8-12% acrylamide, pH 8.8. This gel is responsible for separating proteins by size.
- Stacking Gel (Upper Gel): 4-5% acrylamide, pH 6.8. This gel concentrates all protein samples into a sharp band before they enter the resolving gel.
- Recipe for a 10% Resolving Gel (for one mini-gel):
- 4.0 mL of 30% Acrylamide/Bis Solution
- 2.5 mL of 1.5 M Tris-HCl, pH 8.8
- 3.4 mL of dH₂O
- 0.1 mL of 10% SDS
- 0.1 mL of 10% Ammonium Persulfate (APS)
- 0.01 mL of TEMED
- Casting: Pour the resolving gel between glass plates and overlay with isopropanol to ensure a flat surface. After polymerization, pour off the isopropanol, pour the stacking gel, and immediately insert a comb.
III. Electrophoresis
- Loading: Load an equal amount of protein (e.g., 20-30 µg) per well. Include one well for a pre-stained protein molecular weight marker.
- Running Conditions: Fill the electrophoresis tank with 1x Tris-Glycine-SDS running buffer. Run the gel at a constant voltage (e.g., 80-120 V) until the dye front reaches the bottom of the gel.
IV. Protein Detection
- Staining: After electrophoresis, carefully remove the gel from the cassette and stain with Coomassie Brilliant Blue or a more sensitive silver stain to visualize the protein bands.
- Western Blotting (Immunoblotting): For specific detection of a protein of interest (e.g., WSTF), transfer the separated proteins from the gel onto a nitrocellulose or PVDF membrane. Probe the membrane with a primary antibody specific to your target, followed by a horseradish peroxidase (HRP)-conjugated secondary antibody. Detect the signal using a chemiluminescent substrate and imaging system.
Optimization and Troubleshooting
- Gel Percentage: Use lower percentage gels (e.g., 8%) for resolving high molecular weight proteins and higher percentage gels (e.g., 12-15%) for low molecular weight proteins [14]. Gradient gels (e.g., 4-20%) can resolve a broader range of protein sizes.
- Protein Smiling: Ensure the gel is run at a constant voltage and that the apparatus is cooled if necessary to prevent overheating, which can cause "smiling" bands.
- Transfer Efficiency: For western blotting, optimize transfer time and conditions to ensure complete transfer of proteins from the gel to the membrane, especially for high molecular weight targets.
Application in Biomaterials Research: An Integrated Workflow
The combination of PCR and electrophoresis is indispensable for evaluating the molecular-level interactions between biomaterials and biological systems. These techniques allow researchers to move beyond simple observation of cellular attachment and proliferation to a mechanistic understanding of how a material influences gene expression and protein synthesis, which ultimately dictates the host response—be it regenerative, fibrotic, or inflammatory [17].
An integrated experimental workflow for analyzing cellular response to a novel biomaterial might proceed as follows:
- In Vitro Culture: Culture relevant cell types (e.g., macrophages, fibroblasts, stem cells) on the test biomaterial and appropriate controls.
- Gene Expression Analysis: Harvest cells and perform RT-qPCR to quantify the expression of key marker genes. For inflammation, this might include pro-inflammatory cytokines (e.g., IL-6, TNF-α). For regeneration, growth factors (e.g., VEGF, TGF-β) or extracellular matrix components (e.g., Collagen I) are relevant.
- Protein Analysis: Analyze the same cell lysates via SDS-PAGE and western blotting to confirm that changes in mRNA translate to the protein level for critical targets, such as the WSTF protein [9] [10].
- Data Integration: Correlate the molecular data with functional cellular assays (e.g., migration, proliferation) to build a comprehensive picture of the biomaterial's performance.
This integrated approach provides robust data on biocompatibility and biofunctionality, guiding the rational design of next-generation biomaterials that actively promote healing and integration while minimizing adverse inflammatory responses [17].
The Scientist's Toolkit: Essential Research Reagent Solutions
Table 3: Essential Reagents and Kits for Molecular Target Analysis
| Reagent/Kits | Function/Description | Application Examples |
|---|---|---|
| PCR Polymerases | Enzymes that synthesize new DNA strands. Specialized versions exist for different needs (e.g., high-fidelity, GC-rich templates) [16]. | PrimeSTAR GXL for long templates; enzymes with GC buffer for high GC-content genes [16]. |
| SYBR Green Master Mix | Fluorescent dye that intercalates into double-stranded DNA, allowing real-time quantification of PCR products [13]. | General qPCR gene expression analysis for one or a few targets. |
| TaqMan Assays | Sequence-specific probes labeled with a reporter fluorophore, providing high specificity for target detection [13]. | Multiplex qPCR, discriminating between closely related gene homologs or splice variants. |
| Reverse Transcription Kits | Contain enzymes and reagents to convert RNA into cDNA for downstream PCR applications [13]. | First step in two-step RT-qPCR for analyzing multiple targets from a single RNA sample. |
| Precast Polyacrylamide Gels | Ready-to-use protein gels of various percentages and formats, ensuring consistency and saving time [14]. | Standardized SDS-PAGE for protein separation and western blotting. |
| Protein Molecular Weight Markers | A mixture of proteins of known molecular weights, run alongside samples to estimate protein size [14]. | Essential for determining the approximate mass of separated proteins on SDS-PAGE. |
| Primary & Secondary Antibodies | Immunoreagents for specific detection of target proteins in techniques like western blotting and immunohistochemistry. | Detecting specific protein targets like WSTF [9] in cell lysates or tissue sections. |
The central hypothesis that biomaterials actively influence gene expression patterns in surrounding cells is fundamentally reshaping regenerative medicine and therapeutic development. Biomaterials are no longer considered inert structural supports; they are dynamic interfaces that engage in complex dialogue with biological systems [18]. This interaction triggers precise transcriptional changes that dictate critical outcomes such as cellular heterogeneity, immune response, and tissue regeneration [18].
The emerging framework of the "Biomaterial-mediated Cell Atlas" (BCA) provides a comprehensive approach to characterizing these responses at single-cell resolution [18]. This concept extends the Human Cell Atlas initiative by mapping how physical, chemical, and biological cues from materials redirect cellular function through gene regulation. Understanding these mechanisms requires sophisticated molecular tools, with reverse transcription-polymerase chain reaction (RT-PCR) and electrophoresis forming the foundational methodologies for quantifying these biomaterial-driven genetic changes.
Table 1: Key Aspects of the Biomaterial-mediated Cell Atlas (BCA)
| BCA Aspect | Role in Gene Expression Analysis | Research Application |
|---|---|---|
| Biological Safety | Assesses biocompatibility and toxicological responses | Identifying pro-inflammatory gene expression patterns [18] |
| Bioactivity | Evaluates capacity to positively influence tissue | Measuring pro-regenerative gene upregulation [18] |
| Immune Microenvironment | Analyzes immune reactions to foreign material | Characterizing immunomodulatory gene signatures [18] |
Quantitative Analysis of Gene Expression in Biomaterial Research
Methodological Comparison
Accurate gene expression analysis is crucial for testing the central hypothesis. The choice between endpoint and quantitative PCR methodologies involves significant trade-offs in precision, throughput, and cost [19] [20].
Table 2: Comparison of PCR Methodologies in Biomaterial Research
| Method | Principle | Advantages | Limitations | Ideal Application in Biomaterials |
|---|---|---|---|---|
| Endpoint PCR | Amplification with analysis after final cycle | Inexpensive; simple visualization; no specialized equipment required [20] | Semi-quantitative; low sensitivity; plateau effect masks true expression differences [19] [20] | Initial screening for transcript presence/absence; quality control of RNA samples [19] |
| Gel-Based RT-PCR | Reverse transcription followed by endpoint PCR with gel visualization | Confirms specific amplicon; identifies nonspecific amplification; relatively inexpensive [19] | Limited quantitative accuracy; requires post-reaction processing; ethidium bromide staining potential mutagen [19] | Verifying primer specificity; analyzing splice variants; when transcript abundance is high [19] |
| Absolute Quantitative RT-PCR | Real-time monitoring during exponential phase with standard curve | Highest accuracy; determines actual transcript copy numbers; broad dynamic range [20] | Technically demanding; requires precise standards; higher cost per sample [20] | Precise quantification of osteogenic markers (e.g., osteocalcin) in engineered constructs [20] |
| Relative Quantitative RT-PCR | Normalization to housekeeping genes during exponential phase | Controls for sample-to-sample variation; no need for absolute standards; well-established protocols [20] | Expression reported as ratios; sensitive to reference gene stability; biological meaning can be obscured [20] | Comparing expression fold-changes across multiple experimental conditions [20] |
Key Findings from Biomaterial Gene Expression Studies
Quantitative analysis has revealed how specific material properties translate into transcriptional programs:
- Osteogenic Differentiation: Absolute quantification demonstrated that human fetal osteoblasts (hFOBs) cultured under osteogenic conditions showed significantly elevated osteocalcin expression compared to normal culture conditions, providing molecular validation of biomaterial-induced differentiation [20].
- Immune Response Profiling: Single-cell transcriptomics of cells interacting with implants has revealed previously unappreciated heterogeneity in immune responses, including distinct macrophage polarization states that correlate with material surface properties [18].
- Resource Reallocation: Recent RNA-sequencing of cells expressing synthetic genetic circuits (iFFLs) revealed differential expression in pathways related to RNA processing, translation, and metabolism, suggesting biomaterials can trigger cellular resource redistribution that impacts transgene expression [21].
Experimental Protocols
Protocol 1: Template Preparation Using PBC Method
This rapid potassium hydroxide-based method efficiently prepares PCR templates from diverse microorganisms [22].
Reagents and Equipment
- Potassium hydroxide (KOH), 0.1 M
- Microcentrifuge tubes
- Thermal block or water bath (100°C)
- Centrifuge
- Microbial cultures
Procedure
- Transfer 10-20 μL of microbial culture to a microcentrifuge tube.
- Add an equal volume of 0.1 M KOH solution.
- Incubate the mixture at 100°C for 10 minutes in a thermal block.
- Centrifuge the tubes at 12,000 × g for 5 minutes.
- Use 1-2 μL of the suspended sediment as template in a 25 μL PCR reaction.
- Store remaining template at -20°C for future use.
Technical Notes
- The PBC method works for diverse microorganisms including bacteria (E. coli), fungi (S. cerevisiae), and oomycetes [22].
- This method generates primarily damaged cells and cell-bound DNA rather than free naked DNA [22].
- For Gram-positive bacteria with tough cell walls, extend the boiling time to 15 minutes.
- Avoid using >2 μL of template per 25 μL reaction to prevent inhibitors from affecting PCR efficiency.
Protocol 2: Gel-Based RT-PCR for Transcript Detection
This protocol provides a balance between sensitivity and technical accessibility for detecting transcripts in biomaterial-related samples [19].
Reagents and Equipment
- RNA isolation reagent (e.g., Trizol) or kit (e.g., RNeasy Mini Kit)
- RNase-Free DNase Set
- Access RT-PCR System
- Specific primers for target gene
- Thermal cycler
- Agarose gel electrophoresis equipment
- Ethidium bromide or SYBR-safe DNA gel stain
Procedure
Part A: RNA Isolation and Quantitation
- Homogenize biomaterial-exposed tissue or cells in Trizol reagent, maintaining samples on dry ice to prevent RNA degradation [19].
- Isolate total RNA following manufacturer's protocol, including a DNase digestion step to remove genomic DNA contamination [19].
- Quantitate RNA using fluorescence-based methods (e.g., Quant-iT Ribogreen RNA assay) for superior accuracy over absorbance methods [19].
Part B: RT-PCR Amplification
- Prepare RT-PCR master mix on ice: 1× RT-PCR buffer, 0.2 mM each dNTP, 1.0 mM MgSO₄, 0.3 μM each primer, 5 U of reverse transcriptase, 5 U of DNA polymerase.
- Add 100-500 ng of total RNA template to the reaction mix.
- Program thermal cycler: Reverse transcription at 48°C for 45 min; initial denaturation at 94°C for 2 min; 30-40 cycles of: denaturation at 94°C for 30 sec, annealing at 55-65°C for 30 sec, extension at 72°C for 1 min/kb; final extension at 72°C for 10 min [19].
- Include no-template controls and positive controls in each run.
Part C: Gel Electrophoresis and Visualization
- Prepare 1-2% agarose gel in 1× TAE buffer with nucleic acid stain.
- Mix 5-10 μL of each RT-PCR product with 6× loading dye and load into wells alongside DNA molecular weight marker.
- Run gel at 5-8 V/cm distance between electrodes until adequate separation achieved.
- Visualize bands under UV transillumination and document with imaging system.
Technical Notes
- Cycle number optimization is critical: too few cycles may miss low-abundance transcripts, while too many cycles can obscure expression differences due to plateau effects [19].
- Always confirm a single dominant amplicon of expected size to rule out nonspecific amplification [19].
- For semi-quantitative comparison, ensure all samples are in the linear phase of amplification by testing different cycle numbers [19].
Protocol 3: Absolute Quantification Using Real-Time PCR
This method provides the highest accuracy for quantifying transcript copy numbers in cells responding to biomaterials [20].
Reagents and Equipment
- Real-time PCR system
- Quantified PCR standards (purified target amplicon)
- RNA isolation and DNase treatment reagents
- One-step or two-step RT-PCR kit with fluorescence detection
- Gene-specific primers (and probes if using TaqMan chemistry)
Procedure
- Isolve total RNA from biomaterial-cultured cells using rigorous DNase treatment to prevent genomic DNA contamination [20].
- Generate standards by purifying target amplicon from positive control cDNA using preparative PCR and gel extraction [20].
- Quantify purified amplicon spectroscopically at 260 nm and calculate copy number based on molecular weight [20].
- Prepare 10-fold serial dilutions of standard amplicon (10⁷ to 10¹ copies/μL).
- Set up real-time PCR reactions with standards, test samples, and no-template controls.
- Run amplification with appropriate cycling conditions and fluorescence acquisition.
- Generate standard curve from dilution series and calculate copy numbers in unknown samples from the curve [20].
Technical Notes
- Using PCR-generated standards eliminates molecular cloning steps, simplifying the absolute quantification process [20].
- Verify standard amplicon sequence to ensure accurate quantification of the correct target [20].
- Include a reverse transcription negative control to confirm absence of genomic DNA amplification.
Visualization: Experimental Workflows and Signaling Pathways
Biomaterial-Induced Gene Expression Pathway
Gene Expression Analysis Workflow
The Scientist's Toolkit: Essential Research Reagents
Table 3: Essential Reagents for Biomaterial Gene Expression Analysis
| Reagent/Category | Specific Examples | Function and Application |
|---|---|---|
| RNA Isolation Kits | RNeasy Mini Kit, ZR-Whole Blood Total RNA Kit [19] | High-quality RNA extraction from biomaterial-cultured cells and tissues |
| Reverse Transcriptase | Access RT-PCR System [19] | cDNA synthesis from RNA templates; combined systems streamline workflow |
| DNA Polymerases | Taq DNA polymerase, High-fidelity enzymes [23] | PCR amplification; choice depends on need for speed, fidelity, or GC-rich targets |
| Specialized PCR Kits | Direct PCR kits, Hot-start enzymes [23] | Amplification from crude samples (Direct PCR); reduced primer-dimer formation (Hot-start) |
| Nucleic Acid Stains | Ethidium bromide, SYBR-safe [19] [23] | DNA visualization in gels; SYBR-safe offers safer alternative to ethidium bromide |
| Quantitation Assays | Quant-iT Ribogreen RNA assay [19] | Accurate RNA quantification superior to A260/A280 measurements |
| Electrophoresis Systems | Invitrogen E-gel system [23] | Pre-cast agarose gels for streamlined, buffer-less nucleic acid separation |
The field of biomaterial science has revolutionized biomedical research, providing advanced tools for studying cellular responses. Three-dimensional (3D) scaffolds and nanoparticles have emerged as pivotal platforms for creating biologically relevant microenvironments in vitro. These materials more accurately mimic the native extracellular matrix (ECM) compared to traditional two-dimensional cultures, leading to more physiologically relevant cellular behavior and gene expression patterns [24]. The analysis of this cellular response, particularly through nucleic acid techniques like polymerase chain reaction (PCR) and gel electrophoresis, is fundamental for evaluating the performance and safety of these novel biomaterials. This application note details the material considerations and protocols for integrating 3D scaffold and nanoparticle technologies with standard nucleic acid analysis methods, providing a framework for researchers in biomaterial development and drug discovery.
Material Considerations for 3D Scaffolds
In tissue engineering, scaffolds are not merely passive support structures but active components that direct cell fate through biochemical and biophysical cues. The material properties of a scaffold directly influence cell attachment, proliferation, differentiation, and ultimately, the transcriptional profile of the cells, which is measurable via nucleic acid analysis [24].
Key Scaffold Properties and Their Impact on Cellular Response
The table below summarizes critical scaffold properties and their quantitative influence on cellular behavior, which can be assessed via PCR analysis of specific genetic markers.
Table 1: Key Scaffold Properties and Their Cellular Implications
| Property | Ideal Target/Example Value | Cellular Impact & Analyzable Markers |
|---|---|---|
| Porosity | Highly porous (>90% interconnectivity desirable) [24] | Enables cell migration & nutrient diffusion. PCR can analyze markers for cell invasion (e.g., MMPs) and hypoxia (e.g., HIF-1α). |
| Mechanical Strength | Wide-ranging (e.g., Cortical Bone: ~200 MPa; Trabecular Bone: ~2.5 MPa) [24] | Directs stem cell lineage. Adhesion/spacing of ~34 nm promotes osteogenesis, while ~63 nm promotes adipogenesis [24]. |
| Surface Topography | Nanofibrous structures mimicking native ECM [24] | Enhances cell adhesion and signaling. Upregulates expression of differentiation markers (e.g., RUNX2 for osteoblasts) [24]. |
| Bioactivity | Incorporation of nanoclays, NPs, carbon nanotubes [24] | Can enhance electroconductivity (e.g., for cardiac tissue) or provide antimicrobial activity. PCR can monitor functional gene expression. |
Experimental Protocol: RNA Extraction from 3D Scaffold Cultures
Analyzing the cellular response from 3D cultures requires optimized nucleic acid extraction protocols to account for the complex material matrix.
Materials:
- Cell-laden 3D scaffold
- TRIzol Reagent or equivalent
- Chloroform
- Isopropanol
- 75% Ethanol (in DEPC-treated water)
- RNase-free water
- Liquid nitrogen and mortar/pestle (for non-degradable, rigid scaffolds) or direct homogenization (for soft/hydrogel scaffolds)
Method:
- Termination of Culture & Harvesting: At the desired time point, carefully remove the cell-scaffold construct from culture media. Gently wash with cold 1X PBS to remove residual serum and media.
- Scaffold Disruption:
- For soft/hydrogel scaffolds: Transfer the construct to a microcentrifuge tube containing TRIzol. Homogenize thoroughly using a motorized pellet pestle or by pipetting until no visible fragments remain.
- For rigid/scaffolds: Flash-freeze the construct in liquid nitrogen. Using a pre-cooled mortar and pestle, pulverize the scaffold into a fine powder. Transfer the powder to TRIzol.
- Phase Separation: Incubate the homogenate for 5 minutes at room temperature. Add 0.2 ml of chloroform per 1 ml of TRIzol used. Cap the tube securely and shake vigorously by hand for 15 seconds. Incubate at room temperature for 2-3 minutes.
- Centrifugation: Centrifuge the mixture at 12,000 × g for 15 minutes at 4°C. The mixture will separate into a red lower phenol-chloroform phase, an interphase, and a colorless upper aqueous phase containing the RNA.
- RNA Precipitation: Transfer the aqueous phase to a new RNase-free tube. Precipitate the RNA by adding 0.5 ml of isopropanol per 1 ml of TRIzol used. Mix and incubate at room temperature for 10 minutes.
- RNA Wash: Centrifuge at 12,000 × g for 10 minutes at 4°C. A gel-like pellet will form. Carefully remove the supernatant. Wash the RNA pellet with 1 ml of 75% ethanol by vortexing and subsequent centrifugation at 7,500 × g for 5 minutes at 4°C.
- Redissolution: Air-dry the pellet for 5-10 minutes (do not over-dry). Dissolve the RNA in 20-50 µl of RNase-free water. Quantify the RNA concentration and purity using a spectrophotometer (e.g., Nanodrop). Store at -80°C.
Diagram 1: RNA Extraction from 3D Scaffolds Workflow
Nanotechnology and Nanoparticle Integration
Nanotechnology offers powerful strategies to functionalize scaffolds and interact with biological systems at a molecular level. Nanoparticles (NPs) can be incorporated into 3D scaffolds to impart new functionalities such as localized drug delivery, enhanced imaging, and improved mechanical or electrical properties [24] [25].
Types and Applications of Functional Nanoparticles
The selection of nanoparticle type is critical and depends on the intended application in biomaterial design and analysis.
Table 2: Functional Nanoparticles for Biomaterial Enhancement
| Nanoparticle Type | Key Characteristics | Application in Biomaterials & Analysis |
|---|---|---|
| Metallic NPs (e.g., Gold, Iron Oxide) | Strong optical properties, superparamagnetism [25] | Imaging contrast agents, photothermal therapy, antimicrobial activity (Ag NPs) [24] [26]. |
| Polymeric NPs (e.g., PLGA) | Biodegradable, tunable release kinetics [25] | Controlled delivery of growth factors, antibiotics (e.g., Vancomycin [26]), or siRNA to cells within the scaffold. |
| Lipid NPs (e.g., PEGylated Liposomes) | High biocompatibility, drug encapsulation efficiency [25] | Delivery of hydrophobic/hydrophilic drugs (e.g., Doxorubicin [25]). Model systems for studying NP-cell interactions. |
| Carbon Nanotubes (CNTs) | High electroconductivity, mechanical strength [24] | Incorporated into scaffolds for cardiac or neural tissue engineering to enhance electrical signal propagation. |
| DNA-Programmed NPs | Precise 3D organization via DNA origami [27] [28] | Creation of highly structured materials for biosensing and as programmable scaffolds for studying cell-material interactions. |
DNA-Programmable Assembly for Advanced Materials
A groundbreaking approach in nanomaterial science involves using DNA as a programmable "smart glue" to assemble nanoparticles into precise 3D architectures. DNA origami allows the creation of nanostructures (e.g., octahedral "voxels") with specific binding sites, enabling the construction of complex, pre-designed superlattices that can host various "nanocargo" such as proteins, enzymes, or inorganic NPs [27] [28]. The inverse design algorithm, MOSES (Mapping Of Structurally Encoded aSsembly), helps define the minimal set of DNA voxels and bond types required to form a target structure, streamlining the fabrication of sophisticated materials for analytical applications [28].
Nucleic Acid Analysis Protocols
The cellular response to these advanced materials is ultimately decoded by analyzing changes in gene expression using robust nucleic acid techniques.
Protocol: Polymerase Chain Reaction (PCR)
PCR is a cornerstone technique for amplifying specific DNA sequences, enabling the detection and analysis of minute quantities of genetic material [7].
Principle: The technique involves repeated cycles of thermal denaturation of double-stranded DNA, annealing of sequence-specific primers, and extension of the primers by a thermostable DNA polymerase (e.g., Taq polymerase), resulting in the exponential amplification of the target sequence [29] [7].
Reaction Setup: Table 3: Components of a Standard PCR Reaction [7]
| Component | Final Concentration/Amount | Function |
|---|---|---|
| DNA Template | 1-100 ng (or 1-10 ng for cDNA) | The sample containing the target sequence to be amplified. |
| Forward & Reverse Primers | 0.1-1.0 µM each | Short, single-stranded DNA molecules that define the start and end of the target sequence. |
| Taq DNA Polymerase | 0.5-2.5 units/50 µL reaction | Enzyme that synthesizes new DNA strands by adding dNTPs. |
| dNTP Mix | 200 µM each | Building blocks (dATP, dCTP, dGTP, dTTP) for new DNA synthesis. |
| Reaction Buffer | 1X | Provides optimal pH and salt conditions (often includes MgCl₂, a cofactor for Taq polymerase). |
| Nuclease-free Water | To volume | To bring the reaction to the final volume. |
Thermal Cycler Protocol:
- Initial Denaturation: 95°C for 2-5 minutes (activates polymerase, denatures template).
- Amplification Cycles (25-40 cycles):
- Denaturation: 95°C for 15-30 seconds.
- Annealing: 55-72°C for 15-60 seconds (temperature is primer-specific).
- Extension: 72°C for 1 minute per kb of amplicon.
- Final Extension: 72°C for 5-10 minutes.
- Hold: 4°C ∞.
Diagram 2: Standard PCR Thermal Cycling Process
Protocol: Agarose Gel Electrophoresis
This technique is used to separate, identify, and size PCR products based on their molecular weight [29].
Materials:
- Agarose
- TAE or TBE electrophoresis buffer
- DNA ladder (molecular weight standard)
- Loading dye (e.g., with bromophenol blue)
- Ethidium bromide or SYBR Safe DNA gel stain
- Gel electrophoresis tank and power supply
- UV transilluminator or gel doc system
Method:
- Gel Preparation: Prepare a 1-2% agarose solution by dissolving agarose in electrophoresis buffer by heating. Allow to cool slightly, add nucleic acid stain (e.g., Ethidium Bromide, caution: mutagen), and pour into a gel tray with a comb.
- Sample Loading: Once solidified, place the gel in the electrophoresis tank and submerge with buffer. Mix PCR samples with loading dye. Load the DNA ladder and samples into the wells.
- Electrophoresis: Run the gel at 5-10 V/cm distance between electrodes until the dye front has migrated sufficiently.
- Visualization: Visualize the gel under UV light. The amplified PCR product should appear as a discrete band at the expected size relative to the ladder.
The Scientist's Toolkit: Essential Research Reagents and Materials
Table 4: Key Reagents for Biomaterial-Nucleic Acid Research
| Item/Category | Specific Examples | Primary Function |
|---|---|---|
| Scaffold Materials | Natural (Collagen, Chitosan); Synthetic (PLGA, PCL); Hydrogels (Alginate, PEGDA) [24] | Provide 3D structural support for cells, mimicking the native tissue microenvironment. |
| Functional Nanoparticles | Gold NPs, PLGA NPs, PEGylated Liposomes, Mesoporous Silica NPs (MSNs) [26] [25] | Enhance scaffold functionality (drug delivery, imaging, antimicrobial activity). |
| Nucleic Acid Extraction Kits | TRIzol-based kits, Silica-membrane column kits | Isolate high-quality, intact DNA/RNA from complex 3D cell-scaffold constructs. |
| PCR Master Mix | Pre-mixed solutions containing Taq polymerase, dNTPs, buffer, Mg²⁺ | Simplify PCR setup, ensure reaction consistency, and improve amplification efficiency. |
| Reverse Transcriptase | M-MLV, AMV | Synthesize complementary DNA (cDNA) from RNA templates for gene expression analysis (RT-PCR). |
| DNA Ladders & Stains | 100 bp DNA Ladder, Ethidium Bromide, SYBR Safe | Provide molecular weight standards for gel electrophoresis and enable DNA band visualization. |
A Step-by-Step Guide to Nucleic Acid Analysis for Biomaterial Testing
Protocol for Preparing Biomaterial Extracts and Cell Cultures
Evaluating the biological safety and performance of biomaterials is a critical step in medical device development and drug research. This process involves preparing extracts from the biomaterial to simulate leachable substances and then exposing these extracts to cell cultures to assess their biological response. The data generated is often analyzed using sophisticated molecular techniques, including polymerase chain reaction (PCR) and electrophoresis, to understand specific cellular responses at the genetic level. This protocol outlines a detailed, step-by-step procedure for preparing biomaterial extracts and subsequent cell cultures, framed within the context of a broader research thesis utilizing PCR and electrophoresis for biomaterial cellular response research. It integrates the latest regulatory considerations, including the FDA's September 2024 draft guidance on chemical characterization, to ensure the analytical chemistry studies are consistent and reliable [30] [31].
Background and Regulatory Context
Chemical characterization of medical device materials is used to identify and quantify the chemical substances that may be released from a device into the body. This process helps address potential biological risks and can serve as a supportive or alternative approach to some animal testing when followed by a toxicological risk assessment (TRA) according to ISO 10993-17 [31] [32]. The US FDA's draft guidance "Chemical Analysis for Biocompatibility Assessment of Medical Devices," released in September 2024, provides a comprehensive framework for these assessments, aligning with ISO 10993-18 and focusing on extraction, chemical analysis, and reporting requirements [30].
The fundamental principle of extract preparation is to use conditions that exaggerate or provide a worst-case estimate of the clinical use conditions. This ensures a safety margin by identifying potential leachables that might be released over the device's intended contact duration [32]. The resulting extracts are then applied to cell cultures to evaluate endpoints such as cytotoxicity (cell death), genotoxicity (DNA damage), and other metabolic functions, with downstream analysis via PCR and electrophoresis providing granular data on gene expression and DNA integrity.
Materials and Equipment
Research Reagent Solutions
The following table details key reagents and their functions in the preparation of biomaterial extracts and cell cultures.
Table 1: Essential Research Reagents and Their Functions
| Reagent/Material | Function/Explanation |
|---|---|
| Polar Solvent (e.g., Physiological Saline) | Aqueous extractant for polar and ionic leachables, simulating body fluids like blood and serum [33] [32]. |
| Non-Polar Solvent (e.g., Vegetable Oil) | Lipid-soluble extractant for non-polar leachables, simulating contact with fatty tissues [33]. |
| Semi-Polar Solvent (e.g., Ethanol/Water Mixtures) | Recommended for devices with long-term contact; can extract a broader range of compounds [30] [32]. |
| Cell Culture Media (e.g., DMEM, RPMI) | Provides essential nutrients, hormones, and growth factors to sustain cells ex vivo during biocompatibility testing [34] [35]. |
| Agarose | A polysaccharide powder used to create gels for the electrophoretic separation of DNA fragments by size [36]. |
| TBE (Tris/Borate/EDTA) Buffer | Provides the ionic environment and pH control necessary to conduct electrical current and maintain DNA integrity during electrophoresis [36]. |
| DNA Safe Stain | A fluorescent dye that intercalates with DNA fragments, allowing for visualization under UV or blue light transillumination [36]. |
| Loading Dye | Adds density to DNA samples for easy loading into gel wells and contains a visible dye to track migration progress [36]. |
| DNA Ladder | A molecular weight standard containing DNA fragments of known sizes, enabling the estimation of unknown fragment sizes in samples [36]. |
Laboratory Equipment
- Biomaterial Processing Tools: Sterile scalpels, scissors, or cryogenic mill for sample preparation.
- Extraction Vessels: Sealed containers (e.g., glass vials) with minimal headspace, chemically inert [30] [32].
- Incubator or Oven: For maintaining precise extraction temperatures (e.g., 37°C, 50°C, 70°C) [33].
- Mechanical Agitation Device: Such as an orbital shaker, to ensure continuous, uniform contact between the biomaterial and solvent [30].
- Analytical Balance: High-sensitivity balance capable of measuring down to 10-100 micrograms for Non-Volatile Residue (NVR) analysis [30].
- Cell Culture Facility: Including biosafety cabinet, CO₂ incubator, centrifuges, and microscopes.
- Gel Electrophoresis System: Including a gel tray, comb, power supply, and visualization system (e.g., gel doc) [36].
- Thermal Cycler: For performing PCR amplification.
Experimental Protocol
Part I: Preparation of Biomaterial Extracts
Step 1: Information Gathering and Test Article Selection
Before testing, conduct thorough information gathering on the device, including:
- Materials of Construction: List all constituents, including polymers, plasticizers, colorants, and manufacturing aids (e.g., lubricants, mold release agents) [30] [33].
- Device Configuration and Intended Use: Understand the clinical exposure (contact duration, tissue type, temperature) to define the worst-case scenario [30] [32].
- Select the Test Article: The device should be in its final, clinically representative form, having undergone all manufacturing, packaging, and sterilization steps. If the entire device cannot be used, a representative section containing all material types may be used with justification. The test article should represent a worst-case exposure scenario [30] [33] [32].
Step 2: Determination of Extraction Conditions
The extraction conditions should be selected based on the device's intended use and should exceed clinical conditions to produce a worst-case extract.
Table 2: Guidelines for Selecting Extraction Conditions
| Parameter | Options and Guidelines |
|---|---|
| Solvents | Use polar (saline) and non-polar (oil) solvents as a minimum. For long-term devices, include a semi-polar solvent (e.g., ethanol-water mixture). Prefer neat solvents over mixtures; justify any deviations [30] [32]. |
| Temperature & Duration | Should be exaggerated. Common conditions include: 37°C for 24-72 hours, 50°C for 72 hours, 70°C for 24 hours, or 121°C for 1 hour. The choice must be justified based on the clinical worst-case and material thermal properties [33] [32]. |
| Extraction Exhaustiveness | For prolonged/long-term devices, perform exhaustive extraction until the amount of extractable material in a subsequent cycle is <10% of the initial cycle (determined gravimetrically) [32]. |
| Surface Area-to-Volume Ratio | Follow ISO 10993-12 guidelines. A common ratio is 6 cm²/mL for materials ≤ 0.5 mm thick and 3 cm²/mL for materials > 0.5 mm thick. For irregular shapes, use 0.1-0.2 g/mL [33]. |
Step 3: Performing the Extraction
- Prepare the Test Article: Subdivide the device if necessary under clean conditions to avoid contamination. Record the final surface area or mass.
- Conduct Solvent Compatibility (if needed): For novel materials, a pre-study evaluating at least three solvents of the same polarity is recommended to identify which causes the least swelling or degradation [30].
- Perform the Extraction:
- Place the test article in a sealed extraction vessel.
- Add the predetermined volume of solvent, ensuring the article is completely immersed with minimal headspace [32].
- Place the vessel in an incubator/oven at the selected temperature for the specified duration with continuous mechanical agitation [30].
- Perform extractions in triplicate for each solvent to account for device variability, unless justification is provided (e.g., devices are pooled to obtain sufficient extract volume) [32].
- Post-Extraction Handling:
- After extraction, visually inspect the test article and extract. Note any changes like cloudiness, particulates, or material degradation. The presence of particulates may require analysis per ISO/TS 10993-19 [32].
- For volatile compound analysis (via HS-GC-MS), analyze the extract immediately.
- Store extracts appropriately before biological testing, noting that storage conditions should not alter the chemical profile.
The following workflow diagram summarizes the key stages of the biomaterial extract preparation process:
Part II: Cell Culture Preparation and Dosing
Step 1: Cell Line Selection and Culture
- Select Appropriate Cell Line: Common choices include mammalian cell lines like Chinese Hamster Ovary (CHO) or human-derived lines like HEK293 for general biocompatibility, or more specialized primary cells like Human Peripheral Blood Mononuclear Cells (PBMCs) for specific immune responses [34] [35].
- Culture and Maintain Cells: Grow cells in optimal serum-free or chemically defined media in a humidified CO₂ incubator at 37°C. Using chemically defined media (CDM) eliminates variability from animal-derived components and simplifies regulatory compliance [34].
- Optimize Media (if necessary): For specific applications (e.g., maintaining PBMC viability or recombinant protein production), media may need optimization. Advanced methods like Bayesian Optimization (BO) can efficiently identify optimal media compositions with fewer experiments than traditional Design of Experiments (DoE) [35].
Step 2: Exposing Cell Cultures to Biomaterial Extracts
- Prepare Test Concentrations: Aseptically filter the biomaterial extract if necessary. The extract is often applied to cells at 100% concentration, but serial dilutions (e.g., 1:2, 1:10 in culture medium) may be used to establish a dose-response relationship.
- Apply Extract to Cells: Plate cells at a predetermined density and allow them to adhere and stabilize (typically 24 hours). Remove the growth medium and replace it with the medium containing the biomaterial extract. Include control groups: a negative control (cells with culture medium and pure extraction solvent) and a positive control (cells with a known cytotoxic agent) [33].
- Incubation: Incubate the cells for a predetermined period (e.g., 24, 48, or 72 hours) based on the biological endpoint being investigated.
Integration with PCR and Electrophoresis for Cellular Response Analysis
Following exposure, the cellular response is analyzed. PCR and electrophoresis are key for assessing genetic-level changes.
- RNA/DNA Extraction: After the exposure period, extract total RNA to analyze gene expression (via Reverse Transcription PCR or qRT-PCR) or DNA to assess genomic integrity (e.g., for genotoxicity) or specific edits (e.g., in CRISPR-Cas9 studies) [37].
- Polymerase Chain Reaction (PCR): Amplify specific target sequences. For gene expression analysis, qRT-PCR is used to quantify transcript levels of genes related to stress response, inflammation (e.g., cytokines), or apoptosis. In gene editing research, PCR is used to verify the success of edits in primary cells like Hematopoietic Stem and Progenitor Cells (HSPCs) [37].
- Gel Electrophoresis: Analyze the PCR products.
- Prepare a 1-2% Agarose Gel: Dissolve agarose in TBE buffer by heating, cool to ~55°C, add DNA Safe Stain, and pour into a gel tray with a comb [36].
- Load and Run the Gel: Mix PCR products with loading dye and load into wells alongside a DNA ladder. Run at 50-100V for 30-60 minutes [36].
- Visualize: Under UV/blue light, DNA fragments will appear as bands. Compare against the ladder for size determination and observe band patterns and intensities for qualitative and semi-quantitative analysis.
The following diagram illustrates the workflow from cell culture to molecular analysis:
Data Analysis and Interpretation
- Gel Electrophoresis Analysis: The presence, absence, or smearing of DNA bands can indicate genotoxic effects. The intensity of bands from qRT-PCR products can be used for semi-quantitative analysis of gene expression.
- Toxicological Risk Assessment (TRA): For chemical characterization, identified extractables above the Analytical Evaluation Threshold (AET) must undergo a TRA per ISO 10993-17 to determine if the exposure level poses a risk to patients [31] [32].
This detailed protocol provides a robust framework for preparing biomaterial extracts and corresponding cell cultures, directly supporting downstream molecular analyses like PCR and electrophoresis. Adherence to the latest regulatory drafts, such as the FDA's 2024 guidance, ensures that the chemical characterization is rigorous, justified, and forms a solid foundation for assessing the biological safety of medical devices and biomaterials [30] [31]. This integrated approach from material extraction to genetic analysis is indispensable for modern biomaterial research and development.
The isolation of high-quality nucleic acids from cell-biomaterial constructs presents unique challenges for researchers investigating cellular responses through PCR and electrophoresis. These constructs often incorporate complex scaffolds, hydrogels, and engineered tissues that introduce high levels of polysaccharides, secondary metabolites, and polymers that co-precipitate with DNA and RNA, leading to degradation and poor yield [38]. Success in downstream applications including quantitative PCR, RNA sequencing, and genotyping depends entirely on the initial quality of isolated nucleic acids. This application note provides detailed, validated protocols and comparative data to guide researchers in selecting and implementing optimal isolation strategies for these challenging sample types, with direct application to biomaterial cellular response research.
Comparative Analysis of Nucleic Acid Isolation Techniques
The selection of an appropriate nucleic acid isolation method is critical when working with cell-biomaterial constructs. The table below summarizes the performance characteristics of major technique categories evaluated for challenging sample types.
Table 1: Comparison of Nucleic Acid Isolation Techniques for Complex Biomaterial Constructs
| Technique | Expected Yield | Purity (A260/A280) | Best Application | Technical Complexity | Cost | Suitability for Downstream Applications |
|---|---|---|---|---|---|---|
| Phenol-Chloroform (Guanidinium-based) | High | Moderate (1.7-1.9) | RNA isolation from polysaccharide-rich constructs | High | Low | RT-qPCR, RNA sequencing |
| Silica Column-Based | Moderate | High (1.8-2.0) | High-throughput DNA isolation | Medium | Medium | PCR, genotyping, sequencing |
| Magnetic Bead-Based | Variable | High (1.8-2.0) | Automated high-throughput processing | Low to Medium | Medium to High | All molecular applications |
| Cesium Chloride Gradient | High | Very High (>2.0) | Plasmid DNA purification from constructs | Very High | High | Transfection, cloning |
Recent comparative studies on difficult plant and tissue samples have demonstrated that conventional phenol-chloroform methods, particularly those incorporating guanidinium thiocyanate, consistently yield DNA of superior purity and concentration compared to many commercial kits when processing materials with high secondary metabolite content [38]. For RNA isolation, a hybrid approach combining modified commercial kits with conventional techniques has shown exceptional results, producing RNA with high concentration and purity suitable for even the most sensitive downstream applications like RNA-Seq [38].
Essential Research Reagent Solutions
The following reagents and kits form the foundation of successful nucleic acid isolation from cell-biomaterial constructs.
Table 2: Essential Research Reagents for Nucleic Acid Isolation
| Reagent/Kits | Primary Function | Application Notes |
|---|---|---|
| Guanidinium Thiocyanate | Protein denaturation, nuclease inhibition | Essential for RNA stability during homogenization; effective for polysaccharide-rich constructs [39]. |
| Silica Matrix Columns | Nucleic acid binding and purification | Selective binding in presence of high salt; effective for DNA removal in RNA protocols [39]. |
| Magnetic Silica Beads | Selective nucleic acid capture | Enable automation; effective with small sample volumes; reduce polysaccharide carryover [39]. |
| RNase Inhibitors | Protection of RNA integrity | Critical during RNA isolation from active cellular constructs; required in lysis buffers. |
| Phase Lock Gel | Interface separation | Improves phenol-chloroform separation; increases nucleic acid recovery [39]. |
| DNase I (RNase-free) | DNA removal | Essential for pure RNA isolation; must be effectively removed or inactivated post-treatment. |
| QIAquick Gel Extraction Kit | DNA fragment purification | Enables purification of specific DNA fragments from agarose gels [40]. |
Validated Protocols for High-Quality Nucleic Acid Isolation
Combined Guanidinium-Thiocyanate-Phenol-Chloroform RNA Protocol
This protocol has been specifically adapted for cell-biomaterial constructs with high polysaccharide content and yields RNA with high purity suitable for RT-qPCR and transcriptomic analysis.
Reagents Required:
- Lysis Buffer: 4M guanidinium thiocyanate, 25mM sodium citrate, 0.5% N-lauroylsarcosine, 0.1M 2-mercaptoethanol
- Acid Phenol:Chloroform:Isoamyl Alcohol (125:24:1)
- Isopropanol
- 75% Ethanol
- Nuclease-free Water
Procedure:
- Homogenization: Resuspend cell-biomaterial construct in 800μL lysis buffer. For robust constructs, use mechanical homogenization (e.g., rotor-stator) for 30-60 seconds.
- Phase Separation: Add 200μL chloroform, vortex vigorously for 15 seconds, and incubate on ice for 5 minutes.
- Centrifugation: Centrifuge at 12,000 × g for 15 minutes at 4°C. Transfer the upper aqueous phase containing RNA to a new tube.
- Precipitation: Add equal volume of isopropanol, mix, and incubate at -20°C for 30 minutes. Centrifuge at 12,000 × g for 10 minutes at 4°C.
- Wash: Discard supernatant, wash pellet with 75% ethanol, and centrifuge at 7,500 × g for 5 minutes.
- Resuspension: Air-dry pellet for 5-10 minutes and resuspend in 20-50μL nuclease-free water.
Quality Assessment:
- Assess purity using NanoDrop spectrophotometer (A260/A280 ratio of 1.9-2.1 indicates pure RNA)
- Verify integrity using Agilent 2100 Bioanalyzer (RIN >8.0 recommended for sequencing applications)
- Confirm absence of DNA contamination by PCR of non-reverse transcribed RNA
Silica Column-Based DNA Isolation with Modifications
This protocol incorporates modifications to standard commercial kits to improve DNA yield from complex biomaterial constructs.
Reagents Required:
- Commercial silica-column DNA extraction kit
- Additional β-mercaptoethanol (0.1% final concentration)
- Proteinase K (20mg/mL stock)
- RNase A (10mg/mL stock)
Procedure:
- Lysis: Incubate cell-biomaterial construct in lysis buffer with 0.1% β-mercaptoethanol and 20μL proteinase K at 56°C for 1-3 hours with agitation.
- RNase Treatment: Add 5μL RNase A, mix, and incubate at room temperature for 5 minutes.
- Column Binding: Add equal volume of binding buffer, mix, and transfer to silica column. Centrifuge at 11,000 × g for 1 minute.
- Wash: Wash column twice with wash buffer, centrifuging at 11,000 × g for 1 minute after each wash.
- Elution: Elute DNA in 50-100μL elution buffer pre-heated to 65°C.
Quality Assessment:
- NanoDrop spectrophotometry (A260/A280 ratio of 1.8-2.0)
- Agarose gel electrophoresis to confirm high molecular weight and absence of degradation
- PCR amplification of housekeeping genes to confirm amplifiability
Agarose Gel DNA Purification Protocol
Gel purification is essential for isolating specific DNA fragments after restriction digestion or PCR amplification, particularly for cloning applications in biomaterial research.
Reagents Required:
- Low-melt agarose (0.7-0.8%)
- TAE or TBE buffer
- DNA staining dye (SYBR Safe)
- QIAquick Gel Extraction Kit or equivalent
- Sterile razor blades or scalpels
Procedure:
- Gel Electrophoresis: Prepare 0.8% agarose gel in TAE buffer. Load samples with appropriate DNA ladder, leaving empty lanes between samples to prevent cross-contamination.
- Visualization and Excision: Visualize DNA bands using long-wavelength UV light to minimize damage. Excise target band with clean razor blade, minimizing excess gel.
- Gel Weighing: Weigh gel slice in microfuge tube to determine appropriate buffer volumes.
- DNA Purification: Follow manufacturer's instructions for gel extraction kit. Typically involves dissolving gel slice, binding DNA to column, washing, and eluting.
Critical Optimization Steps:
- Run gel at lower voltage (3-5V/cm) for crisper bands
- Limit UV exposure to less than 30 seconds to prevent DNA damage
- Use wide gel combs for increased sample capacity [40]
Quality Assessment and Validation Methods
Rigorous quality assessment is essential for nucleic acids intended for PCR and electrophoresis applications in cellular response research.
Table 3: Quality Metrics and Validation Methods for Isolated Nucleic Acids
| Quality Parameter | Assessment Method | Acceptance Criteria | Impact on Downstream Applications |
|---|---|---|---|
| Concentration | NanoDrop spectrophotometry | DNA: >50ng/μL, RNA: >100ng/μL | Ensures sufficient template for detection |
| Purity (A260/A280) | NanoDrop spectrophotometry | DNA: 1.8-2.0, RNA: 1.9-2.1 | Indicates absence of protein contamination |
| Purity (A260/A230) | NanoDrop spectrophotometry | >2.0 for both DNA and RNA | Indicates absence of salt/solvent carryover |
| Structural Integrity | Agarose gel electrophoresis | Sharp, high molecular weight bands | Critical for long-amplicon PCR |
| RNA Integrity | Bioanalyzer/biochromatogram | RIN >8.0, 28S:18S >1.5 | Essential for RNA-seq and RT-qPCR |
| Amplifiability | PCR of housekeeping genes | Ct <30 in qPCR, clear bands in PCR | Confirms enzymatic compatibility |
| Functional Purity | Restriction digestion | Complete digestion pattern | Confirms absence of PCR inhibitors |
Validation studies demonstrate that performance metrics should aim for a geometric mean of absolute fold-differences (gmAFD) to ground truth of less than 1.25× for accurate quantification in molecular applications [41]. The quadratic mean of coefficients of variation (qmCV) for technical replicates should be below 5%, indicating high precision in measurement [41].
Workflow Integration for Cellular Response Research
The isolation of high-quality nucleic acids represents the critical first step in comprehensive analysis of cellular responses to biomaterials. The following workflow diagram illustrates the integrated process from sample to analysis.
Nucleic Acid Isolation Workflow Integration
Troubleshooting Common Issues
Low Yield:
- Increase homogenization intensity and duration for robust constructs
- Extend proteinase K digestion time (up to overnight)
- Increase starting material volume
- Add carrier RNA during RNA precipitation
Poor Purity (Low A260/A280):
- Increase number of phenol:chloroform extractions
- Add additional wash steps in column-based protocols
- Ensure complete removal of organic solvents
- Use fresh preparation of β-mercaptoethanol
RNA Degradation:
- Maintain RNase-free conditions throughout procedure
- Keep samples on ice when not in processing
- Use fresh lysis buffer with guanidinium thiocyanate
- Process samples immediately or flash-freeze in liquid nitrogen
Inhibitors in Downstream Applications:
- Perform additional ethanol precipitation with 70% ethanol wash
- Dilute template in subsequent reactions
- Use additives such as BSA in PCR reactions
- Employ inhibitor removal columns
The isolation of high-quality nucleic acids from cell-biomaterial constructs requires methodical optimization and validation to support reliable PCR and electrophoresis results in cellular response research. The protocols and quality control measures presented here provide a framework for obtaining nucleic acids that meet the stringent requirements of modern molecular applications. By implementing these standardized approaches, researchers can enhance the reproducibility and accuracy of their findings, ultimately advancing our understanding of cellular interactions with engineered biomaterials.
Primer Design Best Practices for Specific and Efficient Amplification
In biomaterial cellular response research, the accuracy of gene expression data acquired through polymerase chain reaction (PCR) and subsequent analysis by gel electrophoresis is foundational. The specificity and efficiency of the entire PCR process are fundamentally dictated by the initial primer design. Well-designed primers ensure the selective amplification of target genes, such as those involved in inflammatory response, osteogenesis, or apoptosis, from complex cDNA samples. This application note details evidence-based protocols and best practices for designing primers that guarantee specific and efficient amplification, thereby providing reliable data for evaluating cellular responses to novel biomaterials.
Fundamental Principles of Primer Design
The core objective of primer design is to create oligonucleotides that bind specifically and efficiently to a unique sequence within a DNA template, enabling the DNA polymerase to initiate synthesis. Several physicochemical properties must be optimized to achieve this.
Core Design Parameters
The following parameters are critical for successful primer design and should be evaluated as an interconnected system [42] [43] [44].
- Primer Length: Primers should typically be 18–30 nucleotides long [42] [43]. This length provides a balance between specificity and binding efficiency; shorter primers may bind non-specifically, while longer ones can reduce reaction efficiency.
- Melting Temperature (Tm): The Tm is the temperature at which half of the DNA duplex dissociates into single strands. For specificity, the Tm of both forward and reverse primers should be between 60–75°C and within 5°C of each other [42] [43] [44]. An ideal target Tm is 62°C [43]. The Tm is influenced by length, sequence, and buffer conditions.
- GC Content: The proportion of Guanine and Cytosine bases should ideally be between 40–60%, with an optimal target of 50% [42] [43] [44]. This ensures sufficient sequence complexity and binding stability.
- GC Clamp: The presence of a G or C base at the 3'-end of the primer, known as a GC clamp, strengthens binding due to the stronger hydrogen bonding of G-C pairs compared to A-T pairs. This enhances the initiation of polymerization [42].
- Secondary Structures: Primers must be screened for self-complementarity that can lead to hairpins (internal folding) or primer-dimers (complementarity between two primers). These structures compete with target binding and drastically reduce amplification efficiency. The free energy (ΔG) for any stable secondary structure should be weaker (more positive) than –9.0 kcal/mol [43].
Table 1: Optimal Ranges for Key Primer Design Parameters
| Parameter | Ideal Range | Importance |
|---|---|---|
| Length | 18–30 nucleotides [42] [43] | Balances specificity and binding efficiency. |
| Melting Temp (Tm) | 60–75°C; primers within 5°C [42] [43] | Ensures simultaneous binding of both primers. |
| GC Content | 40–60% (ideal 50%) [42] [43] [44] | Provides stable yet non-specific binding. |
| GC Clamp | G or C at the 3'-end [42] | Stabilizes primer-template binding for extension. |
| Secondary Structures | Avoid hairpins & dimers (ΔG > -9.0 kcal/mol) [43] | Prevents self-annealing and reagent competition. |
Sequence Features to Avoid
To minimize failed experiments, primer sequences should be meticulously checked for the following problematic features [42] [44]:
- Long runs of a single base: Avoid sequences with 4 or more consecutive identical bases (e.g., AAAA or CCCC).
- Dinucleotide repeats: Avoid repetitive sequences (e.g., ATATATAT), as they can cause mispriming.
- High GC repeats: Runs of multiple G residues, in particular, should be avoided [43] [45].
- 3'-end complementarity: Even a few complementary bases at the 3' ends of the forward and reverse primers can lead to primer-dimer formation, which is efficiently amplified by the polymerase.
Experimental Protocol for Primer Design and Validation
This section provides a step-by-step workflow for designing, validating, and implementing primers in a PCR protocol for biomaterial research.
Workflow for Primer Design and In Silico Validation
The following diagram outlines the systematic process from sequence acquisition to in silico validation.
Step 1: Obtain Target Sequence. Identify and retrieve the exact nucleotide sequence of your gene of interest from a reliable database such as the NCBI Nucleotide database [46].
Step 2: Utilize Primer Design Software. Use specialized tools like NCBI Primer-BLAST [47] or other vendor tools (e.g., IDT PrimerQuest). These tools integrate primer design with specificity validation.
Step 3: Set Input Parameters. Configure the software with the parameters listed in Table 1. For qPCR, aim for an amplicon length of 70–150 base pairs for maximum efficiency [43] [45]. When working with cDNA (e.g., from cells cultured on biomaterials), select the option "Primer must span an exon-exon junction" in Primer-BLAST to ensure amplification of cDNA and not contaminating genomic DNA [43] [47].
Step 4: Analyze and Select Candidates. Screen the generated primer pairs for the absence of stable secondary structures (ΔG > -9.0 kcal/mol) using analysis tools like the IDT OligoAnalyzer [43]. Select the pair that best fulfills all design criteria and has passed the in-silico specificity check.
Wet-Lab Validation Protocol
After in silico design and synthesis, primers must be validated experimentally.
Materials and Reagents:
- Template DNA/cDNA: High-quality DNA or cDNA synthesized from RNA extracted from cells. For cDNA, a DNase I treatment step is recommended to remove genomic DNA [43].
- Primers: Resuspend lyophilized primers in TE buffer or nuclease-free water to a stock concentration (e.g., 100 µM).
- PCR Master Mix: Contains Taq DNA polymerase, dNTPs, MgCl₂, and reaction buffers. A Hot-Start polymerase is recommended to reduce non-specific amplification and primer-dimer formation [48].
- Thermal Cycler
- Agarose Gel Electrophoresis System
Procedure:
- Prepare Reaction Mix. Assemble reactions on ice. A typical 25 µL reaction may contain:
- 12.5 µL of 2X PCR Master Mix
- 1.0 µL of Forward Primer (10 µM stock)
- 1.0 µL of Reverse Primer (10 µM stock)
- 1.0 µL of Template DNA/cDNA (e.g., 50-100 ng)
- 9.5 µL of Nuclease-free Water
- Include a no-template control (NTC) where water is substituted for the template.
Thermal Cycling. Run the PCR using the following standard conditions, optimizing the annealing temperature (Ta) as needed:
- Initial Denaturation: 95°C for 3–5 minutes (activates hot-start polymerase).
- Amplification (35 cycles):
- Denaturation: 95°C for 30 seconds.
- Annealing: Ta for 30 seconds. The Ta should be 5°C below the primer Tm or determined by a temperature gradient test.
- Extension: 72°C for 1 minute (adjust based on amplicon length; 1 min/kb).
- Final Extension: 72°C for 5–10 minutes.
- Hold: 4°C.
Analyze PCR Product.
- Prepare a 1.5–2.0% agarose gel with a safe DNA stain.
- Load the PCR products and a DNA ladder.
- Run gel electrophoresis and visualize under UV light.
- Successful Validation: A single, sharp band of the expected size should be present in the sample lane, with no bands in the NTC lane.
The Scientist's Toolkit: Essential Research Reagents
Table 2: Key Reagents for PCR in Biomaterial Research
| Reagent / Tool | Function | Application Notes |
|---|---|---|
| Hot-Start DNA Polymerase | Reduces non-specific amplification and primer-dimer formation by being inactive at room temperature [48]. | Essential for high-specificity PCR and qPCR. |
| dNTP Mix | Building blocks for new DNA strand synthesis. | Use balanced solutions to prevent incorporation errors. |
| MgCl₂ Solution | Cofactor for DNA polymerase activity; concentration influences primer annealing and fidelity [48]. | Often included in buffers; may require optimization (1.5-3.5 mM). |
| Nuclease-free Water | Solvent for reactions and dilutions. | Prevents degradation of primers and templates. |
| Primer Design Software (e.g., NCBI Primer-BLAST) | Designs target-specific primers and checks their specificity in silico [47]. | Critical first step to avoid costly experimental failures. |
| Oligo Analysis Tool (e.g., IDT OligoAnalyzer) | Calculates Tm, and checks for hairpins and self-dimers [43]. | Used for fine-tuning selected primer sequences. |
Determining and Optimizing qPCR Efficiency
In quantitative PCR (qPCR), amplification efficiency is a critical metric for accurate gene expression quantification. Ideal efficiency represents a doubling of amplicon each cycle (100% efficiency, or a slope of -3.32 in a standard curve) [49]. Efficiencies between 90–110% are generally acceptable [45].
Calculating qPCR Efficiency
Efficiency is determined by running a standard curve with a serial dilution of the template (e.g., 5- or 10-fold dilutions) [49].
- Perform qPCR on the dilution series.
- Plot the mean Cq (Quantification Cycle) value against the logarithm of the template concentration for each dilution.
- Perform linear regression to obtain the slope of the trendline.
- Calculate the amplification efficiency (E) using the formula:
- E = [10(-1/slope)] - 1 [49]
- Efficiency (%) = (E - 1) * 100
Table 3: Interpreting qPCR Standard Curve Results
| Slope | Efficiency (E) | Efficiency (%) | Interpretation |
|---|---|---|---|
| -3.32 | 1.00 | 100% | Ideal amplification |
| -3.58 | 0.90 | 90% | Acceptable range |
| -3.10 | 1.10 | 110% | Acceptable range |
| > -3.10 | > 1.10 | > 110% | Indicator of inhibition or error [50] |
| < -3.58 | < 0.90 | < 90% | Indicator of poor primer performance |
Troubleshooting Sub-Optimal Efficiency
The following diagram illustrates a systematic approach to diagnosing and resolving common qPCR efficiency problems.
- Low Efficiency (<90%): Often caused by poor primer design (secondary structures, low Tm), primer degradation, or non-optimal reagent concentrations [50]. Re-optimize the primer design and reaction conditions.
- High Efficiency (>110%): Frequently indicates the presence of PCR inhibitors in the template sample or errors in preparing the dilution series [50]. Diluting the template or re-purifying the nucleic acids often resolves this. Pipetting errors can also be a cause.
Rigorous primer design is not merely a preliminary step but a critical determinant of success in PCR-based analysis of cellular responses to biomaterials. By adhering to the outlined design principles, employing a systematic in silico and wet-lab validation protocol, and meticulously calculating qPCR efficiency, researchers can generate robust, reproducible, and meaningful gene expression data. This disciplined approach ensures that results accurately reflect cellular behavior, thereby strengthening the conclusions drawn in biomaterials research and drug development.
Within research on biomaterial cellular responses, the polymerase chain reaction (PCR) is an indispensable technique for profiling gene expression patterns that indicate cellular states, such as proliferation, differentiation, or inflammation [7]. The reliability of this data is fundamentally dependent on the precision and accuracy of the initial PCR setup. This application note provides a detailed, step-by-step protocol for setting up robust PCR reactions, focusing on the critical components, optimized cycling conditions, and correct reaction assembly to ensure reproducible and meaningful results in a biomaterials research context.
Critical Reaction Components and Their Optimization
A successful PCR requires the careful optimization of several interacting components. The table below summarizes the core reagents, their functions, and optimal concentration ranges for standard PCR protocols.
Table 1: Essential Components of a Standard PCR Reaction Mix
| Component | Function | Final Concentration/Amount | Key Optimization Considerations |
|---|---|---|---|
| Template DNA | Provides the target sequence for amplification. | 1 pg–10 ng (plasmid); 1 ng–1 µg (genomic) [51] | Input amount is critical; high complexity DNA (e.g., gDNA) requires more input than plasmid DNA [52]. |
| DNA Polymerase | Enzyme that synthesizes new DNA strands. | 0.5–2.5 units per 50 µL reaction [51] [53] | Hot-start versions are recommended to enhance specificity by reducing mispriming at room temperature [54]. |
| Primers (Forward & Reverse) | Short oligonucleotides that define the sequence to be amplified. | 0.1–0.5 µM each [51] [53] | Tm should be 55–70°C and within 5°C for each primer; avoid self-complementarity and high GC at 3' end [52]. |
| dNTPs | Building blocks (dATP, dCTP, dGTP, dTTP) for new DNA strands. | 200 µM of each dNTP [51] [53] | Higher concentrations can increase yield but may reduce fidelity; balanced equimolar amounts are crucial [52]. |
| MgCl₂ | Cofactor essential for DNA polymerase activity. | 1.5–2.0 mM (start) [51] | Optimize in 0.5 mM increments; too low causes no product, too high promotes nonspecific amplification [52] [51]. |
| PCR Buffer | Provides optimal ionic environment and pH for enzyme activity. | 1X concentration | Often supplied with the enzyme; may contain stabilizers or enhancers for specific templates like GC-rich regions [55] [54]. |
| Water | Nuclease-free solvent to bring the reaction to final volume. | To volume (e.g., 50 µL) | Must be of high purity to avoid enzyme inhibition or contamination. |
The Scientist's Toolkit: Key Research Reagent Solutions
Table 2: Key Reagents for Specialized PCR Applications in Biomaterial Research
| Reagent / Solution | Primary Function | Application Example in Biomaterials Research |
|---|---|---|
| Hot-Start DNA Polymerase | Minimizes non-specific amplification and primer-dimer formation during reaction setup by requiring thermal activation [54]. | Essential for multiplex PCR to accurately profile multiple cytokine mRNA targets from cells cultured on a new polymer. |
| GC Enhancer / Co-solvents (DMSO, Betaine) | Disrupts secondary structures and lowers the melting temperature of DNA, facilitating denaturation of stable GC-rich regions [55] [54]. | Critical for amplifying promoter regions of genes like collagen, which often have high GC content, from cell-laden hydrogel constructs. |
| dUTP and Uracil DNA Glycosylase (UDG) | Prevents carryover contamination from previous PCR amplicons; UDG cleaves uracil-containing DNA before PCR begins [52]. | Maintains assay integrity in high-throughput screens where the same gene targets are repeatedly analyzed from multiple biomaterial samples. |
| SYBR Green or TaqMan Probes | Enables real-time, quantitative detection of amplified DNA (qPCR) [56]. | The gold standard for quantifying dynamic changes in osteogenic gene expression (e.g., Runx2) by stem cells on a calcium phosphate scaffold over time. |
PCR Cycling Parameters and Conditions
Thermal cycling drives the PCR process through repeated temperature changes. Each cycle consists of three core steps: denaturation, annealing, and extension [55] [7].
Table 3: Standard Three-Step PCR Cycling Parameters
| Step | Typical Temperature | Typical Duration | Purpose and Key Parameters |
|---|---|---|---|
| Initial Denaturation | 94–98°C | 1–3 minutes | Fully denatures complex template DNA and activates hot-start polymerases. GC-rich templates may require longer times [55]. |
| Denaturation | 94–98°C | 15–30 seconds | Separates the newly formed double-stranded DNA into single strands for the next cycle. |
| Annealing | Tm of primers -5°C | 15–60 seconds | Allows primers to bind specifically to their complementary sequences. Temperature is the most critical variable for specificity [55] [51]. |
| Extension | 68–72°C | 1 minute per kb | DNA polymerase synthesizes new DNA strands. Time depends on amplicon length and polymerase synthesis rate [55] [51]. |
| Final Extension | 68–72°C | 5 minutes | Ensures all amplicons are fully elongated. A 30-minute final extension is recommended for TA cloning to ensure A-tailing [55]. |
| Cycle Number | 25–35 cycles | Fewer cycles (25–30) are used for high-copy templates to minimize artifacts; more cycles (up to 40) may be needed for low-abundance targets [55]. |
The following diagram illustrates the logical workflow and iterative nature of a standard PCR protocol, from component assembly to final analysis.
Step-by-Step Reaction Assembly Protocol
A standardized procedure for assembling the PCR reaction is vital for reproducibility.
Materials and Equipment
- Thermal Cycler
- Thin-walled 0.2 mL PCR tubes
- Pipettes and sterile, nuclease-free tips
- Nuclease-free water
- All components listed in Table 1
Procedure
- Thaw all reagents (except the enzyme) on ice. Gently mix each component by vortexing and briefly centrifuge to collect the contents at the bottom of the tube.
- Prepare a master mix for multiple reactions to minimize pipetting error and ensure consistency. Calculate the volumes for (n+1) reactions, where 'n' is the number of experimental samples.
- Add components to a sterile tube on ice in the following order:
- Nuclease-free water (to final volume)
- 10X PCR Buffer (to 1X final concentration)
- dNTP Mix (to 200 µM each)
- MgCl₂ (to 1.5–2.0 mM)
- Forward Primer (to 0.1–0.5 µM)
- Reverse Primer (to 0.1–0.5 µM)
- DNA Polymerase (0.5–2.5 units/reaction)
- Mix the master mix gently by pipetting up and down. Do not vortex after adding the enzyme. Briefly centrifuge.
- Aliquot the appropriate volume of the master mix into individual PCR tubes.
- Add the template DNA to each tube. Include a negative control containing nuclease-free water instead of template.
- Securely close the tubes, place them in the thermal cycler, and start the programmed run.
Advanced PCR Strategies for Biomaterial Research
Biomaterial samples can present challenges such as complex transcriptomes, low cell numbers, or inhibitors leached from materials. The following advanced methods can address these issues.
- Multiplex PCR: This strategy allows for the simultaneous amplification of multiple targets in a single reaction [54]. In biomaterial studies, this enables co-amplification of a housekeeping gene alongside genes of interest from a single, limited sample, ensuring accurate normalization and data reliability.
- Long-Range PCR: Standard PCR is optimal for targets up to 5 kb. Long PCR protocols, which often use a blend of DNA polymerases, allow for the amplification of larger fragments, which can be useful for studying large gene rearrangements or cloning extensive regulatory sequences [54] [52].
- Fast PCR: By using highly processive DNA polymerases and shortened cycling times, Fast PCR can reduce standard amplification time from hours to under 30 minutes [54]. This is highly beneficial for high-throughput screening of cellular responses to a library of biomaterial compounds.
- Reverse Transcription PCR (RT-PCR) & Quantitative PCR (qPCR): While standard PCR detects the presence of a DNA target, RT-PCR is used to analyze RNA by first converting it to complementary DNA (cDNA) [56]. When combined with qPCR (RT-qPCR), it becomes the gold standard for quantifying changes in gene expression, a cornerstone of biomaterial cellular response research [7] [56].
In biomaterial cellular response research, the precise analysis of polymerase chain reaction (PCR) products is a fundamental step for validating genetic outcomes at the molecular level. Agarose gel electrophoresis remains the most widely employed technique for this purpose, providing a robust method to separate, identify, and qualitatively assess amplified DNA fragments. This Application Note provides a detailed protocol and framework for utilizing agarose gel electrophoresis to analyze PCR results, with a specific focus on applications in biomaterial and drug development research. We include optimized methodologies, data interpretation guidelines, and advanced troubleshooting to ensure researchers can obtain reliable, reproducible data to support their scientific conclusions.
The Scientist's Toolkit: Essential Reagents and Equipment
The following table catalogs the essential materials required for successful PCR product analysis via agarose gel electrophoresis.
Table 1: Key Research Reagent Solutions and Materials for Agarose Gel Electrophoresis
| Item | Function/Description |
|---|---|
| Agarose | A polysaccharide derived from seaweed that forms a molecular sieve matrix for separating DNA fragments by size [57]. |
| TAE or TBE Buffer | Running buffer that provides ions to carry electrical current and maintains stable pH. TAE is preferred for longer fragments (>1 kb) and preparative gels, while TBE offers better resolution for smaller fragments (<1 kb) [58] [59]. |
| DNA Ladder | A mixture of DNA fragments of known sizes, loaded alongside samples to determine the size of unknown PCR products [58]. |
| Gel Loading Dye | A colored, dense solution that makes samples visible for loading and allows tracking of migration progress during the run [58] [59]. |
| Nucleic Acid Stain (e.g., EtBr, SYBR Safe/SYBR Gold) | Intercalating dye that binds to DNA and fluoresces under UV light, enabling visualization of DNA bands. SYBR Gold is more sensitive than EtBr or SYBR Safe [58] [57]. |
| DNA Template | The target DNA used in the PCR reaction; can be plasmid (1 pg–10 ng) or genomic (1 ng–1 µg) DNA [60]. |
| Taq DNA Polymerase | Thermostable enzyme that synthesizes new DNA strands during PCR. Typical usage is 0.5–2.5 units per 50 µL reaction [60]. |
| Primers | Short, single-stranded DNA sequences (20-30 nucleotides) that define the start and end points of the DNA segment to be amplified. Ideal GC content is 40-60% [60] [61]. |
| dNTPs | Deoxynucleoside triphosphates (dATP, dCTP, dGTP, dTTP), the building blocks for new DNA strands. A typical final concentration is 200 µM of each dNTP [60]. |
Experimental Protocol: A Step-by-Step Guide
The following diagram illustrates the complete experimental workflow from PCR setup to data interpretation.
Pre-Electrophoresis: PCR Amplification
A successful outcome in gel analysis is contingent on an optimized PCR reaction.
Reaction Setup: Assemble components on ice in the order listed below to a final volume of 50 µL [60] [61]. Table 2: Standard 50 µL PCR Reaction Mixture
Component Final Concentration/Amount Notes Sterile Water Q.S. to 50 µL Nuclease-free 10X PCR Buffer 1X Usually supplied with enzyme MgCl₂ 1.5 - 2.0 mM Optimize if necessary; critical for enzyme activity [60] dNTPs (each) 200 µM Forward Primer 0.1 - 0.5 µM Reverse Primer 0.1 - 0.5 µM DNA Template Varies (e.g., 1-100 ng genomic DNA) Taq DNA Polymerase 1.25 units Add last; mix by pipetting gently Thermal Cycling Parameters: Use the following standard conditions as a starting point for a 0.5 kb amplicon [60]:
- Initial Denaturation: 95°C for 2 minutes.
- Amplification (25-35 cycles):
- Denaturation: 95°C for 15-30 seconds.
- Annealing: 50-60°C for 15-30 seconds. Optimize based on primer Tm.
- Extension: 68°C for 1 minute per kb.
- Final Extension: 68°C for 5 minutes.
- Hold: 4-10°C.
Gel Preparation and Electrophoresis
Casting the Agarose Gel [58] [59] [57]:
- Choose Agarose Concentration: Select a percentage based on the expected size of your PCR product (see Table 3).
Table 3: Agarose Gel Concentration Guidelines
Agarose Percentage (%) Effective Separation Range (bp) 0.7 1,000 - 30,000 1.0 500 - 10,000 1.5 200 - 3,000 2.0 100 - 2,000 - Weigh and Dissolve: For a 1% gel, mix 1 g of agarose with 100 mL of 1X TAE (or TBE) buffer in a flask.
- Melt Agarose: Heat in a microwave with occasional swirling until the solution is completely clear. Caution: The solution will be very hot.
- Cool and Add Stain: Let the flask cool to about 50°C (comfortable to hold). Add a nucleic acid stain (e.g., 2-3 µL of a 10 mg/mL EtBr stock per 100 mL gel) and swirl to mix evenly. Wear gloves when handling mutagenic stains.
- Pour Gel: Place a comb in the gel tray and pour the molten agarose. Allow it to solidify completely at room temperature (20-30 minutes).
- Choose Agarose Concentration: Select a percentage based on the expected size of your PCR product (see Table 3).
Table 3: Agarose Gel Concentration Guidelines
Loading and Running the Gel [59] [57]:
- Prepare Samples: Mix 5 µL of each PCR product with 1 µL of 6X loading dye.
- Set Up Apparatus: Place the solidified gel in the electrophoresis tank and cover with 1X running buffer (the same used to make the gel).
- Load Samples: Carefully load the prepared samples and a DNA ladder into separate wells.
- Run Gel: Connect the lid, ensuring the cathode (black) is near the wells. Run the gel at 80-150 V until the dye front has migrated 75-80% down the gel. A standard run takes about 1-1.5 hours.
Data Visualization and Interpretation
Visualization: After electrophoresis, visualize the gel under an appropriate UV light source. DNA bands will fluoresce due to the intercalated dye [59] [57].
Interpretation of Results: The following diagram and guidelines will aid in accurate data interpretation.
- Sizing the Amplicon: Compare the migration distance of your PCR product band to the bands of the DNA ladder. Plot the log of the ladder's fragment sizes against their migration distance to create a standard curve, and use it to estimate the size of your unknown fragment [62] [59].
- Assessing Specificity and Yield: A successful, specific PCR reaction should yield a single, sharp band of the expected size. The brightness of the band is quantitatively informative about the amplicon concentration, with brighter bands indicating higher yield [63]. Smears or multiple bands suggest non-specific amplification or contamination.
- Identifying Common Artifacts:
- Primer Dimers: A very faint, fast-migrating band (~50-100 bp) at the bottom of the gel, caused by primer-to-primer amplification [62].
- Unexpected Plasmid Forms: If analyzing plasmid DNA, note that undigested plasmid can show multiple bands: the supercoiled (covalently closed circular, CCC) form migrates fastest, followed by the linearized form (if present), and the nicked (open circular, OC) form migrates slowest [62].
Advanced Applications and Quantitative Considerations
While primarily qualitative, agarose gel analysis can be a precise tool for quantitative assessment. Research indicates that the brightness of bands on a gel shows a strong correlation with PCR product concentration, performing with a precision sufficient for many post-PCR analyses that require concentration estimates within a certain range [63]. This makes it a viable, cost-effective alternative to spectrophotometry or fluorometry for relative quantification in many research contexts, including initial screenings in biomaterial studies.
For applications requiring absolute quantification and high sensitivity, such as detecting rare tumor DNA in liquid biopsies for drug efficacy studies, Digital PCR (dPCR) is gaining prominence. dPCR partitions a sample into thousands of individual reactions for absolute nucleic acid quantification without a standard curve, offering superior precision for low-abundance targets [64].
Troubleshooting Guide
Table 4: Common PCR and Gel Electrophoresis Issues and Solutions
| Problem | Potential Cause(s) | Recommended Solution(s) |
|---|---|---|
| No/Smeared Bands | Poor PCR amplification, degraded reagents, insufficient DNA stain. | Check reagent integrity and concentrations. Include a positive control. Ensure fresh stain is used [61]. |
| Multiple Bands | Non-specific primer binding, low annealing temperature, contaminated template. | Increase annealing temperature. Check primer design for secondary structures. Use touch-down PCR [60] [61]. |
| 'Smiling' Gel Bands | Uneven heating in the gel, usually from high voltage. | Run the gel at a lower voltage for a longer period [58]. |
| Faint Bands | Low PCR yield, insufficient DNA loaded, inactive stain. | Optimize PCR cycle number and template amount. Load at least 20 ng of DNA per band for EtBr staining (1 ng for SYBR Gold) [58]. |
| Poor Band Resolution | Incorrect agarose concentration, overloading of wells. | Use a higher % agarose gel for small fragments and a lower % for large fragments. Reduce the amount of DNA loaded per well [58] [59]. |
In biomaterial cellular response research, precise analysis of gene expression is paramount for understanding how cells interact with engineered surfaces and scaffolds. While basic PCR provides a foundation for DNA amplification, Quantitative PCR (qPCR) and Reverse-Transcription PCR (RT-PCR) have become indispensable tools for quantifying cellular responses at the genetic level. These techniques enable researchers to move beyond simple detection to precise quantification of transcriptional changes triggered by specific material properties, such as surface topography, chemical composition, and mechanical stiffness [65]. This application note details the methodologies and applications of qPCR and RT-PCR, providing structured protocols and comparative analyses tailored for research on cellular responses to biomaterials.
RT-PCR specifically enables the investigation of RNA transcripts, routinely converting RNA to more stable complementary DNA (cDNA) via reverse transcription. This conversion allows researchers to apply DNA-based techniques to study RNA, making it crucial for analyzing gene expression patterns in cells grown on various biomaterials [66]. qPCR, also known as real-time PCR, builds upon this by enabling simultaneous amplification and quantification of target DNA molecules, providing data on the actual amount of genetic material present in a sample rather than mere presence or absence [65]. The integration of these techniques into biomaterial research workflows provides powerful insights into cellular behaviors, including osteogenic differentiation, inflammatory response, and metabolic activity in response to material stimuli.
Key Applications in Biomaterial Research
The application of qPCR and RT-PCR in biomaterial science spans multiple critical areas:
- Gene Expression Profiling: Quantifying how genes are turned on or off in response to biomaterial properties provides insights into disease mechanisms, drug responses, and biological pathways. Cancer researchers, for instance, use qPCR to measure oncogene expression levels, influencing targeted therapy development [65].
- Cellular Differentiation Monitoring: In tissue engineering, tracking differentiation markers (e.g., Runx2 for osteogenesis or Sox9 for chondrogenesis) helps optimize scaffold design and culture conditions.
- Inflammatory Response Assessment: Measuring cytokine expression (e.g., IL-6, TNF-α) reveals the immunogenic potential of implant materials.
- Pathogen Detection: Ensuring sterility of implants and tissue-engineered constructs through sensitive detection of bacterial or viral contaminants [65].
- Toxicological Screening: Evaluating cytotoxicity and genotoxicity of novel biomaterials by measuring stress response genes.
Comparative Analysis of qPCR and dPCR
While qPCR remains the workhorse for most gene expression studies in biomaterial research, digital PCR (dPCR) has emerged as a complementary technology. dPCR provides absolute quantification of nucleic acids without relying on standard curves by partitioning a sample into thousands of individual reactions before amplification [64] [67]. The table below compares their key characteristics:
Table 1: Comparison between qPCR and dPCR Technologies
| Parameter | qPCR | dPCR |
|---|---|---|
| Quantification Method | Relative quantification (requires standard curve) | Absolute quantification (counting positive/negative partitions) |
| Sensitivity | High | Extremely High (detects variant allele frequencies <0.01%) [64] |
| Throughput | High | Moderate to High [67] |
| Cost per Sample | Lower | Higher (costly chips/consumables) [67] |
| Tolerance to Inhibitors | Moderate | High [67] |
| Ideal Application | High-throughput gene expression, routine diagnostics | Detection of rare targets, liquid biopsies, copy number variation [64] [67] |
For most biomaterial studies analyzing expression changes in the >1% range, qPCR offers sufficient sensitivity with greater throughput and lower cost. dPCR becomes advantageous when detecting low-abundance transcripts or subtle genetic changes in heterogeneous cell populations on engineered scaffolds [67].
Experimental Protocols
RNA Extraction from Cells on Biomaterials
Principle: Isolate high-quality RNA from cells seeded on 2D biomaterial surfaces or within 3D scaffolds, ensuring inactivation of RNases and separation from DNA, proteins, and other cellular components [68].
Protocol:
- Cell Lysis: Aspirate culture medium and wash cells with PBS. For 2D surfaces, add lysis buffer directly. For 3D scaffolds, mechanically disrupt (e.g., homogenize or grind under liquid N₂) in lysis buffer.
- Phase Separation: Transfer lysate to nuclease-free tube. Add acid-phenol:chloroform and vortex. Incubate at room temperature for 5 minutes.
- RNA Precipitation: Centrifuge at 12,000 × g for 15 minutes at 4°C. Transfer aqueous phase to new tube. Add 1 volume of 70% ethanol and mix.
- RNA Binding: Transfer solution to RNA-binding column. Centrifuge at 12,000 × g for 30 seconds. Discard flow-through.
- Wash: Add Wash Buffer 1. Centrifuge at 12,000 × g for 30 seconds. Discard flow-through. Add Wash Buffer 2. Centrifuge at 12,000 × g for 30 seconds. Discard flow-through.
- Elution: Transfer column to new collection tube. Add 30-50 µL RNase-free water directly to membrane. Centrifuge at 12,000 × g for 1 minute.
- Quality Control: Quantify RNA using spectrophotometry (A260/A280 ratio of ~2.0 is ideal) or fluorometry. Assess integrity via agarose gel electrophoresis (sharp 18S and 28S rRNA bands).
One-Step vs. Two-Step qPCR
Two main approaches exist for quantifying gene expression from RNA samples, each with distinct advantages.
One-Step qPCR combines reverse transcription and PCR amplification in a single reaction tube and mixture [66] [68]. This streamlined workflow reduces handling steps, minimizes contamination risk, and is ideal for high-throughput applications and clinical diagnostics [68]. A recent 2025 veterinary science study successfully developed a one-step qPCR assay for virus detection, demonstrating its applicability in modern diagnostics [69].
Two-Step qPCR separates reverse transcription and PCR amplification into two distinct reactions [66] [68]. This approach offers greater flexibility, as the synthesized cDNA can be stored and used for multiple PCR reactions to analyze different targets from the same RNA sample [68]. It also allows for independent optimization of each step.
Table 2: Comparison of One-Step and Two-Step qPCR Protocols
| Characteristic | One-Step qPCR | Two-Step qPCR |
|---|---|---|
| Workflow | Combined RT and PCR in single tube [68] | Separate RT and PCR reactions [68] |
| Handling Time | Shorter | Longer |
| Risk of Contamination | Lower [68] | Higher |
| Flexibility | Lower | Higher (cDNA can be used for multiple targets) [68] |
| Optimization Potential | Less flexible for troubleshooting | Individual optimization of RT and PCR steps [68] |
| RNA Input | Often uses total RNA | Often uses purified mRNA |
| Ideal For | High-throughput, single-gene studies, diagnostics [68] | Multi-target analysis, precious samples, method development [68] |
Diagram 1: Workflow comparison of One-Step vs. Two-Step qPCR.
Two-Step RT-qPCR Protocol for Biomaterial Studies
Principle: First, convert purified RNA into cDNA via reverse transcription. Then, amplify and quantify specific targets using real-time PCR [66] [68]. This is often preferred in biomaterial research for analyzing multiple genes from the same sample.
Part A: Reverse Transcription
- Prepare Reaction Mix (on ice):
- Total RNA: 10 pg–1 µg [66]
- Oligo(dT) primers (50 µM): 1 µL or Random Hexamers (50 µM): 2 µL
- RNase-free water: to 12 µL
- Denature RNA: Incubate at 65°C for 5 minutes, then immediately place on ice for 2 minutes.
- Add Master Mix:
- 5X RT Buffer: 4 µL
- dNTP Mix (10 mM each): 1 µL
- Reverse Transcriptase: 1 µL
- RNase Inhibitor: 1 µL
- Total Volume: 20 µL
- Incubate:
- If using Oligo(dT): 50°C for 45–60 minutes.
- If using Random Hexamers: 25°C for 10 minutes, then 50°C for 45–60 minutes.
- Enzyme Inactivation: 85°C for 5 minutes. Store cDNA at –20°C.
Part B: Quantitative PCR Amplification
- Prepare Reaction Mix (per reaction, on ice):
- 2X qPCR Master Mix: 10 µL
- Forward Primer (10 µM): 0.5 µL
- Reverse Primer (10 µM): 0.5 µL
- cDNA template: 2 µL (or 1–100 ng equivalent)
- Nuclease-free water: to 20 µL
- Run qPCR:
- Initial Denaturation: 95°C for 2–5 minutes
- 40 Cycles of:
- Denaturation: 95°C for 10–30 seconds
- Annealing: Primer-specific Tₘ (51–59°C) for 20–40 seconds [69]
- Extension: 72°C for 30–60 seconds (fluorescence acquisition)
- Melting Curve Analysis (if using SYBR Green):
- 95°C for 15 seconds
- 60°C for 1 minute
- Ramp to 95°C with continuous fluorescence reading
The Scientist's Toolkit
Successful implementation of qPCR and RT-PCR in biomaterial research requires specific reagents and components. The following table details essential solutions and their functions.
Table 3: Essential Research Reagent Solutions for qPCR/RT-PCR
| Reagent Solution | Function | Key Considerations |
|---|---|---|
| Reverse Transcriptase | Synthesizes cDNA from an RNA template [66]. | Critical for cDNA yield and representation; select for high efficiency, thermostability, and ability to handle challenging RNAs [66]. |
| qPCR Master Mix | Contains components for PCR amplification (DNA polymerase, dNTPs, buffer, salts) [67]. | Often includes fluorescent detection chemistry (e.g., SYBR Green or TaqMan probes). Essential for consistent, reproducible results [66]. |
| SYBR Green Dye | Binds double-stranded DNA, enabling real-time detection of amplification [69]. | Cost-effective; requires post-amplification melting curve analysis to verify specificity [69]. |
| TaqMan Probes | Sequence-specific oligonucleotides with fluorophore/quencher for highly specific target detection [69]. | Higher specificity than SYBR Green; ideal for multiplexing; more expensive [69]. |
| RNA Isolation Kit | Purifies high-quality RNA from cells/tissues, inactivating RNases [68]. | Quality of input RNA is paramount; kits optimize for yield and purity while removing contaminants [68]. |
| Nuclease-Free Water | Solvent for preparing reactions. | Prevents degradation of sensitive RNA and enzyme components. |
Workflow Visualization
The complete experimental workflow, from cell culture to data analysis, is summarized below.
Diagram 2: Overall qPCR workflow for biomaterial analysis.
Solving Common Problems: PCR and Electrophoresis Troubleshooting for Complex Samples
In the field of biomaterial and cellular response research, the polymerase chain reaction (PCR) serves as an indispensable tool for analyzing cellular outcomes, such as gene expression changes, inflammatory responses, and differentiation markers following biomaterial implantation [70] [71]. The inability to obtain amplification—a complete PCR failure—represents a significant experimental hurdle that can delay critical findings in drug development and regenerative medicine studies. This application note systematically addresses the primary causes of amplification failure and provides validated solutions framed within the context of biomaterial research, enabling researchers to efficiently troubleshoot and restore their experimental workflows.
The reliability of PCR data is particularly crucial when evaluating cellular responses to immunomodulatory biomaterials, where precise measurement of cytokine expression, macrophage polarization markers, and osteogenic differentiation factors directly informs material efficacy and safety profiles [70]. By implementing the structured troubleshooting approaches outlined herein, researchers can ensure the generation of robust, reproducible molecular data that accurately reflects biological responses to engineered biomaterials.
Root Causes and Systematic Solutions for No Amplification
Template DNA and Reaction Component Analysis
Table 1: Template DNA and Reaction Component Troubleshooting
| Problem Area | Specific Issue | Recommended Solution | Considerations for Biomaterial Research |
|---|---|---|---|
| Template Quality & Quantity | Degraded or contaminated DNA | Analyze DNA via gel electrophoresis; check 260/280 ratio; further purify template [72] | Samples from biomaterial cultures may contain more contaminants |
| Low DNA concentration | Measure concentration via spectrophotometry or fluorometry; concentrate if needed [73] | Cell numbers may be limited in biomaterial interface studies | |
| Inhibitors present in sample | Use alcohol precipitation, drop dialysis, or commercial cleanup kits [72] | Biomaterial degradation products may inhibit PCR | |
| Reaction Components | Missing reaction component | Repeat reaction setup systematically [72] | Maintain dedicated pre-PCR workspace |
| Suboptimal Mg2+ concentration | Optimize Mg2+ in 0.2-1 mM increments; mix thoroughly before use [73] [72] | Magnesium affects polymerase fidelity | |
| Insufficient enzyme or dNTPs | Increase amount of polymerase or dNTPs; prepare fresh nucleotide mixes [73] [72] | Older dNTPs may degrade | |
| Unbalanced nucleotide concentrations | Prepare fresh deoxynucleotide mixes [72] |
Primer and Thermocycling Optimization
Table 2: Primer Design and Cycling Condition Troubleshooting
| Problem Area | Specific Issue | Recommended Solution | Validation Method |
|---|---|---|---|
| Primer Design & Quality | Poor primer design | Verify primers are non-complementary; increase length; avoid GC-rich 3' ends [72] | Use multiple bioinformatics tools |
| Insufficient primer concentration | Test concentrations from 0.05-1 µM [72] | Create concentration gradient | |
| Poor primer specificity | Verify complementarity to target sequence [72] | BLAST against relevant genome | |
| Thermocycling Conditions | Incorrect annealing temperature | Calculate Tm using validated tools; test gradient 5°C below lower Tm [72] | Empirical testing is essential |
| Insufficient number of cycles | Increase cycle number; rerun reaction [72] | Balance with potential background | |
| Incorrect thermocycler programming | Verify times and temperatures; check block calibration [72] | Regular instrument maintenance |
Comprehensive Experimental Protocol for Troubleshooting PCR Failure
Systematic Workflow for Diagnosing Amplification Problems
Step-by-Step Diagnostic Procedure
Phase 1: Initial Assessment (Days 1-2)
- Template DNA Validation
- Quantify DNA concentration using spectrophotometry (260/280 ratio) or fluorometry [73]
- Run agarose gel electrophoresis to confirm DNA integrity
- If degradation is suspected, repeat extraction with fresh samples
- For samples derived from biomaterial cultures, consider additional purification steps to remove potential inhibitors [72]
- Reaction Component Verification
Phase 2: Optimization (Days 2-3)
- Primer Re-evaluation
- Recalculate primer Tm values using the NEB Tm calculator or equivalent tool [72]
- Verify that primers have no additional complementary regions within the template DNA
- Check for self-complementarity and primer-dimer potential
- If possible, redesign primers with stricter parameters for complex templates
- Cycling Parameter Adjustment
- Test an annealing temperature gradient, starting at 5°C below the lower Tm of the primer pair [72]
- Optimize extension times based on amplicon length and polymerase characteristics
- Verify thermocycler block calibration and temperature uniformity
- Increase cycle number incrementally if dealing with low-abundance targets
Phase 3: Advanced Troubleshooting (Days 3-4)
- Enzyme and Additive Optimization
The Scientist's Toolkit: Essential Research Reagents
Table 3: Key Reagents for PCR Troubleshooting in Biomaterial Research
| Reagent Category | Specific Examples | Function | Application Notes |
|---|---|---|---|
| High-Fidelity Polymerases | Q5 High-Fidelity, Phusion DNA Polymerase [72] | Reduces sequence errors; handles complex templates | Essential for amplifying targets from biomaterial-treated cells |
| Polymerase Additives | GC Enhancer, BSA, Betaine [73] [72] | Overcomes inhibition; improves amplification efficiency | Critical for problematic templates |
| Template Repair Kits | PreCR Repair Mix [72] | Fixes damaged DNA templates | Useful for archived clinical samples |
| Cleanup Kits | Monarch Spin PCR & DNA Cleanup Kit [72] | Removes inhibitors; purifies amplification products | Essential for contaminated samples |
| Specialized Buffers | Mg2+-free buffers with separate Mg2+ solutions [73] | Enables precise Mg2+ optimization | Critical for reaction fine-tuning |
Integration with Downstream Electrophoresis Analysis
Following successful PCR optimization, verification of amplification products typically involves electrophoresis analysis. While slab gel electrophoresis remains a standard method due to its cost-effectiveness and reliability for DNA fragment analysis [74], researchers analyzing multiple samples may benefit from capillary or microchip electrophoresis platforms for higher throughput [74]. For protein-based analyses of cellular responses to biomaterials—particularly when evaluating mitochondrial function in metabolic studies—blue-native and clear-native polyacrylamide gel electrophoresis (BN-PAGE/CN-PAGE) provide powerful alternatives for resolving intact protein complexes [75] [76].
The interconnection between PCR optimization and subsequent analytical techniques underscores the importance of establishing robust amplification protocols early in the experimental pipeline. Properly optimized PCR generates high-quality input material for downstream applications, whether for sequencing, cloning, or quantitative analysis, ultimately strengthening the validity of conclusions drawn in biomaterial cellular response research.
Systematic troubleshooting of PCR amplification failure is essential for advancing biomaterial and cellular response research. By methodically addressing template quality, reaction components, primer design, and cycling parameters, researchers can overcome the challenge of no amplification and generate reliable molecular data. The protocols and frameworks presented herein provide a comprehensive roadmap for diagnosing and resolving amplification failures, enabling continued progress in understanding cellular interactions with engineered biomaterials and supporting the development of novel therapeutic strategies.
Eliminating Non-Specific Bands and Smearing in Gel Electrophoresis
In biomaterial cellular response research, the integrity of molecular biology data is paramount. Polymerase chain reaction (PCR) followed by gel electrophoresis serves as a fundamental methodology for analyzing gene expression patterns, particularly when evaluating cellular responses to novel biomaterials [17]. However, the occurrence of non-specific bands and smearing on agarose gels can severely compromise data interpretation, leading to inaccurate conclusions about inflammatory markers, cell differentiation, and tissue integration processes. These artifacts represent a significant technical challenge in ensuring data reliability and reproducibility within the field [77]. This application note provides a structured framework for identifying, troubleshooting, and eliminating common electrophoresis artifacts, thereby enhancing the quality of molecular data in biomaterials research.
Background
Defining Common Electrophoresis Artifacts
Non-specific amplification in PCR refers to the amplification of non-target DNA sequences, which manifests as unexpected bands on an electrophoresis gel [77]. In the context of biomaterials research, where samples may involve complex cellular lysates or low-abundance transcripts, these artifacts can obscure critical results related to biocompatibility and biofunctionality.
- Primer Dimers: Short amplifiable units (20-60 bp) formed by two primers hybridizing together, visible as a single bright band at the bottom of the gel [77].
- PCR Smears: A continuous blur of DNA fragments of varying lengths, indicating random DNA amplification [77].
- Non-Specific Bands: Discrete bands of unexpected sizes, either smaller or larger than the target amplicon [77].
- DNA Stuck in Wells: Material that fails to migrate into the gel matrix, often due to complex formation or overload [77].
Impact on Biomaterials Research
The presence of these artifacts can significantly hinder the interpretation of results in biomaterials studies. For instance, when assessing the upregulation of osteogenic markers on bone-regenerative scaffolds or analyzing inflammatory cytokine profiles in response to implant materials, smearing or extra bands can lead to false positives or negatives, ultimately affecting the evaluation of a material's safety and efficacy [17]. Accurate PCR and gel analysis are therefore critical for drawing valid conclusions about biomaterial-host interactions.
Troubleshooting Guide: Causes and Solutions
The following section outlines a systematic approach to diagnosing and resolving the most common issues affecting gel electrophoresis results.
PCR Optimization Strategies
The quality of the final gel image is profoundly influenced by the preceding PCR steps. Optimization of the PCR reaction is the first line of defense against electrophoresis artifacts.
Table 1: Troubleshooting PCR-Based Causes of Non-Specific Bands and Smearing
| Problem | Primary Cause | Recommended Solution | Underlying Principle |
|---|---|---|---|
| Non-specific Bands | Low annealing temperature [78] | Increase annealing temperature in increments of 1-2°C. | Higher stringency promotes specific primer-template binding. |
| Excessive cycle number [78] | Keep cycles between 20-35. | Reduces amplification of late-formed, non-specific products. | |
| PCR Smear | Too much template DNA [77] [78] | Dilute template DNA 10-100x and re-amplify. | Reduces probability of non-target priming and polymerase errors. |
| Low Mg²⁺ concentration [79] | Optimize Mg²⁺ concentration (e.g., 1.5-2.5 mM). | Mg²⁺ is a essential cofactor for polymerase processivity; low levels cause incomplete synthesis [79]. | |
| High Mg²⁺ concentration [79] | Titrate Mg²⁺ to find optimal concentration. | High Mg²⁺ promotes non-specific primer binding and spurious amplification [79]. | |
| Primer Dimers | High primer concentration [77] | Reduce primer concentration. | Lowers the chance of primer-primer interactions. |
| Slow PCR setup or non-hot-start polymerase [77] | Use a hot-start polymerase and set up reactions on ice. | Prevents polymerase activity and mispriming during reaction setup. | |
| No Amplification | Low template quality/concentration [78] | Check DNA quality (A260/A280) and concentration; re-isolate if degraded. | Ensures sufficient intact template is available for amplification. |
| Low primer concentration [78] | Increase primer concentration. | Ensures adequate primer molecules for efficient amplification. |
Gel Electrophoresis Optimization
Even with a successful PCR, suboptimal gel electrophoresis conditions can generate artifacts or obscure results. The following protocols address common gel-related issues.
Table 2: Troubleshooting Gel Electrophoresis-Related Artifacts
| Problem | Primary Cause | Recommended Solution | Underlying Principle |
|---|---|---|---|
| Smeared Bands | Gel overloading [80] | Load 0.1–0.2 μg of DNA per mm of well width. | Prevents over-saturation of the gel matrix, which causes trailing. |
| Incorrect gel type [80] | Use denaturing gels for RNA; native gels for dsDNA. | Prevents secondary structure formation that alters mobility. | |
| Voltage too high or low [80] | Apply recommended voltage for gel type and size. | Optimal voltage ensures proper separation without overheating. | |
| Faint Bands | Low quantity of sample [80] | Concentrate sample or use a comb with deep, narrow wells. | Increases signal intensity for visualization. |
| High background stain [80] | Destain gel or use a stain with low intrinsic fluorescence. | Improves signal-to-noise ratio. | |
| Poorly Separated Bands | Incorrect gel percentage [80] | Use higher % agarose for smaller fragments. | Creates a tighter matrix for better size resolution. |
| Insufficient run time [80] | Run gel longer to improve separation. | Allows adequate time for fragments to separate by size. | |
| DNA Stuck in Well | Carryover of proteins/genomic DNA [77] | Dilute DNA extract or improve extraction protocol. | Removes contaminants that can form complexes too large to enter the gel. |
| Well damage during loading [80] | Avoid puncturing wells with pipette tip. | Ensures intact wells for clean sample entry. |
Detailed Experimental Protocols
Protocol 1: Standard Agarose Gel Electrophoresis for PCR Product Analysis
This protocol is designed for the clear separation and visualization of DNA fragments between 100 bp and 3 kbp, typical for many gene expression analyses in biomaterial studies.
Materials & Reagents:
- UltraPure Agarose (e.g., Invitrogen) [81]
- 1x TAE or TBE Buffer
- DNA Staining Dye (e.g., SYBR Safe, Ethidium Bromide) [82]
- DNA Molecular Weight Ladder
- 6x Gel Loading Dye (e.g., Purple Gel Loading Dye, NEB) [81]
- Electrophoresis Tank and Power Supply
Procedure:
- Gel Preparation: Prepare a 1-2% agarose solution by dissolving the agarose in 1x TAE buffer by heating in a microwave. Allow the solution to cool to ~60°C before adding the nucleic acid stain (e.g., SYBR Safe) as per manufacturer's instructions. Pour the gel into a casting tray with a well comb and allow it to solidify completely [80].
- Sample Preparation: Mix 5-10 μL of PCR product with 1/5 volume of 6x loading dye.
- Electrophoresis: Submerge the solidified gel in the electrophoresis tank filled with 1x TAE buffer. Carefully remove the comb. Load the prepared samples and an appropriate DNA ladder into the wells. Run the gel at 5-8 V/cm (distance between electrodes) until the dye front has migrated ⅔ to ¾ of the gel length [80].
- Visualization: Image the gel using a gel documentation system with the appropriate excitation source and filters for your stain [82].
Protocol 2: Hot-Start PCR for High-Specificity Amplification
This protocol is critical for minimizing non-specific amplification and primer-dimer formation, especially when analyzing complex cDNA samples from cells cultured on biomaterials.
Materials & Reagents:
- Hot-Start DNA Polymerase (e.g., Taq HS)
- 10x Reaction Buffer (often supplied with polymerase)
- 10 mM dNTP Mix
- Forward and Reverse Primers (10 μM each)
- Template DNA (10-100 ng)
- Nuclease-Free Water
Procedure:
- Reaction Setup: Assemble the following reaction mix on ice:
- 5.0 μL: 10x Hot-Start Reaction Buffer
- 4.0 μL: dNTP Mix (10 mM)
- 2.0 μL: Forward Primer (10 μM)
- 2.0 μL: Reverse Primer (10 μM)
- 1.0 μL: Hot-Start DNA Polymerase (1 U/μL)
- 1.0 μL: Template DNA
- 35.0 μL: Nuclease-Free Water
- Total Volume: 50.0 μL
- Thermal Cycling: Place the tubes in a pre-heated thermal cycler and run the following program:
- Initial Denaturation: 95°C for 2-5 minutes (activates hot-start polymerase).
- Amplification (25-35 cycles):
- Denature: 95°C for 30 seconds.
- Anneal: Primer-specific Tm for 30 seconds (start 5°C below Tm and optimize).
- Extend: 72°C for 1 minute per kb.
- Final Extension: 72°C for 5-10 minutes.
- Hold: 4°C.
- Analysis: Analyze 5-10 μL of the PCR product by gel electrophoresis as described in Protocol 1.
The Scientist's Toolkit: Essential Reagents
Table 3: Key Research Reagent Solutions for Optimized PCR and Electrophoresis
| Reagent | Function | Application Note |
|---|---|---|
| Hot-Start Polymerase | DNA polymerase inhibited at low temperatures, activated by initial heat denaturation. | Crucial for preventing non-specific priming and primer-dimer formation during reaction setup [77]. |
| SYBR Safe DNA Gel Stain | Fluorescent dye that binds DNA; excited by blue light. | A safer alternative to ethidium bromide, with similar sensitivity [82]. |
| UltraPure Agarose | Highly purified polysaccharide for gel matrix formation. | Provides low background fluorescence and consistent gel porosity for clear band resolution [81]. |
| MgCl₂ Solution | Source of Mg²⁺ ions, a essential cofactor for DNA polymerase. | Concentration must be optimized; too little causes smearing, too much causes non-specific bands [79]. |
| QIAquick Gel Extraction Kit | Silica-membrane technology for purifying DNA fragments from agarose gels. | Used to clean up PCR products before downstream applications like sequencing [81]. |
Visual Workflows
Systematic Troubleshooting Strategy
The following diagram outlines a logical decision-making process for diagnosing and resolving the most common gel artifacts.
PCR Optimization to Prevent Artifacts
This workflow illustrates key optimization steps during PCR setup and cycling to prevent non-specific amplification from occurring.
Achieving clean, interpretable gel electrophoresis results is a critical step in validating PCR-based assays for biomaterial cellular response research. By systematically addressing the root causes of non-specific bands and smearing—through careful optimization of PCR components, thermal cycling parameters, and electrophoresis conditions—researchers can significantly enhance the reliability of their data. The protocols and troubleshooting guides provided here offer a practical framework for diagnosing and resolving these common issues, thereby supporting the generation of high-quality molecular evidence essential for advancing the development of safe and effective biomaterials.
Within research on biomaterial cellular responses, the accurate profiling of cellular gene expression is fundamental. Polymerase chain reaction (PCR) is a cornerstone technique for this analysis. However, successful amplification is often compromised by two significant challenges: templates with high guanine-cytosine (GC) content and targets present in low abundance. High GC content promotes stable secondary structures that impede polymerase progression, while low abundance targets are susceptible to amplification failure and false positives from contaminating DNA. This application note provides detailed, actionable protocols to overcome these challenges, ensuring reliable and reproducible results in biomaterial research and drug development.
Understanding the Challenges
The High GC Content Problem
A DNA template is considered GC-rich when over 60% of its bases are guanine or cytosine [83]. The three hydrogen bonds of GC base pairs confer higher thermodynamic stability compared to the two bonds in AT pairs. This stability leads to two primary issues:
- Resisted Denaturation: DNA strands may not separate completely during the standard denaturation step, preventing primer annealing [83].
- Formation of Secondary Structures: GC-rich regions readily fold into stable intramolecular structures, such as hairpins and G-quadruplexes, which cause DNA polymerases to stall during elongation [83].
These challenges manifest experimentally as complete amplification failure, nonspecific amplification (e.g., smearing on a gel), or significantly reduced yield.
The Low Abundance Target Problem
Amplifying rare targets, such as transcripts from a small number of cells on a biomaterial surface, presents a different set of obstacles:
- Stochastic Amplification: At the single-copy level, some reactions may by chance contain no template molecules, leading to false negatives [84].
- Background DNA Contamination: Commercially available PCR enzymes and reagents are frequently contaminated with trace bacterial DNA, which can be co-amplified in broad-range PCR assays, generating false-positive results that obscure the true signal [85].
- Competition from Host DNA: In host-associated microbiota studies, the bacterial DNA target can be vastly outnumbered by host eukaryotic DNA, further reducing amplification efficiency [86].
Optimizing PCR for GC-Rich Templates
Optimizing for GC-rich templates requires a multi-faceted approach involving specialized reagents, buffer additives, and cycling parameter adjustments.
Reagent and Additive Optimization
The choice of DNA polymerase and reaction buffer is the most critical factor for successful amplification of GC-rich templates.
Table 1: Reagent Optimization for GC-Rich PCR
| Optimization Factor | Recommendation | Mechanism of Action |
|---|---|---|
| Polymerase Selection | Use polymerases specifically designed for GC-rich templates (e.g., OneTaq or Q5 High-Fidelity) [83]. | These enzymes are more proficient at navigating through complex secondary structures. |
| GC Enhancers | Incorporate a proprietary GC Enhancer or additives like betaine (1–1.3 M) or DMSO (1–10%) [83]. | These additives destabilize secondary structures by reducing the melting temperature of GC base pairs, facilitating strand separation. |
| Mg²⁺ Concentration | Optimize MgCl₂ concentration using a gradient from 1.0 mM to 4.0 mM in 0.5 mM increments [83]. | Mg²⁺ is a essential cofactor for polymerase activity; its optimal concentration is template-specific and influences enzyme processivity and fidelity. |
Protocol: Amplification of a GC-Rich Target
The following protocol is adapted for using Q5 High-Fidelity DNA Polymerase and its GC Enhancer [83].
Reaction Setup:
- Assemble the following components on ice:
- 1X Q5 Reaction Buffer
- 1X Q5 High GC Enhancer
- 200 µM of each dNTP
- 0.5 µM each of forward and reverse primer
- 10–50 ng of genomic DNA template
- 0.02 U/µL Q5 High-Fidelity DNA Polymerase
- Adjust the total volume to 50 µL with nuclease-free water.
- Assemble the following components on ice:
Thermal Cycling:
- Initial Denaturation: 98°C for 30 seconds.
- Amplification (35 cycles):
- Denaturation: 98°C for 5–10 seconds.
- Annealing: Calculate the primer Tm using the NEB Tm Calculator (selecting the Q5 polymerase setting) and use this temperature for 10–30 seconds. A temperature gradient is recommended for initial optimization.
- Extension: 72°C for 20–30 seconds per kb.
- Final Extension: 72°C for 2 minutes.
- Hold at 4°C.
Analysis: Analyze 5 µL of the PCR product by agarose gel electrophoresis.
Workflow for GC-Rich PCR Optimization
The following diagram illustrates the logical, step-wise strategy for troubleshooting a failed GC-rich PCR.
Optimizing PCR for Low Abundance Targets
Sensitivity and specificity are paramount when detecting low copy number targets. Strategies focus on maximizing signal-to-noise ratio and minimizing the impact of contamination.
Strategies for Enhanced Sensitivity and Specificity
Table 2: Optimization Strategies for Low Abundance Targets
| Strategy | Description | Application |
|---|---|---|
| Nested PCR | A two-step amplification using two primer sets. The first PCR (with "outer" primers) amplifies a larger region, which serves as the template for a second PCR (with "inner" primers) that bind within the first product [86]. | Dramatically increases sensitivity and specificity for targets in complex backgrounds (e.g., host-associated microbiota) [86]. |
| Hot-Start DNA Polymerase | Uses an enzyme that is inactive at room temperature, preventing nonspecific amplification and primer-dimer formation during reaction setup [87]. | Essential for all low-copy-number PCR to improve specificity and yield. |
| Primer Extension PCR (PE-PCR) | A strategy that uses a fusion probe to tag the genuine template with a non-bacterial sequence prior to PCR, allowing its selective amplification over contaminating bacterial DNA in reagents [85]. | Ideal for broad-range bacterial detection (e.g., 16S rRNA PCR) where reagent contamination is a major concern [85]. |
Protocol: Nested PCR for Low Abundance Bacterial DNA
This protocol is designed to detect bacterial targets present in low concentrations or within a high-background of host DNA, such as in samples derived from biomaterial-implant interfaces [86].
First PCR Round (Outer Amplification):
- Reaction Mix: Prepare a 25 µL reaction containing:
- 1X appropriate PCR Master Mix (e.g., OneTaq 2X Master Mix)
- 0.4 µM each of the outer forward and reverse primers (e.g., rpoB_F/R [86])
- 5 µL of extracted sample DNA.
- Cycling Conditions:
- Initial Denaturation: 94°C for 2 min.
- 25 cycles of:
- Denaturation: 94°C for 30 s
- Annealing: [Primer-specific Tm] for 30 s
- Extension: 72°C for 1 min
- Final Extension: 72°C for 5 min.
- Reaction Mix: Prepare a 25 µL reaction containing:
Second PCR Round (Inner Amplification):
- Reaction Mix: Prepare a 50 µL reaction containing:
- 1X appropriate PCR Master Mix
- 0.4 µM each of the inner forward and reverse primers (e.g., UnirpoBdeg_F/R with Illumina adapters [86])
- 1–2 µL of a 1:50 dilution of the first-round PCR product as template.
- Cycling Conditions:
- Initial Denaturation: 94°C for 2 min.
- 15–25 cycles of:
- Denaturation: 94°C for 30 s
- Annealing: [Primer-specific Tm] for 30 s
- Extension: 72°C for 1 min
- Final Extension: 72°C for 5 min.
- Reaction Mix: Prepare a 50 µL reaction containing:
Critical Note: The total number of cycles (PCR1 + PCR2) should be optimized to avoid nonspecific amplification. Using separate, physically isolated workstations for pre- and post-PCR steps is crucial to prevent cross-contamination.
Workflow for Nested PCR
The nested PCR process for enhancing detection of low-abundance targets is summarized in the workflow below.
The Scientist's Toolkit: Research Reagent Solutions
The following table catalogs essential reagents and their specific functions in optimizing PCR for challenging templates.
Table 3: Key Research Reagent Solutions
| Reagent / Kit | Specific Function | Key Characteristic / Application |
|---|---|---|
| Q5 High-Fidelity DNA Polymerase (NEB) | High-fidelity amplification of difficult amplicons, including GC-rich sequences [83]. | >280x fidelity of Taq; supplied with a GC Enhancer to amplify up to 80% GC content [83]. |
| OneTaq DNA Polymerase with GC Buffer (NEB) | Robust amplification of a wide range of templates, including GC-rich targets [83]. | Ideal for routine and GC-rich PCR; can be supplemented with a High GC Enhancer [83]. |
| Luna Universal qPCR Master Mix (NEB) | Sensitive and specific qPCR detection [84]. | Includes a universal passive reference dye and is compatible with hot-start, room-temperature setup. |
| M-MLV Reverse Transcriptase, RNase H– (e.g., Promega GoScript) | Generation of first-strand cDNA from RNA templates, crucial for gene expression studies in cellular response [88]. | Lack of RNase H activity allows synthesis of longer cDNAs; higher thermostability improves performance on structured RNAs [88]. |
| dNTPs | Building blocks for DNA synthesis. | Use high-quality dNTPs at standard concentrations (200–250 µM each) to ensure high yield and fidelity. |
| Hot-Start Taq DNA Polymerase | Prevention of nonspecific amplification during reaction setup [87]. | Activated only at high temperatures; critical for low-abundance target detection and high-throughput setups [87]. |
Concluding Remarks
The successful application of PCR in advanced biomaterial research hinges on the ability to reliably amplify challenging templates. As detailed in this note, overcoming the hurdles of high GC content and low target abundance is not a matter of a single solution but a systematic process. This involves the strategic selection of DNA polymerases, intelligent use of buffer additives and enhancers, meticulous optimization of cycling parameters, and the implementation of powerful nested or primer extension protocols. By adopting these optimized application notes and protocols, researchers and drug development professionals can achieve the robust, reproducible, and sensitive data required to accurately decipher complex cellular responses to novel biomaterials.
In biomaterial cellular response research, the integrity of polymerase chain reaction (PCR) data is paramount. Contamination from previously amplified DNA fragments, environmental sources, or cross-sample carryover represents one of the most significant threats to experimental validity, potentially leading to false-positive results and erroneous conclusions in gene expression analysis [89] [90]. Establishing and maintaining a rigorously controlled pre-PCR work area is not merely a recommendation but a fundamental requirement for generating reliable, reproducible data. This application note details evidence-based protocols and best practices to combat contamination, ensuring the highest quality outcomes for researchers and drug development professionals.
The extreme sensitivity of PCR and quantitative PCR (qPCR), which enables the amplification of a few DNA molecules into millions of copies, is also its greatest vulnerability [89]. Trace amounts of contaminating DNA, such as aerosolized amplicons from post-PCR processes or foreign nucleic acids introduced via reagents or equipment, can be readily amplified, compromising results [90]. In the context of biomaterial cellular response research, where subtle changes in gene expression are often quantified, contamination can obscure true biological signals, invalidate costly experiments, and derail drug development pipelines. Adherence to Good Laboratory Practice (GLP) and the implementation of a systematic, unidirectional workflow are therefore non-negotiable for any laboratory performing molecular diagnostics [90].
Establishing the Physical Workspace
The foundation of contamination control is the physical separation of laboratory processes. A unidirectional workflow from "clean" to "dirty" areas must be enforced to prevent amplicon carryover into pre-PCR reactions [89] [90].
Work Area Segregation
Ideally, dedicated rooms should be established for different stages of the PCR workflow. Where separate rooms are not feasible, physically separated areas within a single laboratory must be designated with clear demarcations.
- Master Mix Preparation Area: This should be the cleanest zone, exclusively for the preparation of amplification reagents. It must never be exposed to DNA templates or amplified products [90].
- Nucleic Acid Extraction and Template Addition Area: A separate area is required for extracting nucleic acids from biomaterial samples and for adding the extracted template to the prepared master mixes [90].
- Amplification Area: Thermocyclers and real-time PCR instruments should be housed in a dedicated post-PCR area.
- Product Analysis Area: Equipment for gel electrophoresis, UV transilluminators, and gel documentation systems must be confined to a separate post-PCR room [90].
All four areas require separate sets of equipment, including pipettes, tip boxes, tube racks, centrifuges, vortexers, lab coats, gloves, and waste containers [89] [90]. Movement of staff and equipment from post-PCR to pre-PCR areas on the same day should be prohibited. If unavoidable, personnel must thoroughly wash hands, change lab coats and gloves, and any equipment must be rigorously decontaminated before re-entering a clean area [89] [90].
Workflow Visualization
The following diagram illustrates the critical unidirectional workflow necessary to maintain a contamination-free pre-PCR environment.
Protocols for Decontamination and Cleaning
Regular and thorough decontamination of surfaces and equipment is essential. The table below summarizes the recommended agents and protocols for different contexts.
Table 1: Decontamination Agents and Protocols for the Pre-PCR Area
| Decontamination Agent | Concentration | Contact Time | Primary Use & Notes |
|---|---|---|---|
| Sodium Hypochlorite (Bleach) | 10-15% solution [89] | Minimum 10 minutes [90] | Surface decontamination. Highly effective for destroying DNA contaminants. Must be made fresh daily. Wipe down with sterile water after contact time to remove residue [89] [90]. |
| Ethanol | 70% solution [89] [90] | Until evaporated | Routine surface cleaning. Removes grime but does not fully destroy DNA. Often used before UV irradiation or for quick wipes [90]. |
| Commercial DNA-Destroying Reagents | As per manufacturer | As per manufacturer | Alternative surface/equipment decontamination. Use if bleach is unsuitable for the material or per safety guidelines [90]. |
| Ultraviolet (UV) Irradiation | N/A | 30 minutes [90] | Decontamination of closed spaces (e.g., laminar flow cabinets). Effective on surfaces pre-cleaned with ethanol. Do not expose reagents to UV [90]. |
Detailed Protocol: Routine Cleaning of the Pre-PCR Work Area
Objective: To eliminate nucleic acid contamination from all surfaces and equipment in the master mix preparation and template addition areas.
Materials:
- Freshly prepared 10% bleach solution
- 70% ethanol solution
- DNA-decontaminating solution (commercial alternative)
- UV lamp (if available in a safety cabinet or closed hood)
- Disposable, lint-free wipes
- Powder-free gloves
- Lab coat dedicated to the pre-PCR area
Procedure:
- Preparation: Put on a dedicated lab coat and fresh gloves. Ensure all reagents and consumables are stored away from the surfaces to be cleaned.
- Initial Decontamination: Liberally apply the 10% bleach solution to all work surfaces, including the bench, the interior of laminar flow hoods, and the external surfaces of equipment (e.g., centrifuges, vortexers). Ensure a minimum contact time of 10 minutes [90].
- Rinsing (if using bleach): After the contact time, use a wipe soaked in sterile water to remove any residual bleach from the surfaces to prevent corrosion [89] [90].
- Secondary Cleaning (Alternative): If bleach cannot be used, wipe all surfaces thoroughly with a commercial DNA-decontaminating solution according to the manufacturer's instructions.
- Ethanol Wipe: Wipe all surfaces with 70% ethanol to remove any remaining residue and speed drying.
- UV Decontamination: If a UV lamp is fitted in a safety cabinet or closed hood, expose the cleaned interior to UV light for 30 minutes to complete the decontamination process [90].
- Equipment Cleaning: Dedicated pre-PCR pipettes should be autoclaved regularly if the manufacturer permits. If not, wipe them down with 70% ethanol followed by UV exposure, or use a commercial DNA-decontaminant [90].
Personal Best Practices and Reagent Handling
Human activity is a primary vector for contamination. Vigilant personal practice is crucial.
Personal Protective Equipment (PPE) and Behavior
- Always wear a dedicated lab coat and powder-free gloves in the pre-PCR area [90].
- Change gloves frequently, especially after touching potentially contaminated surfaces, skin, or hair, and whenever moving between pre- and post-PCR areas [89] [90].
- Open tubes carefully and slowly to avoid splashing or aerosol generation. Centrifuge tubes briefly before opening to collect contents at the bottom [90] [91].
- Keep reaction tubes capped or covered as much as possible [89].
Reagent and Sample Management
- Aliquot all reagents (primers, probes, dNTPs, enzymes, water) into single-use volumes to prevent repeated freeze-thaw cycles and avoid contaminating master stocks [89] [90].
- Use aerosol-resistant filter pipette tips for all liquid handling to prevent cross-contamination via pipettors [90].
- Prepare a master mix of common reagents whenever possible to minimize the number of individual pipetting steps [90] [91].
- Store pre-PCR reagents and samples separately from post-PCR amplification products [89].
The Scientist's Toolkit: Essential Research Reagent Solutions
The following table details key reagents and materials critical for establishing and maintaining a contamination-controlled pre-PCR workflow.
Table 2: Essential Materials for a Contamination-Controlled Pre-PCR Laboratory
| Item | Function & Importance |
|---|---|
| Aerosol-Resistant Filter Pipette Tips | Prevents aerosols and liquids from entering the pipette shaft, thereby protecting the instrument from becoming a source of cross-contamination [90]. |
| Molecular Biology Grade Water | A pure, nuclease-free water source used for preparing reagents and master mixes. Prevents introduction of nucleases that could degrade reactions [90]. |
| Hot-Start DNA Polymerase | Reduces non-specific amplification and primer-dimer formation by requiring a heat activation step. This improves assay specificity and sensitivity, reducing potential background [90]. |
| Uracil-N-Glycosylase (UNG) | An enzymatic system to prevent carryover contamination. When used with dUTP in place of dTTP in PCR mixes, UNG selectively degrades uracil-containing amplicons from previous reactions before thermocycling begins, inactivating common contaminants [89]. |
| No-Template Control (NTC) | A critical quality control. Contains all reaction components except the DNA template. Amplification in the NTC indicates contamination of reagents or the environment [89]. |
| Positive & Negative Extraction Controls | Included during nucleic acid extraction to monitor the efficiency of the extraction process and to detect any potential contamination introduced during this step [90]. |
| Fresh Sodium Hypochlorite (Bleach) | The cornerstone of surface decontamination for destroying contaminating DNA. A 10% solution must be made fresh daily to ensure efficacy [89] [90]. |
Quality Control and Contamination Monitoring
Proactive monitoring is essential to confirm the efficacy of your contamination control strategies.
Utilizing Controls in Every Run
- No-Template Controls (NTCs): Must be included in every qPCR run. The absence of amplification in the NTC wells confirms that reagents are free of target sequence contamination. If amplification occurs, the pattern (e.g., consistent Ct across wells vs. random Ct values) can help identify the source [89].
- Positive Controls: Used to verify that the PCR reaction is functioning correctly. The positive control should be a weak, well-characterized sample to minimize its own contamination risk [90].
- Extraction Controls: A negative control (e.g., water) taken through the nucleic acid extraction process monitors for contamination during sample preparation [90].
Responding to Contamination
If contamination is detected via NTCs:
- Replace all suspect reagents, particularly water and master mix aliquots.
- Re-decontaminate the entire pre-PCR area and all equipment using the protocols in Section 3.
- Review laboratory practices to ensure unidirectional workflow is being strictly followed and that no breaches in PPE or reagent handling have occurred.
Maintaining a clean pre-PCR work area is a disciplined, systematic process integral to the success of biomaterial cellular response research. By implementing physical segregation, enforcing strict decontamination protocols, adhering to meticulous personal practices, and employing robust quality controls, researchers can shield their sensitive PCR assays from contamination. This vigilant approach safeguards the integrity of genetic data, ensures the reliability of experimental conclusions, and ultimately supports the advancement of robust scientific and drug development outcomes.
In the realm of molecular biology, particularly within biomaterial cellular response research, the polymerase chain reaction (PCR) is an indispensable tool for analyzing gene expression, cytokine profiles, and cellular differentiation markers. However, the accuracy of this technique can be compromised by challenges such as inhibitory substances co-extracted from complex biomaterial matrices, high GC-content sequences in mammalian genes, and general assay inefficiencies. The strategic use of PCR additives, including Dimethyl Sulfoxide (DMSO), Bovine Serum Albumin (BSA), and Betaine, provides a robust approach to overcome these hurdles. These compounds enhance PCR by mitigating inhibition, stabilizing enzymes, and homogenizing DNA melting temperatures, thereby ensuring the generation of accurate and reproducible data essential for evaluating cellular responses to novel biomaterials. This article details the mechanisms, optimized protocols, and practical applications of these additives, providing a framework for their implementation in advanced biomedical research.
Mechanisms of Action
PCR enhancers function through distinct biochemical mechanisms to facilitate the amplification of difficult templates. The interplay of these mechanisms can be visualized in the following pathway, which outlines how each additive counters specific PCR challenges.
DMSO (Dimethyl Sulfoxide)
DMSO enhances PCR primarily by reducing the secondary structural stability of DNA. It interacts with water molecules surrounding the DNA strand, reducing hydrogen bonding and thereby lowering the melting temperature (Tm) of the DNA. This action facilitates the unraveling of GC-rich sequences that would otherwise form stable secondary structures, hindering primer binding and polymerase progression [92]. However, DMSO also slightly reduces Taq polymerase activity, necessitating careful concentration optimization to balance its template-destabilizing benefits with its enzymatic drawbacks [92].
Betaine
Betaine (also known as trimethylglycine) is an osmoprotectant that homogenizes the thermodynamic stability of DNA. It equalizes the melting temperature differences between GC-rich and AT-rich regions by eliminating the base composition dependence of DNA melting. This is particularly useful for amplifying high-GC content templates, as it prevents the formation of secondary structures and hairpins that block polymerase activity [93] [94]. Its mechanism is distinct from DMSO, and in some cases, it can rescue reactions that fail even with DMSO [95].
BSA (Bovine Serum Albumin)
BSA acts as a multi-functional stabilizer. Its primary role is to bind and sequester PCR inhibitors commonly found in complex samples, such as phenolic compounds, humic acids, and tannins, preventing them from interacting with and inhibiting the DNA polymerase [96] [97]. Furthermore, BSA acts as a protein chaperone, stabilizing the DNA polymerase enzyme under high-temperature conditions, thereby preserving its activity throughout the thermal cycling process [96]. Notably, BSA can exhibit synergistic effects when combined with organic solvents like DMSO, further boosting PCR yields [98].
Comparative Data of PCR Additives
The effective use of PCR additives requires an understanding of their optimal concentrations and primary applications. The table below provides a comparative summary of DMSO, BSA, and Betaine.
Table 1: Comparative Overview of PCR Additives
| Additive | Common Working Concentration | Primary Mechanism | Main Application Context | Key Considerations |
|---|---|---|---|---|
| DMSO | 2 - 10% [94] [92] | Lowers DNA Tm; disrupts secondary structures [92] | Amplification of GC-rich templates (>65% GC) [94] | Reduces Taq polymerase activity; requires concentration titration [92] |
| Betaine | 1 - 2 M [94] [95] | Homogenizes DNA thermal stability; equalizes GC/AT melting [93] | GC-rich templates; long-range PCR [94] | Can be inhibitory in some reactions; may not combine well with DMSO [95] [93] |
| BSA | 0.1 - 0.8 mg/mL [96] | Binds inhibitors (phenolics, humics); stabilizes polymerase [97] [96] | Complex samples (e.g., wastewater, plant, blood); inhibitor-rich matrices [97] [98] | Effective alone and as a co-enhancer with DMSO or formamide [98] |
| Formamide | 1 - 5% [92] | Reduces DNA Tm; binds DNA grooves [97] [92] | Can enhance specificity [97] | Effective concentration range is narrow [97] |
| TMAC | 15 - 100 mM [92] | Increases hybridization specificity; shields electrostatic repulsion [99] [92] | Reduction of non-specific amplification; use with degenerate primers [92] | Primarily improves specificity, not yield [99] |
Quantitative data from recent studies underscores the efficacy of these additives. One systematic evaluation found that BSA significantly improved viral load measurements from inhibitor-rich wastewater samples, while other enhancers like Tween-20 and glycerol showed minimal effects [97]. In plant research, adding 5% DMSO increased the PCR success rate for the challenging ITS2 DNA barcode from 42% to 91.6%, and betaine could rescue the single remaining failed reaction [95]. Furthermore, research has demonstrated that BSA acts as a powerful co-enhancer; when added with DMSO, it produces a significant increase in the yield of GC-rich amplicons across a broad size range, from 0.4 kb to 7.1 kb [98].
Application Protocols
Protocol 1: Combating Inhibition in Complex Samples Using BSA
Objective: To reliably amplify target DNA from samples containing PCR inhibitors, such as those extracted from biomaterials, wastewater, or plant tissues. Background: Complex matrices can introduce inhibitors that bind to or degrade polymerase enzymes, leading to false negatives or an underestimation of target concentration [97].
Materials:
- Research Reagent Solutions:
- BSA Solution: Molecular biology grade, acetylated BSA (e.g., 10 mg/mL stock).
- PCR Master Mix: Contains buffer, dNTPs, MgCl₂, and a inhibitor-tolerant DNA polymerase.
- Template DNA: Extracted from the complex sample (e.g., biomaterial-cell lysate).
- Primers: Specific to the target gene.
Method:
- Prepare a 2X concentrated PCR master mix, omitting BSA and template DNA.
- In a 0.2 mL PCR tube, create the reaction mixture as follows:
- 10 μL of 2X PCR Master Mix
- Forward and Reverse Primer (to final concentration, e.g., 0.5 μM each)
- BSA (from 10 mg/mL stock) to a final concentration of 0.8 mg/mL [96]
- Template DNA (e.g., 1-5 μL, depending on concentration)
- Nuclease-free water to a final volume of 20 μL
- Gently mix and briefly centrifuge the reactions.
- Run the PCR using the optimized thermal cycling conditions for your target.
- Critical Step: Include a control reaction without BSA to assess the degree of enhancement.
Troubleshooting: If inhibition persists, consider a 10-fold dilution of the template DNA or combining BSA with a low concentration (e.g., 2.5%) of DMSO, as synergistic effects have been reported [98].
Protocol 2: Amplifying GC-Rich Targets with DMSO and Betaine
Objective: To achieve efficient and specific amplification of DNA templates with high GC content (>65%). Background: GC-rich sequences form stable secondary structures that impede polymerase progression. DMSO and betaine work via different mechanisms to destabilize these structures [94] [92].
Materials:
- Research Reagent Solutions:
- DMSO: Molecular biology grade.
- Betaine Solution: 5M stock, molecular biology grade.
- High-Fidelity PCR Master Mix: Designed for GC-rich templates.
- Template DNA: GC-rich target.
Method:
- Initial Setup: It is generally not recommended to use DMSO and betaine simultaneously, as they can be antagonistic [95] [93]. A tiered approach is advised.
- Tier 1 - DMSO: Set up a PCR reaction with a final concentration of 5% DMSO [95]. Use a thermal cycler with a gradient function to optimize the annealing temperature.
- Tier 2 - Betaine: If amplification with DMSO fails, set up a new reaction substituting DMSO with Betaine at a final concentration of 1 M [95] [94].
- Thermal Cycling: For betaine-containing reactions, a slightly higher denaturation temperature (e.g., 98°C) may be beneficial for particularly stubborn secondary structures.
Troubleshooting: If non-specific amplification occurs with DMSO, titrate its concentration downwards in 1% increments. If betaine alone is ineffective, consider using a commercial PCR buffer specifically formulated for GC-rich templates, which often contains a proprietary blend of enhancing agents.
The Scientist's Toolkit: Research Reagent Solutions
Table 2: Essential Reagents for Enhanced PCR Protocols
| Reagent | Function | Storage | Quality & Safety Notes |
|---|---|---|---|
| DMSO (Molecular Grade) | Additive for GC-rich templates; disrupts secondary structure [92] | Room Temp; anhydrous | Use high purity to avoid contaminants. Handle with gloves. |
| BSA (Acetylated, Molecular Grade) | Stabilizer; binds inhibitors in complex samples [96] [97] | -20°C | Acetylated BSA is preferred to avoid enzyme contamination. |
| Betaine (Monohydrate, Molecular Grade) | Additive for GC-rich templates; homogenizes DNA stability [92] | 4°C | Use betaine monohydrate, not hydrochloride, to avoid pH shifts [92]. |
| Inhibitor-Tolerant DNA Polymerase | Enzyme resistant to common PCR inhibitors | -20°C | Select based on sample type (e.g., for direct blood or soil PCR). |
| dNTP Mix | Building blocks for DNA synthesis | -20°C | Neutralize pH to 8.0-8.5 and aliquot to prevent freeze-thaw degradation. |
| MgCl₂ Solution | Essential cofactor for DNA polymerase activity | Room Temp | Concentration is critical; optimize between 1.0-4.0 mM [94]. |
The strategic application of DMSO, BSA, and betaine provides a powerful, cost-effective means to overcome pervasive challenges in PCR, enabling reliable genetic analysis in advanced biomaterial research. DMSO and betaine address the fundamental biophysical constraints of amplifying complex, GC-rich DNA templates, while BSA effectively neutralizes the inhibitory effects of complex biological matrices. By following the detailed protocols and mechanistic insights provided in this article, researchers can systematically troubleshoot and optimize their PCR assays. The integration of these robust enhancement strategies ensures the generation of high-fidelity, reproducible data, which is fundamental to elucidating the intricate cellular responses to novel biomaterials and driving progress in therapeutic development.
Ensuring Data Accuracy: Validation, Quality Control, and Advanced Techniques
In biomaterials research, particularly in studies investigating cellular responses via molecular biology techniques, the integrity of experimental data is paramount. Controls are not merely procedural steps; they are fundamental components that validate the entire experimental setup. They ensure that the observed effects—such as changes in gene expression or protein levels—are genuinely due to the interaction between the cells and the biomaterial and not a result of experimental artifacts or variability [100]. Within the context of a thesis utilizing PCR and electrophoresis, implementing robust controls transforms speculative results into defensible, publishable scientific findings by verifying that the instrumentation, reagents, and procedures functioned as intended [100].
This application note provides a detailed framework for integrating positive and negative controls into biomaterial studies, with a specific focus on protocols for PCR and Western blotting.
The Critical Controls: Definitions and Purpose
Positive Controls
A positive control is a sample treated in a known way to produce an expected positive result. Its primary purpose is to confirm that the experimental system is capable of producing results under the current conditions. A successful positive control verifies that the procedure is working correctly, the reagents are functional, and the detection system is operational [100].
Negative Controls
A negative control, conversely, is a sample that undergoes the same experimental process but is not expected to produce the target effect. This control is crucial for identifying any background signal, nonspecific binding, or contamination that could lead to false positive results. It demonstrates that the changes observed in the experimental samples are specific to the variable being tested [100].
Table 1: Overview of Core Control Types in Biomaterial Research
| Control Type | Purpose | Example in Biomaterial PCR | Example in Western Blot |
|---|---|---|---|
| Positive Control | Verifies experimental system is working | Cells with known high expression of the target gene (e.g., an osteogenic gene in differentiated cells) [20] | Cell lysate known to express the target protein [100] |
| Negative Control | Confirms result specificity and detects artifacts | Non-template control (NTC) with water instead of cDNA to detect DNA contamination [20] | Cell lysate from a knockout line or one known not to express the protein [100] |
| Loading Control | Normalizes for sample preparation variability | Use of a constitutively expressed housekeeping gene (e.g., β-actin, GAPDH) [20] | Antibody against a housekeeping protein (e.g., β-actin, α-tubulin) [100] |
Detailed Experimental Protocols
Protocol: Absolute Quantification PCR for Osteogenic Gene Expression
This protocol is designed to quantify the absolute copy numbers of specific mRNAs (e.g., osteocalcin) in cells cultured on a novel biomaterial, using the method described by [20].
1. Sample Preparation and RNA Extraction
- Culture Conditions: Seed human fetal osteoblasts (hFOBs) or relevant progenitor cells on the test biomaterial and a control surface (e.g., tissue culture plastic). Culture in normal and osteogenic media (supplemented with ascorbic acid, β-glycerophosphate, and dexamethasone) for a predetermined period [20].
- RNA Isolation: Lyse cells and extract total RNA using a commercial kit. Include a step for DNase I treatment to remove genomic DNA contamination. Quantify RNA concentration spectroscopically.
2. cDNA Synthesis
- Reverse transcribe equal amounts of total RNA (e.g., 1 µg) from each sample into cDNA using a Reverse Transcriptase kit and oligo(dT) or random hexamer primers.
3. Generating dsDNA Standards for Absolute Quantification
- Amplify Target Sequence: Using the synthesized cDNA from a positive control sample (e.g., cells in osteogenic media on TCP), perform a standard PCR with primers specific to your target gene (e.g., osteocalcin) and a housekeeping gene (e.g., β-actin).
- Gel Purification: Run the PCR product on a standard agarose gel. Excise the band at the correct molecular weight and purify the dsDNA using a gel extraction kit.
- Quantify and Dilute: Precisely measure the concentration of the purified dsDNA and calculate the number of copies/µL. Serially dilute this standard to create a concentration series (e.g., from 10^2 to 10^8 copies/µL) for the standard curve.
4. Real-Time PCR Setup and Data Analysis
- Reaction Setup: In a real-time PCR plate, set up reactions for the standard curve dilutions, experimental samples (cDNA from cells on biomaterials), and critical negative controls.
- Critical Controls:
- Positive Control: cDNA from cells with known high expression of the target gene.
- Non-Template Control (NTC): Use nuclease-free water instead of cDNA to detect any plasmid or amplicon contamination in the master mix or reagents [20].
- Run and Analyze: Perform the real-time PCR run. Use the software to generate a standard curve from the standards and interpolate the absolute copy number for each unknown sample from this curve.
Table 2: Key Controls and Reagents for Quantitative PCR
| Component | Function / Rationale | Example / Specification |
|---|---|---|
| dsDNA Standard | Enables absolute quantification; creates standard curve [20] | Purified PCR product of target sequence (e.g., Osteocalcin, 71 bp) |
| Gene-Specific Primers | Amplifies target and control genes | Validated primer pairs for Osteocalcin, β-actin [20] |
| Non-Template Control (NTC) | Detects contaminating DNA in reagents [20] | Nuclease-free water substituted for cDNA template |
| Positive Control cDNA | Verifies PCR efficiency and reagent functionality | cDNA from cells known to express the target gene at high levels |
| Housekeeping Gene | Serves as an internal reference for RNA integrity and loading [20] | β-actin, GAPDH, or 18S rRNA |
Protocol: Western Blot Analysis of Protein Expression
This protocol outlines how to use controls to reliably detect specific proteins (e.g., signaling phosphoproteins) in cells exposed to a biomaterial.
1. Protein Extraction and Quantification
- Lyse cells cultured on the biomaterial and control surfaces in RIPA buffer containing protease and phosphatase inhibitors.
- Quantify the total protein concentration for each sample using a colorimetric assay (e.g., BCA assay).
2. Gel Electrophoresis and Transfer
- Load equal amounts of protein (e.g., 20-30 µg) for each experimental sample, controls, and a molecular weight marker.
- Critical Controls:
- Positive Control Lysate: A lysate from cells or tissue known to express the protein of interest (e.g., a stimulated cell line for a phospho-protein) [100].
- Negative Control Lysate: A lysate from cells that do not express the protein (e.g., a knockout cell line, siRNA-treated cells, or a different tissue type) [100].
- After SDS-PAGE, transfer the proteins to a PVDF membrane.
3. Immunoblotting
- Blocking: Incubate the membrane in a blocking buffer (e.g., 5% BSA or non-fat milk).
- Antibody Incubation:
- Probe with the primary antibody against your target protein.
- Loading Control: The membrane must be re-probed with an antibody for a constitutively expressed housekeeping protein (e.g., β-actin, α-tubulin, GAPDH). This control verifies equal loading across all lanes and allows for normalization of the target protein signal [100].
- Detection: Incubate with an appropriate HRP-conjugated secondary antibody and develop using a chemiluminescent substrate.
The Scientist's Toolkit: Essential Research Reagent Solutions
Table 3: Key Research Reagent Solutions for Biomaterial Studies
| Reagent / Material | Function in Experiment | Specific Application Example |
|---|---|---|
| Control Cell Lysates | Ready-to-use positive and negative controls for immunoassays [100] | Rockland's control lysates from stimulated cells or overexpressed proteins for Western blot [100] |
| Purified Proteins | Ideal positive controls for ELISA, Western blot, and flow cytometry; can be used for standard curves [100] | Purified immunoglobulin proteins to validate antibody specificity and assay performance [100] |
| Loading Control Antibodies | Recognize housekeeping proteins to verify equal protein loading across samples [100] | Antibodies against β-actin or α-tubulin in Western blotting for normalization [100] |
| Low Endotoxin Controls | Critical for biological assays where endotoxin can cause non-specific immune activation [100] | Low endotoxin IgG controls in neutralization assays or studies of immune cell response [100] |
| dsDNA Standards | Enable absolute quantification in real-time PCR, providing actual copy numbers of mRNA [20] | Purified PCR products of target genes (e.g., β-actin, osteocalcin) used to generate a standard curve [20] |
Nucleic acid integrity is a foundational element in molecular biology, directly influencing the reliability and reproducibility of downstream applications such as PCR, sequencing, and gene expression analysis. Within the context of biomaterial cellular response research, the quality of extracted DNA and RNA is paramount for accurately interpreting cellular behaviors, including adhesion, proliferation, and differentiation. Degraded or impure nucleic acids can skew data, leading to inaccurate conclusions about cellular responses to engineered materials. This Application Note details the critical quality metrics—including RNA Integrity Number (RIN), DNA Integrity Number (DIN), and others—and provides standardized protocols for their assessment using electrophoresis and related technologies. By implementing rigorous quality control (QC), researchers can ensure the validity of their data in demanding applications like drug development and diagnostic assay creation [101].
Key Quality Metrics for Nucleic Acid Integrity
A comprehensive nucleic acid QC strategy evaluates three core aspects: concentration, purity, and integrity. While concentration and purity are often assessed via UV spectrophotometry, integrity provides a more nuanced view of the nucleic acid's structural state and is typically evaluated using electrophoresis-based methods [101].
The following table summarizes the primary integrity metrics used in the field.
Table 1: Key Quality Metrics for Assessing Nucleic Acid Integrity
| Metric Name | Full Form | Nucleic Acid Type | Principle of Measurement | Interpretation of Values |
|---|---|---|---|---|
| RIN | RNA Integrity Number | RNA | Capillary electrophoresis; algorithm based on entire electrophoretic trace, including 18S and 28S ribosomal RNA peaks. | Scale of 1-10; 10 = fully intact, 1 = fully degraded. ≥8 is generally suitable for most downstream applications. |
| DQN | DNA Quality Number | Genomic DNA | Capillary electrophoresis; assesses degradation level and proportion of samples above a size threshold. | Scale of 0-10; higher values indicate better integrity. |
| DV200 | Percentage of RNA fragments >200 nucleotides | RNA (especially FFPE-derived) | Capillary electrophoresis; calculates the proportion of RNA fragments larger than 200 nucleotides. | Percentage value; ≥70% is generally considered high quality for degraded samples like FFPE. |
| Other Metrics | - | - | - | - |
| Purity (A260/A280) | - | DNA & RNA | UV Spectrophotometry; ratio of absorbance at 260 nm and 280 nm. | DNA: 1.8-2.0; RNA: 1.8-2.0. Low values indicate protein/phenol contamination. |
| Purity (A260/A230) | - | DNA & RNA | UV Spectrophotometry; ratio of absorbance at 260 nm and 230 nm. | Typically >2.0. Low values indicate contamination by salts, EDTA, or carbohydrates. |
For RNA, the RIN metric provides a standardized assessment of integrity. The algorithm considers the entire electrophoretic trace, with a primary focus on the two prominent ribosomal peaks (18S and 28S in eukaryotic RNA). In a perfectly intact RNA sample (RIN=10), the 28S peak is approximately twice the height of the 18S peak. As degradation occurs, these peaks diminish, and the baseline increases due to the accumulation of smaller RNA fragments, resulting in a lower RIN score [101].
For DNA, the DIN is a analogous metric. It is generated by capillary electrophoresis systems to evaluate the degradation state of genomic DNA samples. A high DIN value indicates that the DNA is of high molecular weight and largely intact, which is critical for applications like PCR and whole genome sequencing [101].
For RNA samples that are expected to be highly degraded, such as those extracted from Formalin-Fixed Paraffin-Embedded (FFPE) tissues, the DV200 metric is more appropriate than RIN. DV200 represents the percentage of RNA fragments that are longer than 200 nucleotides. A DV200 value of 70% or higher is generally considered acceptable for many downstream assays, including sequencing [101].
Relationship Between Nucleic Acid Integrity and Downstream Applications
The integrity of nucleic acids has a profound and direct impact on the success and accuracy of downstream molecular experiments. This relationship is crucial in biomaterial research, where subtle changes in cellular expression profiles are often the key readouts.
- PCR and qPCR: Degraded DNA can lead to complete amplification failure or significant biases in multi-template PCR. In quantitative PCR (qPCR) for gene expression, degraded RNA will result in an under-representation of the target transcript, leading to artificially low quantification cycles (Cq values) and inaccurate fold-change calculations. This is particularly critical when assessing cellular responses to biomaterials, where the expression of specific genes is monitored.
- Next-Generation Sequencing (NGS): The effect of integrity is magnified in NGS. For RNA-Seq, degraded RNA causes 3' bias, where sequencing reads are disproportionately generated from the 3' end of transcripts. This skews transcript abundance estimates and can obscure the detection of important isoforms. In DNA sequencing, fragmented DNA can lead to uneven genomic coverage and gaps in assembly.
- Multi-template PCR Bias: As highlighted in recent research, sequence-specific amplification efficiency is a major source of bias in complex amplicon libraries used in sequencing. Even with intact nucleic acids, certain sequence motifs adjacent to priming sites can lead to poor amplification via mechanisms like adapter-mediated self-priming. This can cause a drastic reduction in the representation of some sequences after as few as 12 PCR cycles, compromising the accuracy and sensitivity of results. This underscores that integrity is not the only factor; sequence-specific properties also play a key role in downstream success [102].
The following diagram illustrates the logical workflow connecting nucleic acid quality control to downstream experimental outcomes.
Essential Reagents and Equipment for Integrity Analysis
A robust QC workflow requires specific tools and reagents. The following table lists key solutions for assessing nucleic acid integrity.
Table 2: Research Reagent Solutions for Nucleic Acid Quality Control
| Item | Function/Description | Example Use Case |
|---|---|---|
| Micro-volume Spectrophotometer | Measures nucleic acid concentration and purity (A260/A280, A260/A230 ratios) using only 1-2 μL of sample. | Rapid initial QC to confirm sample concentration and check for common contaminants like protein or phenol [101]. |
| Capillary Electrophoresis System | Automates the separation and analysis of nucleic acid fragments by size to generate integrity metrics (RIN, DIN, DQN). | Precisely determining the integrity of RNA (RIN) or gDNA (DIN) prior to RNA-Seq or whole genome sequencing [103] [101]. |
| Automated Electrophoresis Software | Specialized software for analyzing capillary electrophoresis data. Provides automatic calculation of concentration, sizing, and integrity metrics. | Streamlining data acquisition, analysis, and reporting for high-throughput nucleic acid QC workflows [103]. |
| Genetic Quality (GQ) Agarose | Agarose tested for contaminants and enzyme inhibitors, suitable for sensitive molecular biology applications. | Standard gel electrophoresis to visually assess DNA integrity (e.g., genomic DNA smearing vs. sharp bands) [104]. |
| Agarose with Low EEO | Agarose with a low Electroendosmosis (EEO) value, which minimizes the reverse flow of buffer cations for improved resolution. | Optimal separation of large DNA fragments (>10 kb) [104]. |
| Polyacrylamide Gel Reagents | Molecular biology-grade acrylamide, bisacrylamide, APS, and TEMED for preparing high-resolution polyacrylamide gels. | Distinguishing nucleic acids of the same length but different conformations (supercoiled, nicked, linear) or separating very small fragments [104]. |
Detailed Experimental Protocols
Protocol 1: Comprehensive RNA Integrity and Purity Analysis
This protocol describes a two-step process for a complete RNA quality assessment, combining purity checks with a precise evaluation of integrity.
- Principle: RNA concentration and purity are first verified using UV spectrophotometry. The integrity is then determined by capillary electrophoresis, which separates RNA fragments by size and calculates the RNA Integrity Number (RIN) or the DV200 value.
- Applications: Quality control for RNA-Seq, qPCR, microarray analysis, and cDNA library construction.
- Equipment & Reagents:
- Micro-volume spectrophotometer (e.g., EzDrop 1000)
- Capillary electrophoresis system (e.g., Agilent TapeStation, Qsep series)
- Appropriate RNA analysis kits for the capillary system (e.g., RNA ScreenTape)
- Nuclease-free water and pipette tips
- Procedure:
- Spectrophotometric Purity and Concentration Check:
- Power on the micro-volume spectrophotometer and initialize the software. Select the "RNA" measurement mode.
- Clean the sample pedestal with nuclease-free lint-free tissue.
- Apply a 1-2 μL blank of nuclease-free water for a background measurement and clean the pedestal.
- Apply 1-2 μL of the RNA sample to the measurement surface.
- Initiate the measurement. Record the concentration (in ng/μL) and the purity ratios (A260/A280 and A260/A230).
- Interpret results: A260/A280 should be ~1.8-2.0; A260/A230 should be >2.0. Values outside these ranges suggest contamination [101].
- Capillary Electrophoresis for Integrity:
- Prepare the RNA samples according to the manufacturer's instructions for the capillary electrophoresis system. This typically involves diluting the RNA to a specified concentration in a provided buffer.
- Load the prepared samples and the required reagents (ladder, gel-dye mix) onto the designated cartridge or chip.
- Start the analysis run using the instrument's controlling software. The system will automatically perform electrophoresis, data collection, and analysis.
- Upon completion, review the generated electropherogram and gel-like image. The software will automatically assign an RIN value (for intact RNA) or a DV200 value (for degraded RNA).
- Interpret the RIN value: A RIN ≥ 8 is generally required for sensitive applications like RNA-Seq. For DV200, a value ≥ 70% is often the minimum threshold for successful sequencing of FFPE-derived RNA [101].
- Spectrophotometric Purity and Concentration Check:
- Troubleshooting Notes:
- Low A260/A280: Indicates protein or phenol contamination. Perform an additional purification step, such as a phenol-chloroform extraction or column clean-up.
- Low A260/A230: Suggests contamination by salts, carbohydrates, or guanidine. An additional ethanol precipitation step can help remove these contaminants.
- Low RIN/High Degradation: Ensure all work is performed on ice using RNase-free reagents and consumables. Consider using a fresh RNA extraction from material that was snap-frozen immediately after collection.
Protocol 2: Genomic DNA Integrity Analysis using Capillary Electrophoresis
This protocol is designed to assess the integrity of genomic DNA (gDNA) to ensure its suitability for long-range PCR, Southern blotting, or next-generation sequencing.
- Principle: Genomic DNA fragments are separated by size using capillary electrophoresis. The resulting electrophoretic trace is analyzed by proprietary algorithms to generate a DNA Integrity Number (DIN) or DNA Quality Number (DQN), which quantifies the level of degradation.
- Applications: Quality control for whole genome sequencing, PCR amplification of large fragments, and genetic biobanking.
- Equipment & Reagents:
- Capillary electrophoresis system (e.g., Agilent TapeStation, Qsep series)
- Appropriate genomic DNA analysis kits (e.g., Genomic DNA ScreenTape)
- Micro-volume spectrophotometer
- Procedure:
- Initial Quality Check: Determine the DNA concentration and purity using a micro-volume spectrophotometer as described in Protocol 1, Step 1, but selecting the "DNA" mode. Expect A260/A280 ratios of 1.8-2.0.
- Sample Preparation: Dilute the gDNA sample to the recommended concentration (e.g., 5-50 ng/μL) using the elution buffer or nuclease-free water specified by the capillary system manufacturer.
- Instrument Loading: Load the diluted DNA samples and the provided reagents (ladder, dye, gel matrix) onto the designated cartridge or chip.
- Execution and Analysis: Start the run in the controlling software. The software will provide a DIN/DQN score and an electropherogram.
- Interpretation: A high DIN score (e.g., DIN ≥ 7 for the TapeStation system) indicates high molecular weight DNA with minimal degradation. A low score indicates significant fragmentation. The software also provides a size estimate for the dominant DNA population [101].
- Troubleshooting Notes:
- Fragmented DNA (Low DIN): Avoid excessive pipetting or vortexing of DNA samples. Ensure optimal cell lysis conditions during extraction and avoid repeated freeze-thaw cycles.
- Insufficient Sample Concentration: Concentrate the sample using a vacuum concentrator or ethanol precipitation, taking care not to shear the DNA.
Advanced Considerations for Electrophoresis-based QC
While the protocols above are standardized, understanding the factors that influence electrophoresis is key to troubleshooting.
- Nucleic Acid Conformation: The conformation of DNA (supercoiled, linear, or nicked circular) significantly affects its migration through a gel. For instance, in plasmid DNA preparation QC, supercoiled DNA migrates fastest, followed by linear and then nicked circular DNA. This must be considered when interpreting results [104].
- Gel Properties: The choice of gel matrix is critical.
- Agarose Gels: Used for separating larger nucleic acid fragments (100 bp to 50 kb). Key properties include Electroendosmosis (EEO), where a high EEO can hinder the movement of large DNA fragments, and gel strength, which affects handling. Genetic Quality (GQ) agarose is certified to be free of nucleases and inhibitors [104].
- Polyacrylamide Gels: Provide higher resolution for smaller fragments (1 to 1000 bp). The pore size is controlled by the total monomer concentration (%T) and the crosslinker ratio (%C). Higher %T creates smaller pores for better separation of small fragments [104].
- Deep Learning for Amplification Bias: Beyond physical integrity, the nucleotide sequence itself can influence downstream outcomes. Recent research uses one-dimensional convolutional neural networks (1D-CNNs) to predict sequence-specific amplification efficiency in multi-template PCR. Interpretation of these models has identified that specific sequence motifs near adapter priming sites can cause low amplification efficiency through mechanisms like adapter-mediated self-priming. This represents a cutting-edge, sequence-based "quality control" check to pre-emptively identify and remove sequences prone to amplification bias, thereby ensuring more homogeneous library preparation for sequencing [102].
Polymersse Chain Reaction (PCR) is a foundational technique in molecular biology, enabling the amplification of specific nucleic acid sequences. Since its invention by Kary Mullis in 1983, PCR has evolved into several advanced forms, each with distinct principles and applications [105] [7]. This article provides a comparative analysis of three principal PCR technologies—End-point PCR, Quantitative PCR (qPCR), and Digital PCR (dPCR)—within the context of biomaterial cellular response research. As the field increasingly relies on precise molecular diagnostics to evaluate cell-material interactions, understanding the capabilities and optimal applications of each PCR technology becomes crucial for researchers and drug development professionals.
Principles and Evolution
End-point PCR, the original format, is a qualitative technique where DNA amplification is detected after the reaction is complete, typically using agarose gel electrophoresis [106] [7]. Quantitative PCR (qPCR), also known as real-time PCR, revolutionized the field by enabling real-time monitoring of DNA amplification during thermal cycling, allowing for quantitative measurement of target sequences [105]. Digital PCR (dPCR), the most recent innovation, provides absolute quantification of nucleic acid molecules by partitioning a sample into thousands of individual reactions, with Poisson statistical analysis determining precise copy numbers without requiring standard curves [64] [67] [107].
The following table summarizes the core characteristics and applications of these three technologies, providing a clear comparison for researchers.
Table 1: Comparative Analysis of End-point, Quantitative, and Digital PCR Technologies
| Parameter | End-point PCR | Quantitative PCR (qPCR) | Digital PCR (dPCR) |
|---|---|---|---|
| Core Principle | Amplification followed by end-point detection | Real-time fluorescence monitoring during amplification | Partitioning and absolute counting of target molecules [67] |
| Quantification | Qualitative or semi-quantitative | Relative quantification (requires standard curve) | Absolute quantification, no standard curve needed [64] [107] |
| Key Output | Band presence/intensity on a gel | Cycle threshold (Ct) value | Copies per microliter [107] |
| Sensitivity | Moderate | High | Very High (detects single molecules) [108] |
| Key Applications | Cloning, mutation screening, routine detection | Gene expression, viral load monitoring, pathogen quantification | Low-abundance targets, rare mutation detection, liquid biopsy, precise quantification in complex samples [64] [109] [107] |
| Throughput | Moderate | High | Lower than qPCR [67] |
| Cost & Accessibility | Low cost, widely accessible | Moderate cost, widely accessible | Higher cost for instruments and consumables [67] [107] |
Performance Characteristics in Research
The choice between qPCR and dPCR often hinges on required precision and sensitivity. dPCR demonstrates superior accuracy, particularly for medium and high viral loads, and shows greater consistency and precision than qPCR [107]. Its partitioning process makes it less susceptible to inhibitors present in complex sample matrices, a significant advantage in analyzing crude biomaterial lysates [67] [107]. However, qPCR remains the dominant workhorse for high-throughput applications due to its established infrastructure, lower per-test cost, and extensive validation in clinical and research settings [67] [109].
Table 2: Key Research Reagent Solutions for PCR Workflows
| Reagent/Material | Function | Application Notes |
|---|---|---|
| Taq DNA Polymerase | Heat-stable enzyme that synthesizes new DNA strands [110] [7]. | The standard polymerase for routine PCR. High-fidelity versions are available for applications requiring low error rates [105]. |
| Primers | Short, single-stranded DNA sequences that define the target region for amplification [110]. | Careful design is critical for specificity. In multiplex PCR, primers must be designed to avoid primer-dimer formation and work at a uniform annealing temperature [108]. |
| dNTPs | Deoxynucleotide triphosphates (dATP, dCTP, dGTP, dTTP); the building blocks for new DNA strands [110]. | Quality and concentration are vital for efficient amplification and high yield. |
| SYBR Green / Hydrolysis Probes | Fluorescent chemistries for real-time detection in qPCR. SYBR Green binds dsDNA, while probes (e.g., TaqMan) provide target-specific signal [7]. | Probe-based assays (TaqMan) are more specific and enable multiplexing, while SYBR Green is more cost-effective [109]. |
| Microfluidic Chips / Cartridges | Consumables for dPCR that physically partition the sample into thousands of nanoscale reactions [64] [107]. | Enable absolute quantification. Formats include droplet-based (ddPCR) and chip-based (nanowell) systems [106] [107]. |
Application Notes for Biomaterial Research
In biomaterial science, analyzing cellular responses often requires quantifying subtle changes in gene expression, detecting rare transcripts, or precisely measuring cytokine profiles. PCR technologies are indispensable for these tasks.
- Gene Expression Profiling: qPCR is the established method for quantifying mRNA expression levels of genes involved in inflammation (e.g., IL-6, TNF-α), extracellular matrix remodeling (e.g., collagen, MMPs), and osteogenesis (e.g., Runx2, OCN) in cells exposed to biomaterials [7]. The use of reverse transcription qPCR (RT-qPCR) allows for the conversion of RNA into complementary DNA (cDNA) for subsequent amplification [105] [7].
- Liquid Biopsies and Rare Event Detection: dPCR is particularly powerful for analyzing liquid biopsy samples, such as detecting low levels of cell-free DNA or rare mutations [64] [109]. Its superior sensitivity allows for the detection of rare genetic variants present at frequencies below 0.1%, which is valuable for monitoring specific cellular responses or microbial contamination in complex biological fluids interacting with implants [64].
- Syndromic Testing and Pathogen Detection: Multiplex qPCR and dPCR panels can screen for multiple pathogens or biomarkers simultaneously [109] [107]. This "syndromic testing" approach is highly efficient for sterility testing of biomaterials or in diagnosing co-infections that may complicate the performance of implantable devices [109].
Experimental Protocols
Protocol: Absolute Quantification of a Gene of Interest using Digital PCR
This protocol is adapted for the precise measurement of gene expression in cells cultured on a novel biomaterial, using a nanowell-based dPCR system (e.g., QIAcuity) [107].
1. Sample Preparation and Nucleic Acid Extraction
- Culture cells on the test biomaterial and control surfaces for a predetermined time.
- Lyse cells directly on the surface or after trypsinization to release RNA.
- Extract total RNA using a silica-membrane or magnetic bead-based kit. Ensure RNA integrity and purity (A260/A280 ratio ~2.0).
- Synthesize cDNA using a reverse transcription kit with random hexamers and/or oligo-dT primers.
2. dPCR Reaction Setup
- Prepare the dPCR master mix on ice. A typical 40 µL reaction may contain:
- 20 µL of 2x dPCR Probe Master Mix
- 1.8 µL of each primer (10 µM final concentration each)
- 0.5 µL of FAM-labeled probe (10 µM final concentration)
- 5 µL of cDNA template
- Nuclease-free water to 40 µL
- Gently mix and briefly centrifuge the master mix.
3. Partitioning and Amplification
- Load the entire reaction mixture into the inlet of a nanowell dPCR plate.
- Place the plate into the dPCR instrument. The instrument will automatically partition the sample into ~26,000 nanowells [107].
- Run the thermal cycling protocol as follows:
- Initial Denaturation: 95°C for 5 minutes.
- 40 Cycles:
- Denaturation: 95°C for 30 seconds.
- Annealing/Extension: 60°C for 60 seconds (acquire fluorescence).
- Final Hold: 4°C.
4. Data Analysis
- The instrument's software analyzes each nanowell as positive or negative for fluorescence.
- Based on the ratio of positive to total partitions, it applies Poisson statistics to calculate the absolute concentration of the target in copies/µL of the original reaction [67] [107].
- Normalize the target concentration to a reference gene or total RNA input for gene expression studies.
Protocol: Multiplex Detection of Pathogens using Quantitative PCR
This protocol describes a multiplex qPCR assay for screening common pathogens in a biomaterial-associated infection model [109].
1. Sample and Standard Preparation
- Collect samples (e.g., swabs from explanted devices, tissue homogenates).
- Extract DNA/RNA using a commercial kit. For RNA viruses, include a reverse transcription step to generate cDNA.
- If performing relative quantification, prepare a standard curve using serial dilutions of known quantities of the target DNA plasmids.
2. qPCR Reaction Setup
- Prepare a multiplex master mix on ice. A typical 20 µL reaction contains:
- 10 µL of 2x Multiplex qPCR Master Mix
- Optimized concentrations of multiple primer-probe sets (e.g., FAM, HEX/VIC, Cy5 labels for different targets)
- 2-5 µL of DNA/cDNA template
- Nuclease-free water to 20 µL.
- Include a no-template control (NTC) and positive controls for each target.
3. Thermal Cycling and Data Acquisition
- Load the plate into a real-time PCR instrument.
- Run the following cycling protocol:
- Initial Denaturation: 95°C for 3 minutes.
- 40 Cycles:
- Denaturation: 95°C for 15 seconds.
- Annealing/Extension: 60°C for 60 seconds (acquire fluorescence from all channels).
- The instrument software generates a Cycle threshold (Ct) value for each target in each sample.
4. Data Analysis
- For qualitative analysis, a sample is positive for a pathogen if its Ct value is below a predetermined cut-off.
- For relative quantification, interpolate the target concentration from the standard curve using the Ct value.
- Report the presence and, if applicable, the load of each pathogen detected.
Workflow Visualization
The following diagram illustrates the logical decision process for selecting the appropriate PCR technology based on key experimental requirements.
PCR Selection Workflow: This decision tree guides researchers in selecting the optimal PCR method based on their experimental needs for quantification, throughput, and sensitivity [67] [107].
Understanding the relationship between molecular data and cellular phenotypes is a cornerstone of modern biomaterial research. Cellular viability, proliferation, and differentiation are critical endpoints for evaluating the biological performance of novel materials, therapeutic compounds, and tissue engineering strategies [111]. These phenotypic outcomes are driven by complex molecular networks involving gene expression, protein signaling, and metabolic activity. Polymerase chain reaction (PCR) and electrophoresis techniques provide powerful tools to quantify these molecular drivers, enabling researchers to establish causal relationships between material properties and cellular responses. This application note details standardized protocols for correlating key molecular data with phenotypic outcomes, providing a robust framework for research in biomaterial science and drug development.
The inverse relationship between cell proliferation and differentiation necessitates precise molecular control [112]. As cells transition from a proliferative state to a differentiated one, they undergo significant transcriptional reprogramming and metabolic shifts. For instance, cyclin-dependent kinases (CDKs) that promote cell cycle progression often directly antagonize transcription factors that induce tissue-specific gene expression [112]. Furthermore, physical forces from the cellular microenvironment, including mechanical stress and electrostatic potentials, can modulate mitochondrial function and thereby control both differentiation and proliferation pathways [113]. This note places special emphasis on using PCR and electrophoresis to monitor these critical molecular transitions in the context of biomaterial testing.
Key Molecular Determinants of Cellular Phenotypes
Genetic and Metabolic Regulators
Cellular phenotypes are governed by intricate networks of genetic and metabolic regulators. Transcriptional networks and chromatin remodeling complexes work in concert to execute differentiation programs while simultaneously arresting the cell cycle [112]. The SWI/SNF chromatin remodeler, for example, contributes to the dual regulation of cell cycle exit and tissue-specific gene expression during terminal differentiation.
Beyond nuclear events, metabolic programming is equally critical. The mitochondria serve as a central control switch, integrating physical and biochemical signals to direct cellular fate decisions [113]. A shift from oxidative phosphorylation to aerobic glycolysis often occurs in response to inflammatory signals or increased energy demands, influencing both proliferative capacity and differentiation potential.
Table 1: Key Molecular Regulators of Cellular Phenotypes
| Molecular Regulator | Primary Function | Impact on Phenotype | Detection Method |
|---|---|---|---|
| CDKs (e.g., CDK2, CDK4/6) | Phosphorylation of cell cycle proteins | Promotes proliferation; antagonizes differentiation | qPCR (mRNA), Western Blot |
| Myogenic Regulatory Factors (e.g., MyoD, myogenin) | Master transcription factors for muscle differentiation | Induces terminal differentiation and cell cycle exit | RT-qPCR, Gel Electrophoresis |
| p21Cip1/p27Kip1 | CDK inhibitors | Induces cell cycle arrest; facilitates differentiation | qPCR, Western Blot |
| Mitochondrial Activity | Energy production via oxidative phosphorylation | Controls balance between proliferation and differentiation | Metabolic assays, mRNA analysis |
| IL-10/TGF-β | Anti-inflammatory cytokines | Promotes M2 macrophage polarization; supports tissue repair | ELISA, RT-qPCR |
Phenotypic Characterization in Biomaterial Research
The assessment of biomaterial functionality relies heavily on accurate phenotypic characterization. Key biological functionalities include mineralization capacity, immunomodulatory effects, cellular differentiation, and angiogenic potential [111]. For example, the polarization state of macrophages—typically categorized as pro-inflammatory M1 or anti-inflammatory M2—directly influences material biocompatibility and tissue regeneration outcomes [114]. Similarly, the differentiation of mesenchymal stem cells into osteogenic, chondrogenic, or adipogenic lineages is a crucial indicator of a biomaterial's regenerative capacity.
Advanced analytical approaches now enable more sophisticated phenotypic linking. Computational frameworks like Φ-Space allow for continuous phenotyping of single-cell multi-omics data, characterizing cell identity in a low-dimensional phenotype space defined by reference phenotypes [115]. This approach is particularly valuable for capturing transitional cell states during differentiation processes that are poorly represented by discrete classification systems.
Experimental Protocols
Protocol 1: Live Culture PCR for Functional Screening
Principle: This protocol utilizes intact bacterial cells expressing polymerase variants as both enzyme source and DNA template for real-time PCR, enabling direct screening of enzymatic function without protein purification [116]. This approach is particularly valuable for assessing biological responses to inhibitory environments relevant to biomaterial applications.
Workflow:
Procedure:
Library Preparation:
- Generate randomly mutagenized DNA polymerase libraries using error-prone PCR with Mg²⁺/Mn²⁺ [116].
- Clone amplified products into appropriate expression vectors (e.g., pUC18 for Taq polymerase).
- Transform recombinant plasmids into bacterial host cells (e.g., E. coli X7029).
Cell Culture and Induction:
- Plate transformed cells into U-bottom 96-well plates containing 100 µL of ampicillin-supplemented media.
- Add 1 mM IPTG to induce enzyme expression.
- Incubate plates for 12-16 hours at 37°C with orbital shaking at 100-150 rpm.
Live Culture PCR Setup:
- Transfer 5 µL of culture from each well to a replica 96-well PCR plate.
- Add 30 µL of PCR master mix to each well containing:
- PCR buffer (50 mM Tris-HCl, pH 9.2, 2.5-3.5 mM magnesium chloride, 16 mM ammonium sulfate, 0.025% Brij-58)
- dNTPs (250 µM each)
- Target-specific primers (e.g., 16S rRNA gene primers)
- 0.5X SYBR Green
- 0.5X PCR enhancer
- Challenging PCR inhibitor (e.g., 2-3 µL of 10% chocolate or black pepper extract per 35 µL reaction)
Real-time PCR Amplification:
- Perform PCR with the following cycling conditions:
- Initial denaturation: 94°C for 10 minutes
- 40-45 cycles of:
- Denaturation: 94°C for 30 seconds
- Annealing: 54°C for 40 seconds
- Extension: 70°C for 2 minutes
- Include control wells with known inhibition-resistant polymerase variants.
- Perform PCR with the following cycling conditions:
Analysis and Selection:
- Compare amplification curves and Ct values across variants.
- Select clones showing superior resistance to inhibitors (lower Ct values) for further characterization.
- Purify selected variants and validate resistance across diverse inhibitors (blood, humic acid, plant extracts).
Protocol 2: Gene Expression Profiling for Differentiation Assessment
Principle: This protocol uses reverse transcription quantitative PCR (RT-qPCR) to monitor expression changes in differentiation markers during stem cell differentiation, particularly in response to biomaterial scaffolds.
Workflow:
Procedure:
Cell Culture and Differentiation:
- Seed appropriate precursor cells (e.g., mesenchymal stem cells, myoblasts) onto test biomaterials at defined density.
- Induce differentiation using appropriate media formulations (e.g., reduced serum, specific morphogens).
- Include control groups on standard tissue culture plastic.
RNA Extraction:
- Harvest cells at multiple time points (e.g., days 0, 3, 7, 14) using appropriate lysis buffers.
- Extract total RNA using silica-membrane columns or magnetic beads.
- Determine RNA concentration and purity (A260/A280 ratio >1.8).
- Treat with DNase I to remove genomic DNA contamination.
cDNA Synthesis:
- Use 0.5-1 µg total RNA per reaction.
- Perform reverse transcription with random hexamers and oligo(dT) primers.
- Use reverse transcriptase with RNAse inhibitor activity.
- Run controls without reverse transcriptase to assess genomic DNA contamination.
qPCR Amplification:
- Design primers for:
- Differentiation markers (e.g., myogenin for muscle, osteocalcin for bone)
- Proliferation markers (e.g., CDK2, cyclin E)
- Cell cycle inhibitors (e.g., p21Cip1, p27Kip1)
- Housekeeping genes (e.g., GAPDH, β-actin, HPRT)
- Prepare reactions with SYBR Green master mix.
- Use the following cycling parameters:
- Initial denaturation: 95°C for 10 minutes
- 40 cycles of:
- Denaturation: 95°C for 15 seconds
- Annealing/extension: 60°C for 1 minute
- Melt curve analysis: 65°C to 95°C, increment 0.5°C
- Design primers for:
Gel Electrophoresis Verification:
- Resolve select PCR products on 2% agarose gels.
- Include DNA ladder for size determination.
- Visualize with ethidium bromide or SYBR Safe.
- Confirm single amplification products of expected size.
Data Analysis:
- Calculate ΔCt values relative to housekeeping genes.
- Use the 2-ΔΔCt method to determine fold changes.
- Correlate gene expression patterns with phenotypic outcomes (morphology, staining, functional assays).
Protocol 3: Integrated Multi-Omic Phenotyping
Principle: This protocol leverages joint single-cell DNA-RNA sequencing (SDR-seq) to simultaneously profile genomic variants and gene expression in thousands of single cells, enabling confident linkage of genotypes to phenotypic expression patterns [117].
Procedure:
Sample Preparation:
- Dissociate cells into single-cell suspensions.
- Fix cells with glyoxal (preferred over PFA for better nucleic acid quality) [117].
- Permeabilize cells to allow reagent access.
In Situ Reverse Transcription:
- Perform reverse transcription using custom poly(dT) primers.
- Include unique molecular identifiers (UMIs) and sample barcodes.
- Generate cDNA with capture sequences.
Droplet-Based Partitioning:
- Load cells onto microfluidic systems (e.g., Tapestri platform).
- Generate first droplet for cell lysis and proteinase K treatment.
- Mix with reverse primers for gDNA and RNA targets.
Multiplex PCR Amplification:
- Generate second droplet with forward primers, PCR reagents, and barcoding beads.
- Perform multiplex PCR to amplify both gDNA and RNA targets.
- Use distinct overhangs on reverse primers for gDNA (R2N) and RNA (R2).
Library Preparation and Sequencing:
- Break emulsions and purify amplification products.
- Prepare separate sequencing libraries for gDNA and RNA.
- Sequence gDNA libraries for full-length variant information.
- Sequence RNA libraries for transcript quantification with UMIs.
Data Integration and Analysis:
- Map sequencing reads to reference genomes.
- Associate coding and noncoding variants with gene expression changes.
- Use computational frameworks like BSNMani or Φ-Space to correlate spatial omics data with phenotypic outcomes [118] [115].
- Identify sub-networks with biological relevance to proliferation or differentiation phenotypes.
Table 2: Research Reagent Solutions for Phenotypic Characterization
| Reagent/Category | Specific Examples | Function in Experimental Workflow |
|---|---|---|
| DNA Polymerases | Taq C-66 (E818V), Klentaq1 H101 (K738R) | Resistant to PCR inhibitors in complex biological samples; enables reliable amplification from challenging matrices [116] |
| Cell Culture Models | H9C2, AC16, HL-1 cardiac cell lines; primary cardiomyocytes | Model systems for cardiac phenotype assessment; note limitations in resemblance to mature adult tissue [119] |
| Biomaterial Scaffolds | Decellularized extracellular matrix (dECM) | Provides tissue-specific biological cues for cell differentiation and proliferation; modulates immune response [114] |
| Immunomodulators | Treg-conditioned medium (Treg CM) | Contains anti-inflammatory cytokines (IL-10, TGF-β) that promote M2 macrophage polarization; enhances tissue regeneration [114] |
| Computational Tools | Φ-Space, BSNMani, SDR-seq | Enables continuous phenotyping, integrates multi-omics data, and links spatial information to clinical outcomes [118] [115] [117] |
Signaling Pathways in Phenotype Determination
Molecular Antagonism in Proliferation-Differentiation Decisions
The relationship between proliferation and differentiation is characterized by mutual antagonism at the molecular level. Key regulatory pathways ensure that cells either divide or specialize, but rarely both simultaneously [112].
This molecular interplay creates a switch-like mechanism where cells commit to either proliferation or differentiation. During skeletal muscle differentiation, for example, CDK activity directly phosphorylates and inhibits myogenic transcription factors like MyoD, while these transcription factors simultaneously repress cell cycle genes and upregulate CDK inhibitors [112]. The G1 phase of the cell cycle is particularly important for these decisions, as extending G1 duration increases susceptibility to differentiation signals.
Mitochondrial Control of Cell Fate
Physical forces and metabolic signals converge at the mitochondria to influence cell fate decisions. Mechanical stress, electrical potentials, and osmotic pressure can alter mitochondrial function, which in turn controls gene expression patterns that determine whether cells proliferate or differentiate [113].
Table 3: Physical Forces and Their Effects on Cellular Phenotypes
| Physical Force | Cellular Sensor | Molecular Effect | Phenotypic Outcome |
|---|---|---|---|
| Shear Stress | Ion channels, cytoskeleton | Alters mitochondrial metabolism; modifies extracellular matrix secretion | Enhanced chondrocyte differentiation; vascular network formation [113] |
| Osmotic Pressure | Volume-sensitive channels | Reduces oxygen solubility; affects enzyme-substrate dynamics | Inhibited cell proliferation; metabolic shift to aerobic glycolysis [113] |
| Matrix Stiffness | Focal adhesions, cytoskeleton | Activates mechanotransduction pathways (YAP/TAZ) | Influences stem cell lineage specification [113] |
| Electrical Fields | Membrane receptors, ion channels | Alters spatial distribution of charged macromolecules | Affects cell migration and differentiation patterns [113] |
Correlating molecular data with cellular phenotypes requires integrated experimental approaches that capture the complexity of biological systems. PCR and electrophoresis methodologies provide the foundation for quantifying molecular determinants of viability, proliferation, and differentiation. The protocols detailed in this application note—from live culture PCR for functional screening to sophisticated multi-omic phenotyping—offer robust frameworks for establishing these critical correlations in biomaterial research.
As the field advances, the integration of computational frameworks like Φ-Space for continuous phenotyping and spatial omics technologies will enable increasingly precise mapping of molecular networks to phenotypic outcomes [118] [115]. These approaches, combined with standardized molecular protocols, will accelerate the development of biomaterials that precisely control cellular responses for therapeutic applications.
The development of novel biomaterials for medical devices represents a dynamic frontier in biomedical research, converging with advanced analytical techniques like Polymerase Chain Reaction (PCR) and electrophoresis. These methods are crucial for evaluating cellular responses, a core aspect of biological safety assessments governed by international standards. The recent publication of ISO 10993-1:2025, the sixth edition of "Biological evaluation of medical devices," marks a significant evolution in the regulatory landscape [120] [121]. This update fundamentally shifts the paradigm from a prescriptive, test-checklist approach to a risk management-led framework fully integrated with ISO 14971 principles [122] [123] [124]. For researchers using PCR and electrophoresis in biomaterial studies, this emphasizes the need for scientifically justified, reproducible testing strategies that are documented throughout the device lifecycle. The standard reinforces that biological evaluation is an iterative process, beginning with material characterization and risk assessment before any biological testing, ensuring that advanced laboratory techniques are applied purposefully and efficiently [123] [124].
Key Updates in ISO 10993-1:2025 and Research Implications
The 2025 revision introduces several critical updates that directly impact how biomaterial research should be planned and documented. Understanding these changes is essential for designing compliant and scientifically robust experimental protocols.
Core Conceptual Shifts
- Enhanced Risk Management Integration: The standard now fully embeds the biological evaluation process within a risk management framework, requiring the identification of biological hazards, hazardous situations, and potential harms in a structure that mirrors ISO 14971 [122]. This means that for any biomaterial, the researcher must first establish a biological evaluation plan (BEP) that outlines the risk-based rationale for all subsequent testing.
- Consideration of Reasonably Foreseeable Misuse: A significant expansion is the requirement to consider "reasonably foreseeable misuse" during risk assessment [122] [121]. For example, using a device longer than intended, resulting in a longer duration of patient exposure, must now be factored into the categorization and testing strategy [122]. This necessitates a broader perspective during experimental design.
- Refined Contact Duration and Categorization: The calculation of exposure duration has been made more conservative. Body contact of even minimal duration (e.g., a few minutes) now defaults to a one-day exposure for categorization purposes [122] [125]. Furthermore, the device categorization has been simplified from the previous version to focus solely on the nature of patient contact: 1) intact skin, 2) intact mucosal membranes, 3) breached or compromised surfaces or internal tissues other than blood, and 4) circulating blood [121] [125]. The category of "Externally Communicating" devices has been eliminated [121].
Specific Testing and Endpoint Emphasis
The terminology has shifted from "biological endpoints" to "biological effects," moving away from a checkbox mentality ("Table A1 mentality") toward a focus on biological outcomes relevant to patient safety [121] [123]. Key updates on specific effects include:
- Systemic Toxicity: Evaluations must now reflect the duration of device use more accurately [125].
- Genotoxicity and Carcinogenicity: Genotoxicity assessment is now required for all devices with prolonged contact (unless contact is with intact skin only). Carcinogenicity evaluation has been added for devices with long-term mucosal contact [125].
- Material-Mediated Pyrogenicity (MMP): MMP has been omitted from the standard tables of effects, as it is considered rare. Testing remains necessary only for devices manufactured with materials of unknown pyrogenic potential [121] [125].
- Chemical Characterization: The standard continues to emphasize the pivotal role of thorough chemical characterization (as per ISO 10993-18) before initiating biological testing [123] [124].
Table 1: Key Conceptual Updates in ISO 10993-1:2025 and Their Impact on Research
| Update Aspect | Previous Approach | ISO 10993-1:2025 Requirement | Impact on Biomaterial Research |
|---|---|---|---|
| Overall Philosophy | "Table A1" checklist mentality [121] | Science-based, risk-justified evaluation [121] [123] | Requires stronger rationale for test selection/inclusion. |
| Risk Management | Loosely connected to ISO 14971 [122] | Fully integrated biological risk process [122] [124] | Biological Evaluation Plan (BEP) must document hazard identification and risk estimation. |
| Device Categorization | Based on device type & contact [121] | Simplified to four contact-based groups [121] [125] | Simplifies initial categorization but requires careful contact definition. |
| Exposure Calculation | Summation of contact time [122] | Each contact day counts as one day; bioaccumulation risk can mandate long-term designation [122] [121] | More conservative duration categorization, affecting required testing scope. |
Implementing a Biological Evaluation Plan Within a Risk Management Framework
The Biological Evaluation Plan (BEP) is the central document that orchestrates the entire safety assessment. The following workflow diagram illustrates the key stages of creating a BEP aligned with ISO 10993-1:2025, highlighting points where PCR and electrophoresis data provide critical evidence.
BEP Workflow in ISO 10993-1:2025
Critical Workflow Stages for Researchers
- Establish the BEP: The plan must define the device, its intended use, and reasonably foreseeable misuse [122] [121]. It should outline the evaluation scope, acceptance criteria, and rationale for all decisions.
- Device Categorization: Classify the device based on the nature of body contact (intact skin, mucosa, breached surface, or blood) and determine exposure duration (limited, prolonged, long-term) using the new, more conservative calculation method [122] [125].
- Material Characterization & Hazard Identification: This is a foundational step. Utilize chemical characterization (ISO 10993-18) to identify potential leachables and extractables. This data is the basis for identifying biological hazards, such as cytotoxic or genotoxic compounds [123] [124].
- Biological Risk Estimation: For each identified hazard, estimate the biological risk qualitatively or quantitatively, considering the severity of the potential harm and the probability of its occurrence [122]. This is a direct adoption of the ISO 14971 methodology.
- Testing Strategy: The need for testing, including in vitro methods like PCR and electrophoresis, is driven by the gaps in risk estimation. The standard emphasizes reducing animal testing (3Rs principle) and using alternative methods where possible [121].
Application Notes: PCR & Electrophoresis for Standardized Genotoxicity Assessment
Genotoxicity assessment is a key biological effect that requires highly sensitive and reproducible methods. PCR and gel electrophoresis are cornerstone techniques for evaluating DNA damage, a primary endpoint for genotoxicity (ISO 10993-3).
Experimental Protocol: DNA Damage Detection via PCR and Electrophoresis
This protocol outlines a standardized method for detecting DNA damage in cells exposed to biomaterial extracts, using the comet assay (a gel electrophoresis-based method) and quantitative PCR (qPCR) to detect DNA strand breaks and lesions.
I. Sample Preparation (Extract of Biomaterial)
- Prepare an extract of the biomaterial per ISO 10993-12, using appropriate solvents (e.g., culture medium with serum) and extraction conditions (e.g., 37°C for 24 hours or 72°C for 24 hours) relevant to the clinical use [126].
- Use a relevant cell line (e.g., L929 mouse fibroblast or human primary cells) cultured in standard conditions.
- Expose cells to the biomaterial extract at various concentrations (e.g., 100%, 50%, 25%) for a relevant period (e.g., 24 hours). Include a negative control (culture medium) and a positive control (e.g., 100 µM Methyl methanesulfonate - MMS).
II. Alkaline Comet Assay for DNA Strand Breaks
- Harvest and Embed Cells: After exposure, trypsinize, wash, and resuspend cells in PBS. Mix ~10,000 cells with 100 µL of 1% low-melting-point agarose at 37°C. Pipette onto a comet slide pre-coated with standard agarose. Place a coverslip and let it solidify at 4°C for 10 minutes.
- Lysis: Remove coverslip and immerse slides in a freshly prepared, cold lysis solution (e.g., 2.5 M NaCl, 100 mM EDTA, 10 mM Tris, 1% Triton X-100, pH 10) for at least 1 hour at 4°C in the dark.
- Unwinding and Electrophoresis: After lysis, gently place slides in an electrophoresis tank filled with fresh, cold alkaline electrophoresis buffer (300 mM NaOH, 1 mM EDTA, pH >13) to unwind DNA for 20-40 minutes. Perform electrophoresis under predetermined conditions (e.g., 25 V, 300 mA, 20 minutes).
- Neutralization and Staining: Neutralize slides 2-3 times with neutralization buffer (0.4 M Tris, pH 7.5) for 5 minutes each. Stain with a fluorescent DNA-binding dye (e.g., 20 µg/mL Ethidium Bromide or 1X SYBR Gold).
- Analysis: Visualize 50-100 randomly selected comets per sample using a fluorescence microscope. Analyze comet images with specialized software to determine the % tail DNA, a key metric of DNA damage.
III. Quantitative PCR (qPCR) Assay for DNA Lesions This assay detects lesions that block DNA polymerase progression, reducing amplification efficiency [116].
- DNA Isolation: Isolate genomic DNA from exposed and control cells using a commercial kit. Precisely quantify DNA using a fluorometer.
- qPCR Amplification of Long and Short Amplicons: Perform two separate qPCR reactions on each DNA sample using the same primer set that amplifies a single-copy gene (e.g., β-actin).
- Use one primer pair to generate a long amplicon (e.g., 10-20 kb), which is highly sensitive to DNA lesions.
- Use another primer pair to generate a short amplicon (e.g., 100-200 bp), which is relatively insensitive to damage and serves as a control for DNA quantity and integrity.
- Data Analysis: Calculate the amplification efficiency for both long (EL) and short (ES) amplicons. The DNA lesion frequency is proportional to the reduction in amplification of the long fragment relative to the short fragment, often expressed as the Lesion Frequency (LF) = (1 - 2^(-ΔCt)) / (Long Amplicon Length - Short Amplicon Length), where ΔCt = Ct,long - Ct,short.
The Scientist's Toolkit: Key Reagents for Genotoxicity Assessment
Table 2: Essential Research Reagents for PCR and Electrophoresis-based Genotoxicity Testing
| Reagent / Material | Function / Purpose | Example & Notes |
|---|---|---|
| Agarose | Matrix for gel electrophoresis; separates DNA fragments by size. | Low-melting-point agarose for comet assay; standard agarose for routine DNA analysis. |
| Fluorescent Nucleic Acid Stain | Visualizes DNA in gels or comets under UV/blue light. | SYBR Gold, Ethidium Bromide, GelRed. SYBR Gold is more sensitive and less mutagenic. |
| DNA Ladder | Molecular weight standard for sizing DNA fragments in gel electrophoresis. | Essential for confirming amplicon size and quantifying damage in comet assay. |
| Thermostable DNA Polymerase | Enzyme for PCR amplification; critical for fidelity and yield. | Taq polymerase for standard PCR; high-fidelity enzymes for qPCR-based genotoxicity assays [116]. |
| dNTPs | Nucleotide building blocks (dATP, dCTP, dGTP, dTTP) for DNA synthesis in PCR. | Quality is critical for efficient amplification and minimizing errors. |
| PCR Primers | Short, specific DNA sequences that define the start and end of the DNA region to be amplified. | Designed for specific gene targets (e.g., β-actin); must be HPLC-purified for qPCR [116]. |
| qPCR Master Mix | Optimized buffer containing polymerase, dNTPs, salts, and a fluorescent reporter for real-time PCR. | Simplifies reaction setup and improves reproducibility. Contains SYBR Green or uses probe-based chemistry. |
The updated ISO 10993-1:2025 standard reinforces the critical role of rigorous, reproducible, and well-justified laboratory science in demonstrating the safety of medical device biomaterials. The shift to a fully integrated risk management framework means that techniques like PCR and electrophoresis are no longer merely tools for generating data points on a checklist. Instead, their application must be strategically planned within a Biological Evaluation Plan, with their results feeding directly into a continuous risk assessment process. By adhering to these guidelines and employing standardized, well-documented protocols, researchers can not only ensure regulatory compliance but also accelerate the development of safer, more effective biomaterials that truly meet patient needs.
Conclusion
The integration of PCR and electrophoresis provides an indispensable toolkit for decoding the complex molecular dialogues between cells and biomaterials. By mastering foundational concepts, applying robust methodologies, systematically troubleshooting protocols, and rigorously validating results, researchers can reliably assess biocompatibility and biofunctionality. The future of this field points toward the adoption of more sensitive and absolute quantification methods like digital PCR, the integration of artificial intelligence for data analysis, and the continued development of standardized protocols. These advancements will accelerate the rational design of next-generation biomaterials, ultimately leading to safer and more effective clinical solutions in regenerative medicine and tissue engineering.
References
- 1. Biocompatibility - an overview [https://www.sciencedirect.com/topics/medicine-and-dentistry/biocompatibility]
- 2. Biocompatibility [https://en.wikipedia.org/wiki/Biocompatibility]
- 3. Biocompatibility assessment of biomaterials used in ... [https://pmc.ncbi.nlm.nih.gov/articles/PMC8461597/]
- 4. Quantitative Evaluation of the In vivo Biocompatibility and ... [https://pmc.ncbi.nlm.nih.gov/articles/PMC6954349/]
- 5. Comparative Evaluation of Biocompatibility between ... [https://pmc.ncbi.nlm.nih.gov/articles/PMC12549374/]
- 6. Standard PCR Protocol [https://www.sigmaaldrich.com/US/en/technical-documents/protocol/genomics/pcr/standard-pcr?srsltid=AfmBOorQN7iYJqunNoQjXThl1OdtSQhLb9q7FXu6NhPIS8bhTdfrFTUV]
- 7. Polymerase Chain Reaction (PCR) - StatPearls - NCBI - NIH [https://www.ncbi.nlm.nih.gov/books/NBK589663/]
- 8. Computational reconstruction of the signalling networks ... [https://pmc.ncbi.nlm.nih.gov/articles/PMC9894531/]
- 9. Scientists Discover Novel Protein Target to Regulate ... [https://bioengineer.org/scientists-discover-novel-protein-target-to-regulate-chronic-inflammation/]
- 10. New protein target offers hope for chronic inflammation ... [https://www.news-medical.net/news/20250702/New-protein-target-offers-hope-for-chronic-inflammation-treatment.aspx]
- 11. Largest Genome-Wide Association Study Uncovers New ... [https://www.medschool.umaryland.edu/news/2025/largest-genome-wide-association-study-uncovers-new-drug-targets-and-potential-therapies-for-osteoarthritis.html]
- 12. An optimized protocol for stepwise optimization of real-time ... [https://www.nature.com/articles/s41438-021-00616-w]
- 13. Introduction to Quantitative PCR (qPCR) Gene Expression ... [https://www.thermofisher.com/us/en/home/life-science/pcr/real-time-pcr/real-time-pcr-learning-center/gene-expression-analysis-real-time-pcr-information/introduction-gene-expression.html]
- 14. Overview of Protein Electrophoresis [https://www.thermofisher.com/us/en/home/life-science/protein-biology/protein-biology-learning-center/protein-biology-resource-library/pierce-protein-methods/overview-electrophoresis.html]
- 15. Research Techniques Made Simple: Polymerase Chain ... [https://pmc.ncbi.nlm.nih.gov/articles/PMC4102308/]
- 16. Optimizing your PCR [https://www.takarabio.com/learning-centers/pcr/faq/optimization?srsltid=AfmBOoqEsyUrPeDtB0knlDe5BZIYNGewRRTtpKYSmwJaTNkeo2Ae3Ymq]
- 17. Essential molecular biology methods in biomaterials ... [https://www.explorationpub.com/Journals/ebmx/Article/101344]
- 18. Biomaterial-mediated Cell Atlas: an insight from single-cell ... [https://pmc.ncbi.nlm.nih.gov/articles/PMC12356410/]
- 19. RT-PCR Analysis of Pain Genes: Use of Gel-Based ... [https://pmc.ncbi.nlm.nih.gov/articles/PMC3417750/]
- 20. Absolute quantification of gene expression in biomaterials ... [https://www.sciencedirect.com/science/article/abs/pii/S0142961206007836]
- 21. Computational identification of small molecules for ... [https://www.nature.com/articles/s41467-025-62529-9]
- 22. A simple and rapid technique of template preparation for PCR [https://pmc.ncbi.nlm.nih.gov/articles/PMC9686307/]
- 23. PCR, Nucleic Acid Electrophoresis, Laboratory Techniques ... [https://www.yeasenbio.com/blogs/molecular-biology/pcr-nucleic-acid-electrophoresis-laboratory-techniques-handbook]
- 24. Applications of nanotechnology in 3D printed tissue ... [https://pmc.ncbi.nlm.nih.gov/articles/PMC7969465/]
- 25. Next-Generation Biomaterials: Design Strategies, Clinical ... [https://pmc.ncbi.nlm.nih.gov/articles/PMC12529143/]
- 26. The application and challenges of antimicrobial drug-loaded ... [https://pubs.rsc.org/en/content/articlehtml/2025/nh/d5nh00378d]
- 27. Need a New 3D Material? Build It With DNA [https://www.technologynetworks.com/applied-sciences/news/need-a-new-3d-material-build-it-with-dna-402168]
- 28. Arbitrary Design of DNA-Programmable 3D Crystals ... [https://pmc.ncbi.nlm.nih.gov/articles/PMC12020415/]
- 29. 1.4: PCR and Gel Electrophoresis [https://bio.libretexts.org/Bookshelves/Genetics/Genetics_Agriculture_and_Biotechnology_(Suza_and_Lee)/01%3A_Chapters/1.04%3A_PCR_and_Gel_Electrophoresis]
- 30. Understanding the New FDA Draft Guidance on Medical ... [https://namsa.com/resources/blog/new-fda-draft-guidance-chemical-characterization-2/]
- 31. Navigating the FDA's New Draft Guidance on Chemical ... [https://www.intertek.com/blog/2025/01-24-new-draft-guidance-on-chemical-analysis-for-medical-devices/]
- 32. Biocompatibility Assessment of Medical Devices - Congenius [https://congenius.ch/chemical-analysis-biocompatibility-medical-devices/]
- 33. A Practical Guide to ISO 10993-12: Sample Preparation ... [https://www.mddionline.com/materials/a-practical-guide-to-iso-10993-12-sample-preparation-and-reference-materials]
- 34. How to Optimize Cell Culture Media for High-Yield ... [https://cellculturecompany.com/how-to-optimize-cell-culture-media-for-high-yield-recombinant-protein-production-in-mammalian-cells/]
- 35. Accelerating cell culture media development using ... [https://www.nature.com/articles/s41467-025-61113-5]
- 36. Biotechnology 101 Protocol : Gel Electrophoresis | Bento Lab [https://bento.bio/protocol/biotechnology-101/gel-electrophoresis/]
- 37. Protocol for optimizing culture conditions for ex vivo ... [https://pubmed.ncbi.nlm.nih.gov/40173037/]
- 38. Comparative study of DNA and RNA extraction methods for ... [https://pubmed.ncbi.nlm.nih.gov/40618335/]
- 39. What are the different types of nucleic acid extraction? [https://frontlinegenomics.com/what-are-the-different-types-of-nucleic-acid-extraction/]
- 40. How to Purify DNA from an Agarose Gel [https://www.addgene.org/protocols/gel-purification/]
- 41. Validation and standardization of DNA extraction and library ... [https://pmc.ncbi.nlm.nih.gov/articles/PMC8082873/]
- 42. PCR Primer Design Tips - Behind the Bench [https://www.thermofisher.com/blog/behindthebench/pcr-primer-design-tips/]
- 43. Rules and Tips for PCR & qPCR Primer Design | IDT [https://www.idtdna.com/page/support-and-education/decoded-plus/how-to-design-primers-and-probes-for-pcr-and-qpcr/]
- 44. Proven tips for PCR primer design [https://www.neb.com/en-us/nebinspired-blog/proven-tips-for-pcr-primer-design?srsltid=AfmBOoqbkyHewrTSjkLQEKz8XUk05l9ETnT8TCo32UwFlfvm9NC3NHQE]
- 45. Optimization Tips for Luna® qPCR [https://www.neb.com/en-us/tools-and-resources/usage-guidelines/optimization-tips-for-luna-qpcr?srsltid=AfmBOopvW8igIznkbls9cONiuXzLyXOg-8-BeKKxnGAgF95TyqIdScW8]
- 46. PCR Protocols & Primer Design Guide [https://www.bosterbio.com/protocol-and-troubleshooting/pcr-protocol?srsltid=AfmBOor2BIiMyNdKhbO0I9Xb0iwdlnOVjQNay8vWiSMJIyYfULGBJKK1]
- 47. Primer designing tool - NCBI - NIH [https://www.ncbi.nlm.nih.gov/tools/primer-blast/]
- 48. PCR Amplification | An Introduction to PCR Methods [https://www.promega.com/resources/guides/nucleic-acid-analysis/pcr-amplification/]
- 49. PCR efficiency | Determining amplification efficiencies [https://www.qiagen.com/us/knowledge-and-support/knowledge-hub/bench-guide/pcr/pcr-quantification/determining-amplification-efficiencies]
- 50. Understanding qPCR Efficiency and Why It Exceeds 100% [https://biosistemika.com/blog/qpcr-efficiency-over-100/]
- 51. Guidelines for PCR Optimization with Taq DNA Polymerase [https://www.neb.com/en-us/tools-and-resources/usage-guidelines/guidelines-for-pcr-optimization-with-taq-dna-polymerase?srsltid=AfmBOoqMOmdsPBPSH0AQXy89JIBoAl_LEyqOlc-GEq9Eo1vGZ4qrliEC]
- 52. PCR Setup—Six Critical Components to Consider [https://www.thermofisher.com/us/en/home/life-science/cloning/cloning-learning-center/invitrogen-school-of-molecular-biology/pcr-education/pcr-reagents-enzymes/pcr-component-considerations.html]
- 53. PCR Protocol - PCR Steps - PCR Design Tool [https://www.genscript.com/pcr-protocol-pcr-steps.html]
- 54. PCR Methods - Top Ten Strategies [https://www.thermofisher.com/us/en/home/life-science/cloning/cloning-learning-center/invitrogen-school-of-molecular-biology/pcr-education/pcr-reagents-enzymes/pcr-methods.html]
- 55. PCR Cycling Parameters—Six Key Considerations for ... [https://www.thermofisher.com/us/en/home/life-science/cloning/cloning-learning-center/invitrogen-school-of-molecular-biology/pcr-education/pcr-reagents-enzymes/pcr-cycling-considerations.html]
- 56. PCR, Real-Time PCR, and RT-PCR: Key Differences [https://superiorbiodx.com/blog/qpcr-rtpcr/]
- 57. Agarose Gel Electrophoresis for the Separation of DNA ... [https://pmc.ncbi.nlm.nih.gov/articles/PMC4846332/]
- 58. Eight Tips to Improve Gel Electrophoresis Results [https://www.thermofisher.com/us/en/home/brands/thermo-scientific/molecular-biology/molecular-biology-learning-center/molecular-biology-resource-library/spotlight-articles/8-DNA-ladder-tips.html]
- 59. Protocols Agarose Gel Electrophoresis [https://www.addgene.org/protocols/gel-electrophoresis/]
- 60. Guidelines for PCR Optimization with Taq DNA Polymerase [https://www.neb.com/en-us/tools-and-resources/usage-guidelines/guidelines-for-pcr-optimization-with-taq-dna-polymerase?srsltid=AfmBOooTlUWcOa0eo57DQ5TKHUbC4AIV2Pq9E0lHLm4ewLLC2iXZtUQ5]
- 61. Polymerase Chain Reaction: Basic Protocol Plus ... [https://pmc.ncbi.nlm.nih.gov/articles/PMC4846334/]
- 62. How to Interpret DNA Gel Electrophoresis Results [https://www.goldbio.com/blogs/articles/interpreting-gel-electrophoresis-results?srsltid=AfmBOooPhd2DkE3_Hi1_nrRtfNtW5m_2ztei9uziNLaOIZgfdcVWoVlU]
- 63. Agarose gel electrophoresis to assess PCR product yield [https://pubmed.ncbi.nlm.nih.gov/35311378/]
- 64. Digital PCR Breaks Into the Mainstream in 2025 - Vocal Media [https://vocal.media/feast/digital-pcr-breaks-into-the-mainstream-in-2025]
- 65. Quantitative PCR in the Real World: 5 Uses You'll Actually ... [https://www.linkedin.com/pulse/quantitative-pcr-real-world-5-uses-youll-actually-see-fotqe/]
- 66. Reverse Transcription Applications [https://www.thermofisher.com/us/en/home/life-science/cloning/cloning-learning-center/invitrogen-school-of-molecular-biology/rt-education/reverse-transcription-applications.html]
- 67. Quantitative or digital PCR? A comparative analysis for ... [https://www.sciencedirect.com/science/article/abs/pii/S0165993624001584]
- 68. RT-PCR: Reverse Transcription Polymerase Chain Reaction [https://opentrons.com/applications/rt-pcr-protocol?srsltid=AfmBOorRfetwqU_PpW248qT2PhAX_tETdpwth92ECTM_7Wlq9O-qZkYq]
- 69. One-step and two-step qPCR assays for CAPRV2023 [https://www.frontiersin.org/journals/veterinary-science/articles/10.3389/fvets.2025.1620997/full]
- 70. Research Progress on Biomaterials with Immunomodulatory ... [https://pmc.ncbi.nlm.nih.gov/articles/PMC12412535/]
- 71. Tracing immune cells around biomaterials with spatial ... [https://www.nature.com/articles/s41467-023-41608-9]
- 72. PCR Troubleshooting Guide [https://www.neb.com/en-us/tools-and-resources/troubleshooting-guides/pcr-troubleshooting-guide?srsltid=AfmBOopEiAsfewNeZ9JhloM5bnZ1beG4VQR0enU5mQ9PLQuGzlN7nEo9]
- 73. PCR Troubleshooting: Common Problems and Solutions [https://www.mybiosource.com/learn/pcr-troubleshooting-common-problems-and-solutions/]
- 74. Trends development and applications on electrophoresis ... [https://www.sciencedirect.com/science/article/abs/pii/S0039914025005193]
- 75. and clear-native polyacrylamide gel electrophoresis protocols ... [https://journals.plos.org/plosone/article?id=10.1371/journal.pone.0332065]
- 76. Validation of blue- and clear-native polyacrylamide gel ... [https://pmc.ncbi.nlm.nih.gov/articles/PMC12445495/]
- 77. Troubleshooting Non-Specific Amplification [https://bento.bio/resources/bento-lab-advice/troubleshooting-non-specific-amplification-with-bento-lab/]
- 78. Weak PCR Band Results or Smearing - What To Do [https://www.goldbio.com/blogs/articles/troubleshooting-pcr-part-three-solutions-for-weak-bands-and-smearing?srsltid=AfmBOoqjYMpCoxFtdgO5z9rmp4L4R6jVDuZuEmYe39RunWzVpSg14hxI]
- 79. Smearing in PCR Amplification | NTA NET LIFE SCIENCE [https://www.letstalkacademy.com/smearing-in-pcr-amplification-due-to-low-mg-ions-concentration/]
- 80. Nucleic Acid Gel Electrophoresis Troubleshooting [https://www.thermofisher.com/us/en/home/life-science/cloning/cloning-learning-center/invitrogen-school-of-molecular-biology/na-electrophoresis-education/na-electrophoresis-troubleshooting.html]
- 81. Protocol for detecting interactions between intrinsically ... [https://pmc.ncbi.nlm.nih.gov/articles/PMC12305580/]
- 82. A Guide to Gel Electrophoresis and Gel Documentation ... [https://www.thelabworldgroup.com/blog/guide-to-gel-documentation-systems/]
- 83. Four tips for PCR amplification of GC-rich sequences [https://www.neb.com/en-us/nebinspired-blog/four-tips-for-pcr-amplification-of-gc-rich-sequences?srsltid=AfmBOorxtysYgXfjukUl1DvdwmoEj9ec4btS1m_RGH4RRvWfJSW60FOk]
- 84. Optimization Tips for Luna® qPCR [https://www.neb.com/en-us/tools-and-resources/usage-guidelines/optimization-tips-for-luna-qpcr?srsltid=AfmBOoriTpYdBKa8Vx3LLGurZpB0u47LvDUoTkqeVQzmrPCl9S4zqpOf]
- 85. An Efficient Strategy for Broad-Range Detection of Low ... [https://journals.plos.org/plosone/article?id=10.1371/journal.pone.0020303]
- 86. Nested PCR to optimize rpoB metabarcoding for low- ... [https://pmc.ncbi.nlm.nih.gov/articles/PMC12403564/]
- 87. DNA Polymerase—Four Key Characteristics for PCR [https://www.thermofisher.com/us/en/home/life-science/cloning/cloning-learning-center/invitrogen-school-of-molecular-biology/pcr-education/pcr-reagents-enzymes/dna-polymerase-characteristics.html]
- 88. How to Choose the Right Reverse Transcriptase [https://www.promega.com/resources/pubhub/choosing-the-right-reverse-transcriptase/]
- 89. Avoiding Contamination | Thermo Fisher Scientific - ES [https://www.thermofisher.com/us/en/home/life-science/pcr/real-time-pcr/real-time-pcr-learning-center/real-time-pcr-basics/good-laboratory-practice-avoid-contamination-qpcr-experiments.html]
- 90. Dos and don'ts for molecular testing [https://www.who.int/teams/global-malaria-programme/case-management/diagnosis/nucleic-acid-amplification-based-diagnostics/dos-and-don-ts-for-molecular-testing]
- 91. Standard PCR Protocol [https://www.sigmaaldrich.com/US/en/technical-documents/protocol/genomics/pcr/standard-pcr?srsltid=AfmBOoqmK8SYscSEufB5_Zihvcr1AXjXAmA1Cl7DFY4d-aH_P__WAEox]
- 92. Enhancement of DNA amplification efficiency by using ... [https://www.bocsci.com/blog/enhancement-of-dna-amplification-efficiency-by-using-pcr-additives/?srsltid=AfmBOopeTcE4737rbxbFv1wXlq7goQeYDZRP2GJBM9poD_J24E6rJpKR]
- 93. Better Than Betaine: PCR Additives That Actually Work [https://bitesizebio.com/2592/better-than-betaine-pcr-additives-that-actually-work/]
- 94. Optimizing PCR Reaction Conditions for High Fidelity and ... [https://www.labx.com/resources/optimizing-pcr-reaction-conditions-for-high-fidelity-and-yield/5579]
- 95. DMSO and betaine significantly enhance the PCR ... [https://pubmed.ncbi.nlm.nih.gov/32433893/]
- 96. Why Add BSA to PCR Mixes? The Science Behind ... [https://synapse.patsnap.com/article/why-add-bsa-to-pcr-mixes-the-science-behind-stabilization]
- 97. Evaluation of PCR-enhancing approaches to reduce ... [https://www.sciencedirect.com/science/article/abs/pii/S0048969724069250]
- 98. Bovine serum albumin further enhances the effects of organic ... [https://pmc.ncbi.nlm.nih.gov/articles/PMC3466135/]
- 99. Comprehensive evaluation of molecular enhancers of the ... [https://www.nature.com/articles/srep37837]
- 100. Positive and Negative Controls [https://www.rockland.com/resources/positive-and-negative-controls/?srsltid=AfmBOorfBTHfuDXqFeKWrKoHoTP-CIsAT7PxFHp8jqsVAfNSbgXmDWkG]
- 101. Comprehensive Nucleic Acid Quality Control-Total ... [https://www.blue-raybio.com/en/blog/Comprehensive-Nucleic-Acid-Quality-Control-Total-Solutions-for-Molecular-Experiment-Issues]
- 102. Predicting sequence-specific amplification efficiency in ... [https://pmc.ncbi.nlm.nih.gov/articles/PMC12533003/]
- 103. DNA and RNA quality analysis, TapeStation Software [https://www.agilent.com/en/product/automated-electrophoresis/tapestation-systems/tapestation-software/tapestation-software-379381?srsltid=AfmBOoo_7JMCO-qzbRgxt69Spg19uqvrItgEWSUhBN0CqtFzDDDbvXF3]
- 104. Five Considerations for the Nucleic Acid Gel ... [https://www.thermofisher.com/us/en/home/life-science/cloning/cloning-learning-center/invitrogen-school-of-molecular-biology/na-electrophoresis-education/na-electrophoresis-considerations.html]
- 105. Major Milestones in PCR Technology [https://www.thermofisher.com/us/en/home/brands/thermo-scientific/molecular-biology/molecular-biology-learning-center/molecular-biology-resource-library/spotlight-articles/pcr-landmark-publications.html]
- 106. Real-time PCR, Digital PCR, And End-point PCR Market Size [https://www.mordorintelligence.com/industry-reports/real-time-pcr-digital-pcr-and-end-point-pcr-market]
- 107. Comparative Performance of Digital PCR and Real-Time RT ... [https://pmc.ncbi.nlm.nih.gov/articles/PMC12474457/]
- 108. A comprehensive review of methodological and ... [https://www.sciencedirect.com/science/article/abs/pii/S0734975025002058]
- 109. A brighter future with advances in PCR [https://www.nature.com/articles/d42473-024-00261-6]
- 110. A Comprehensive Guide to Polymerase Chain Reaction (PCR) [https://www.clyte.tech/post/unlocking-the-power-of-dna-a-comprehensive-guide-to-polymerase-chain-reaction-pcr?srsltid=AfmBOoobprWVwy--tlbUQcG2eQUPdr299djDd7l5QCUPEc3IlXXILVD6]
- 111. Guidance on the assessment of the functionality ... [https://www.sciencedirect.com/science/article/pii/S0109564124003749]
- 112. Coordinating cell proliferation and differentiation: Antagonism ... [https://pmc.ncbi.nlm.nih.gov/articles/PMC4825819/]
- 113. Physical forces modulate cell differentiation and proliferation ... [https://pmc.ncbi.nlm.nih.gov/articles/PMC5783863/]
- 114. Decellularized Extracellular Matrix Scaffold Loaded with ... [https://pmc.ncbi.nlm.nih.gov/articles/PMC12006722/]
- 115. Space: continuous phenotyping of single-cell multi-omics data [https://genomebiology.biomedcentral.com/articles/10.1186/s13059-025-03755-8]
- 116. Live culture-based qPCR screening of Taq DNA ... [https://www.frontiersin.org/journals/bioengineering-and-biotechnology/articles/10.3389/fbioe.2025.1624735/full]
- 117. Functional phenotyping of genomic variants using joint ... [https://www.nature.com/articles/s41592-025-02805-0]
- 118. Linking spatial omics to patient phenotypes at the ... [https://www.medrxiv.org/content/10.1101/2025.08.09.25333297v2.full]
- 119. Systematic transcriptomic and phenotypic characterization ... [https://www.sciencedirect.com/science/article/pii/S0022282821002340]
- 120. ISO 10993-1:2025 - Biological evaluation of medical devices [https://www.iso.org/standard/10993-1]
- 121. ISO 10993-1:2025 Publication Is Imminent [https://veranex.com/blog/iso-10993-1-2025-implications-med-device-innovators-manufacturers]
- 122. ISO 10993-1:2025 Updates —Top 10 Biological Evaluation ... [https://namsa.com/resources/blog/iso-10993-12025top-10-biological-evaluation-essentials-in-the-update/]
- 123. Understanding the Key Updates to ISO 10993-1 [https://www.mddionline.com/testing/the-crucial-role-of-biological-evaluation-in-medical-device-safety-key-updates-to-the-international-organization-for-standardization-iso-10993-1]
- 124. How ISO 10993-1:2025 Impacts Your Regulatory Strategy [https://qservegroup.com/blog/how-iso-10993-12025-impacts-your-regulatory-strategy]
- 125. Navigating revision to ISO 10993-1: Biological evaluation ... [https://www.labcorp.com/education-events/articles/navigating-revision-iso-10993-1-biological-evaluation-medical-devices]
- 126. Use of International Standard ISO 10993-1, "Biological ... [https://www.fda.gov/regulatory-information/search-fda-guidance-documents/use-international-standard-iso-10993-1-biological-evaluation-medical-devices-part-1-evaluation-and]